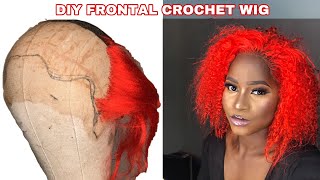
Realistic Crochet Kinky Curly V-Part Wig|Newtechnique+Install Tutorial
- Posted on 20 July, 2022
- U Part Wig
- By Anonymous
This DIY video will show you a detailed new technique way of doing a V-part kinky curly crochet wig to make your wig look like hair is growing straight out of your scalp using a sewing machine method and traditional crocheting hair. This video is a true NO!!!!Leave out tutorial. This tutorial will give step-by-step ways of achieving that natural look with no lace nor glue. This is a budget and beginner friendly video on how to make a Vpart or ipart wig….I paid $1 a pack for this hair at my local beauty supply store and I used 4 packs of the X-pression 14in kinky curly hair prelooped in the color Burgundy. It take about an hour and 1/2 to complete. Learning to do this will be valuable because there is no need to go to the hair salon.
Supplies needed:
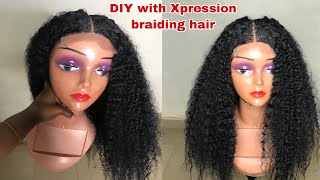
X-pressions kinky curly in 14 in (4packs)
Crochet needle
Wig cap
White pencil
Bobby-pins
Hair clamp
Scissors
Foam wrapping lotion
Canvas head
Sewing machine or (needle and thread)
#vpartwig #upartwigs #wigs #crochetwig #wigs #naturalwig #coloredwig #hairstyles #naturalhairwig #naturalhairstyles #gluelessinstall #gluelesswig #gluelesswigs#whatlace #redwig #colorfulwigs #uniquehairstyle #uniquecolor #deepwavewig #kinkycurlywig #diywig #shortvideo #hairtutorial #cheapwigs #cheapwig#budgetfriendly #sewinghacks #customwigs #revamp #wig transformation
Please like and subscribe
Hello, everyone, this is beauty, it will bringing you a crochet, look to fall in love with imma jump right into this video and show you how you can achieve the same. Look. This is beauty, it will luxury on a budget all right, so you want to use the expression hair it's in kinky curly and i'm using the color burgundy. You want to go grab your white eye pencil because you have your wig cap already on the dome head and you just want to draw a white line in the middle of the wig cap. That will be your guideline because the way we're going to lay the pieces of hair we're going to sew it onto this wig cap. You can either do this hand stitching or with the sewing machine, but i'm gon na choose to use a sewing machine. I'M showing you my pressure plate right now to show you about the distance that we want to leave space for so that plate can guide through when sewing okay. So all you want to do is get single strands of the hair. It said pre-looped, but it actually was not pre-looped. It was just single strands, so you're just going to take those single strands and you want to slide it onto the bobby pin. The bobby pin is used to help with the control factor, because when you get the sewing, you do not want this hair shifting that much because you can have a lot of snagging when you're sewing and that's not good and the purpose of me using a sewing Method, and so the v part wig can have a seamless look to it. Yes, making it look exactly like it's actually growing out of your scalp, and that way you don't have to have any leave out for real, because a lot of tutorials that you see with the v part wig that they still use hair to blend in with their Um natural hair, but with this method right here, you can literally put it on and go with no hair showing at all and throughout the video i'll, also be showing you how we're gon na sew on some um combs onto the wig cap as well and uh. We'Ll be hand stitching that part of the sewing process so back to the hair strands. You just want to make sure that they're close together. That'S why you're seeing me checking and making sure that they are right beside each other, because when you sew you want it not to be bulky, but not too skimpy to wear. You can see thread, but you will definitely not see any thread doing it. This method that i'm showing you comment below, if you have seen somebody do this method, i have not seen it, but it's possible that somebody has seen it and if you like in this video, please give it a thumbs up and right now i am using some More bobby pins just to securely keep that hair in place, and i'm just showing you where that white line. I was drawing that you just want to put that bobby, pin right beside it, because when you get the sewing you're going to be sewing near that white line, the white line is literally a guideline for you to help. You um not go past it because you want to have about the same distance on each side, because you're gon na be flipping over the hair once it's sewn on one side and then you're gon na do what you do to one side. You have to do to the other, so we'll be doing the same process on the other side right beside each other, but we'll get into that when we get closer to the next step and right now, i'm just showing you where we will be sewing and unfortunately I was not recording. I accidentally pushed something else instead of record, so i'm just showing you a demonstration, but this is how it should be looking how the seam should be. It'S just a straight stitch that i use going across the wig cap and i did a few back stitches just to make sure that it was secured. But later on in the video, i will be showing you some stitches, because once you what you do to one side, you have to do to the other side. So i'm basically going to do the same process on the opposite side, and you will see me sewing in that clip coming up in a little bit, but right now, i'm just cutting off the excess string that i had from using my sewing machine. This is how it's going to look now. Is that seamless, always that that seamless, you can't even can't even tell that it's sewn whatsoever. So that's the look we want, so i'm just showing you the white line and how close it is to the white line. Once you flipped it now, you're gon na get another bobby pin because you're gon na start on the other side, and you want to do the exact same thing. You want to start off by grabbing some hair and putting the hair onto the bobby, pin just sliding it in there. I'M just using some more bobby pins just to keep that hair out the way on the opposite side, because i really don't want it to interfere with the hair. I'M about to lay because it's gon na get a little poofy up there, but it will lay flat, because this is some kinky hair anyway. So it's not that big of a deal and i will be bringing you more videos with different hair textures with the same method that i will be using so stay tuned for that and i'm just showing you how the pressure plate goes, and you just want to Make sure that you have enough room whenever you sewing on your sewing machine or hand stitching that you have enough room well, basically, for it, that's the one machine to have enough room for that pressure plate to be able to maneuver through. So you just want to start guiding the hair in and i'm just going to speed this process up, because we did see it on one side and we're just going to do the same process on the other side. Okay and right now, just flipping it over. So you can see how it will be looking once you sew it um right now, i'm just using bobby pins just to get the hair positioned out the way. So i can get the sewing. So i have the hair all out the way you can use as many bobby pins as you like long as you don't use a lot in the part or don't use none at the part that you're actually going to be stitching on. So you want to grab your wig and you just i'm going to show you where the other line is, and you just want to make sure you do not sew on top of the line. That'S next to it, but you do want to sew close to it. So once you cut that in the middle that is going to be closed, really close and give you that seamless, look that you won't wear your hair look natural. So i'm just putting my pressure plate down and i am going to be again doing a straight stitch and i'm and i will be doing some back stitching on it, just to make sure it's secure, because the thread is so thin. You will not see the thread at all. Okay, once that's completed, you just want to cut off the excess thread like i'm doing here, i'm just demonstrating that and just a few strands left - and this is exactly how it should be looking. Let me give you a close-up: it's a straight stitch going across and i haven't took the bobby pins off yet and that's how the back should be looking and you can see. I got extremely close. I almost got a little too close, and this is my first time ever trying this method and i'm in love with it, and i just wanted y'all to um be able to do the same thing if you, you know, wanted to and another good thing with this Method, you can literally do a full wii or you can do the v part wig that i'm um explaining, but it is so versatile. It is so versatile, so you can just play around with it and see what different types of style you can come up with. As well, okay, this is how it's gon na be looking. It looks seamless, it looks great and i'm just gon na push the hair out the way. So we can start the next process of crocheting and in this step right here with the crochet in you just want to crochet as normal as regular with the latch hook method. When you go through the neck, you grab the hair and then you twist and you pull both strands through and you're done, and you want to do that throughout the hair. Until you get to the top of the wig, you want to make smaller pieces, but at the back you just want to do regular and you want to go about almost an inch apart for each section of hair that you crochet in okay, i'm just going to Show you one more time how to do that. This is for my beginners just so they will understand how to do you just want to click it through, and you see how i got these two fingers right here and you want to grab the two strands of hair and you want to bring it through the Hoop and you want to twist it and then you just want to pull it back through, and you can watch this as many times as you need to to make sure that you got it right, so you just want to pull it and make sure it's tight. Okay and once again after you get to the top of the hair, you want to make small pieces because you want it to lay flat and you want it to look seamless, looking like a lace front or something melted but yeah. This is exactly how i was gon na look and she looked gorgeous once she completed all the crocheting and all the hard work. The reward is great, so stay tuned for the next part, which will be cutting off the part you need cutting, which you want to cut straight down the middle of where that white line is and making sure you don't cut any thread or anything. But if you don't stitch too close, you will not cut any thread. Just be tedious about this part, and once you cut it, it should look like this and you got some excess wig cap left. Then all you want to do is just cut that part off, because you want as close as the headline as you like, because we will be sewing on some combs onto this unit. If you like in this video, please give me a thumbs up and subscribe to. My youtube channel, because i have a lot of tutorials to give you different ideas and we're gon na do all this on a budget. Yes, beauty it will on a budget. We all like to say right. I know i do comment below if you like, to save. As well, okay back to this gorgeous wig, this is how she should be looking looking nice laying flat next thing you want to do. You want to go grab you some wig, cones and start stitching on some combs you're gon na put two on each side. Then you're gon na put a cone where the v part is, and one at the nape of your wig cap, and this is how the cones should be, laying and i'll just pause it. So you can see it all righty now it's time to put some foaming lotion on this wig and you just want to make sure that you are raking it in pretty good and the curls are popping. That'S all you need is some foam lotion for this wig you'll need nothing else to give it enough shine and it holds the curls and you just want to trim it after you put the foam motion on like i'm doing right here and now it's time for The fun part, the install, don't mind my braids, these are old and my hair is short, so i haven't um re-braided my hair yet, but i will so, and you want to start at the front, putting that comb in there. Then you want to go to the next comb on the side and you just want to work your way around to the front of the wig, because you want to make sure that it's lined up with the other side. And you just want to feel around for your combs and just place them where your braids are, or your hair or. However, you have your hair done, um up underneath the wig, so i'm just putting a little bit foam lotion on it, some more and i'm just gon na play around with it and i'm gon na come show you the final look and, if you're liking this video. Please give it a thumbs up like this video and i definitely will bring you more tutorials. You
Comments
Toni Toni Kitchen: The red looks good with your skin tone. Great job! Looks so natural
Be Encouraged: I like how you present different ways to obtain a finished product. I like the way you showed the part where one side you had the comb attached and the other side wasnt attached yet to show how close to natural it looked.
Madam Sierra Golden: It’s gorgeous.. the part is a dead giveaway
Herveline AKOUMANY: Qtt