Adding Highlights To My U-Part Crochet Wig + Curling | Short Afro Kinky Curly Hair | Vivian
- Posted on 13 November, 2020
- U Part Wig
- By Anonymous
Hello everyone, welcome back to my channel!
For today's video, I'll be transforming my Ocean Weave U-part Crochet Braid Wig into a Short Afro Kinky Curly. Also, I'll be adding color 350 braiding hair to the wig for the highlight effect.
Click on the link below for the main tutorial for the u-part crochet.
Natural Texture Hair: DIY U-part Crochet Wig With Leave Out https://youtu.be/kXzGeAApKGs
Please don't forget to give this video a big thumbs up if you find it helpful.
THANKS FOR WATCHING!
https://instagram.com/vivianbeautyands...
My second channel https://youtube.com/c/StylebyViv ( Sewing channel )
More videos
JUST ONE BUNDLE NO PRE-MADE CLOSURE: How-to/ DIY Closure Wig Side Part https://youtu.be/-oQXwQ49lrc
How To Natural Texture Hair: DIY U-part Crochet Wig With Leave Out https://youtu.be/kXzGeAApKGs
HOW-TO: Lace Frontal Crochet Wig Using One Pack Of Braiding Hair! |Straight Crochet Wig https://youtu.be/bVY7Ulf9LfU
How To Make A Lace Frontal Crochet Wig | Yaki Straight Hair https://youtu.be/3PMboDarNCs
DIY 2*5 Lace Closure Straight Crochet Wig Using Braiding Hair https://youtu.be/FbjtbxL_1xU
HOW-TO Braided Lace Front Wig With Baby Hair Using All My Leftover Braiding Hair | DIY Ombre: https://youtu.be/dtU2WsZGsBE
HOW-TO: DIY 8x6 Lace Closure Wig With Kinky Curly Human Hair Bundles https://youtu.be/6BKSo9sNpGE
#blackandcolor350wig #crochetwigtransformation
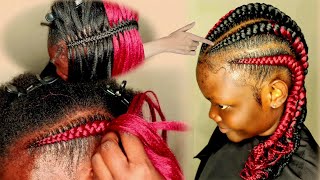
Hello, everyone and welcome back to my channel if you're new, here you're, welcome - and i hope you all are doing well so in today's video i'm going to be transforming this u-part crochet wig into a kinky, coily, okay. So the reason why i decided to coil this hair. The reason why i decided to turn it into a kinky coil is because i don't want to be applying heat on my natural hair. Every time i need to put on this wavy crochet wig. So i figured the best way to avoid using heat. Every time i need to apply. The u-part wig is to coil. It is to do a kicking coil. So that way i wouldn't have to apply heat, and i don't i wouldn't have to do too much work when it comes to putting on the wig and getting out the dough. So i figure i'll just go ahead and um change up the look a little bit and also coil it okay. So the first thing i'm going to be doing is to add, highlights and for the highlight color, i'm using the color 350 and i'm going to be working on a session by session or line by line and also i'm going ahead to wash right at the color. 350, all over the wig, so you can just um, spread it out depending on how you want your final result to look so there's no rule just put as many color as you want, or as little as you want so yeah, okay, so taking my brush, i'm Gon na brush that through so next i'm gon na go ahead and i'll repeat the same method on the rest of the wig. So i went ahead and did that off camera. So this is the final result after adding the highlight. So this is the highlight pad the highlight part. As you can see, the waves are still intact. Looking beautiful, look at the highlight color, it looks beautiful like the wave texture, it's so beautiful, but just that the thought of using heat on my hair before styling. This wig is just too much so i'm just gon na go straight into coiling it, okay, all right! So to do that, i'm going to be using um straws, okay, so i've already went ahead in the section of the bottom row and went ahead and put the rest of the hair away. So before i start i'm going to have to brush the hair through to make sure it's tangle free before moving on to the next step, so to koi the hair, i'm gon na take the straw and um okay. So to start, i'm gon na take the straw and just like that, i'm gon na go ahead and wrap the hair around the straw just hold on just like that. So to get a tight coils, i'm going to hate to twist the hair and wrap it around. The straw twist and wrap it around twist and wrap it around as at the same time, using my fingers to kind of hold the the wrapped hair in place. As you can see right here doing the same thing twist and wrap around twist and wrap around just like that, so i'm going to continue doing that, so i'm done wrapping the whole hair around the straw, okay, so for the bottom part of the straw, i'm going To be securing that in place using a rubber band, so i'm just taking the rubber band and i'm wrapping that around it just like that, so that will secure it in place and we prevent it from unraveling. That'S the bottom of the coils was prevented from arriving. So from for the top, i'm going to be using a bobby pin to secure the top in place, so to do that, i'm going to take the bobby, pin and pass it through the the straw, the both ends of the straw, so that will help to hold It in place, so you can also use the rubber band to secure the top in place if you prefer that so almost done doing the same thing using the straw, i'm going to go ahead and wrap the hair around the straw. Also doing the same thing: i'm going to be twisting and wrapping the hair around the straw. Take that twist and wrap around twist and wrap around till i get to the bottom part of the hair, so the whole hair is wrapped around okay. At the end, again doing the same thing, i'm gon na bend the straw just like that. So so next, i'm gon na take the rubber band and wrap that around the the bottom and using the bobby pin i'm gon na secure the top in place all the roots in place. Okay, so the next step now is to dip the wig in hot water. So i've already went ahead and pulled the hot water inside a bucket. So the next step i'm going to have to add hair conditioner inside the water and i'm missing it in as you can see right here. So i'm going in with more hair conditioner and i'm going to use the um the handle of the comb to mix that inside of water. So next i'm going to head to dip the whole wig inside the bucket to make sure that the the hair is inside. The water make sure to like push it down so for this part right here, you want to make sure to have your protective gloves on. Please do not dip your hands in hot water. If you don't have protective gloves on okay, if you don't have the protective gloves, you can use the uh, the handle of your hair brush or the comb to push the wig into the bucket or inside the water. Okay, so put the wig inside the bucket and let it soak for few minutes so once that is done, go ahead and remove the wig put it on your mannequin head or take your towel to dry off the excess water. So once that is done, you want to go ahead and let it air dry. Okay. So once the wig is completely dry, you can go ahead and unravel the coils and separate the coils. So i'm just going to here to remove the rubber band and also the bobby pin. So next i'm going to go ahead and just pull out the straw. Okay, so using my scissors, i'm going to go ahead and trim off the tip of the coil, just like that. Okay, so before going ahead to unravel the coils, i'm going ahead with a little bit of hair oil and i'm applying that on the hair. As you can see right here, uh, okay, okay, so for the financial shop, i'm going to go ahead and cut this curly hair short. So next i'm going to crochet the short pieces along the edge of the cap. Just like that. So taking my crochet hook, i'm gon na go ahead and crochet that along the edge of the cap, so okay, so i'm done crocheting the short pieces down. So the next step now is to fluff it out with my fingers and next i'm going to take my scissors and trim it a little bit. So, as you can see right there, a tree mate and fluff it out to make it look like a natural looking root. So, as you can see right here, that's how the wig is looking after crocheting the short pieces down and also doing a little bit of trimming to make it look natural. So doing this so doing this right here. Allow me to start the wig without having a leave at without blending my natural hair with it. So with this i can style it as a middle part or a side part without blending, my natural hair with it. So that's why i had to crochet these short pieces along the edge of the cap. So right now, i'm just going ahead to uh clip the comb in place. It'S going to have to adjust it. You can see, and again i'm going to do the same thing to the second one, i'm going to go ahead and clip it in place. So for the back of the wig, i'm going to be securing it down using the bobby pin okay. So this is the middle part right here it looks natural look as if it's coming out of my scalp, that's because of the short hair i crocheted along the edge of the cap no leave out. So this hairstyle is awesome and i love it alright guys. So this is the final result of the video. As always, you don't have to use the same hair color i use in this video. You can use any hair color of your choice and your hairstyle with the comma. Looking awesome all right guys. So this is the final result. I hope you enjoyed this video. I hope you find this video helpful. If you do, please don't forget to give it a big thumbs up and also, if you're new to my channel, please don't forget to hit subscribe button down below and if you already subscribed. Thank you so much for subscribing. Thank you so much for popping by today and i'll see you all in my next one enjoy your weekend, guys

Comments
Miriam Mwakosya: I like the highlights and everything about the wig, it looks so natural. I am going to try it ❤❤
Hannex.x: Thank you for always coming through vivian❤.....I've learnt a whole lot from you honestly ....thank you once again God bless you ❤
Jmac: Awesome revamp wig‼️ Talent beauty and style, that’s you Vivian”!
Mkolaa: Lovely as always
pat ohonsi: Wow so beautiful thanks for sharing
SANDRA NOWAMAGBE: Thanks vivian you're awesome
Beauty Zairay's Way: You are GORGEOUS and So TALENTED!!!!
O_Oscar: beautyfull!
Ozenga Thylda: Très beau
Emma Beauty and styles: Gal you so inspirational
happyosarenkhoe: Good job
CANAL DA MAGA: ❤️
Mary Nabudere: Wow u r so creative dia
brown_ skin_lover_queen: Love u queen
Angel Gladys: Please Vivian, what is the name of conditioner and oil did you use for your wigs. Please dear I will really appreciate it if you can reply.
Azenabor Glory: Pls you cut the expression into how many
DivaNy hair: Popping