Step By Step Body Wave V Part Wig Install Ft. Alipearl Hair
- Posted on 26 May, 2022
- U Part Wig
- By Anonymous
I'm showing you step by step how to install a v part wig that I got from Alipearl hair.
Shop Now➤https://bit.ly/3ECglnw
Hair Info: 24 inches body wave v part wig, 180%density
❤#AlipearlHair Official Store:➤ https://bit.ly/3K5sqCE
1.Join FB Group, Win FREE HAIR➤https://bit.ly/3EA3C4O
2.Lace Front Wigs for Sale!➤ https://bit.ly/38ahB56
3.Invisible HD Swiss Lace Wigs:➤ https://bit.ly/36AoITY
#alipearlhairwig #alipearlupartwig #alipearlbodywavehair
Instagram @alipearl_hair: https://bit.ly/34I3Oyd
Youtube @Ali Pearl Hair: http://bit.ly/2H0Gmmc
Facebook @Ali Pearl Hair: https://bit.ly/3aKwxX3
WhatsApp: +86 15890076489 E-mail: [email protected]
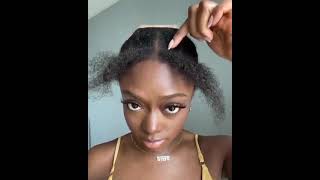
What'S up guys welcome back to my channel or welcome to my channel if this is your first time here, my name is diana and in this video i'm going to be installing a wig that i got from ally, pearl hair um. All their information, of course, is going to be in the description box below. So let's go ahead and get into the video i'm going to be installing a 24-inch v-part wig. This v-part wig has a clip at the back two clips on each side and the little combs on the sides and a comb at the back, and this hair is super thick. I know you can tell from here it's so thick. It'S a body wave texture. I don't know if i said that already but yeah, let's go ahead and get into it. So i'm going to start off by parting, my hair down the middle i'm going to be using anchor braids for this style. So i'm going to go ahead and make my parts for the anchor braids as well, which is just basically me, leaving out enough hair on each side of my part enough to make a braid out of after parting. My leave out. I'M gon na go ahead and tuck it away with a clip, and then i'm gon na make two parts on each side. Um. These parts are actually gon na become braids. I'M gon na use anchor braids in the front because, as you saw in the beginning of the video, the wig had two combs on each side. So i'm just gon na um make these braids so that i can slide the combs into them to make the wig more secure on my head and to prevent it from sliding. And then i'm just going to put my hair back into a ponytail and i'm gon na secure it with bobby pins to make it flat against my head. I'M not gon na do like um cornrows going back. I don't feel like it. I'M just gon na. Do the anchor braids - and this is the final result of me - pinning down my ponytail with bobby pins and now i'm just going to go ahead and braid down my sides. Honestly, i'm a completely terrible braider um they're, not neat at all. If you're like me and you're, not good with braids, you can also do like flat twists if it'll be easier um. Just so you can have. You know something for the combs to grab onto in the front and then after i'm done braiding that i'm just going to go ahead and bobby, pin them to the back of my head. And next i'm going to go ahead and create my anchor braids at the top of my head. This is where the clips at the top of the wig are going to be able to grab onto this is going to prevent the wig from sliding from the top. The ones that i did on the sides is going to prevent the wigs from sliding back, and these are going to prevent the wig from sliding from the top kind of just extra protection from all angles. I'Ve tried it without these braids before in the past and honestly, this is the best way like you, don't have to do braids or twists, but it's honestly better to have something for those clips to hold onto, because the wig will slide. Okay and now it's time to apply the wig, you just want to go ahead and slide it on your head, making sure you don't mess up your braids at the sides or your leave out at the back um. So the first thing i'm going to do is take that clip in the middle, like towards the back of the part and just put it towards the back of where my leave out is and then i'm going to apply the comb in the back of my head And then i'm going to apply the the combs at the top and slide them into the anchor braids at the top um. Now this is just my preference of how i like to apply my wigs. I just find it easier this way because i noticed like it can slide all over the place if you like, don't start with one particular area, but you know you can you know, there's different ways to skin a cat. Oh i hate that saying you could. Definitely you could do this any kind of way that you want to honestly truly. This is just how i'm deciding to do it, but you know either way you're going to be securing your clips, and now i'm just going to go ahead and snap them down. You want to give them, you know, give the wig a little tug and just move it around to make sure it fits comfortably on your head um and you can just readjust them as needed, because it's clips, you know it's not glue or anything make sure it's Comfortable and then you'll be done with applying the wig and once you're done installing the wig. Now it's time to go ahead and style it. I decided that i want to put waves in the wig, like the wig already has waves, but i have my own waiver. I just kind of want to make the waves more um, like like detailed, i guess um yeah like because once you brush out the hair, the waves become like a super loose wave and i kind of just wanted to be able to see them a little more. So i'm just going to use this little crimper that i got here. I think i got this from marshalls. These are like marshmallows honestly. I always get my hot tools from like marshalls or tj maxx. Everything i have, except for my flat irons, has come from marshalls of tj maxx, their crimpers and their curling irons to me are the best like they're, really good um, so i'm just gon na go through my whole head. Of course. I'M gon na speed up through this and just crimp my hair baby. Won'T you keep here. You can see the difference between the two sides. The left side was crimped. The right side was not they look the same. It'S just. The left side is a little more defined um. The longer you leave the crimper on your hair, the more defined your crimps will be. I kind of was just rushing, so i didn't like leave it. You know on there for too too long, but of course you don't leave it on there for like five minutes, but if you leave it on there like a little bit longer and like the hotter, it gets um. The more defined your waves will be. For my edges, i'm using edge booster in the red jar per usual - the more i use this tomorrow. I realize it's really not the best for natural hair, like i stopped relaxing my edges, and so now my edges are like very natural, and it doesn't last that long for me, like i have to use a lot of edge booster to get my edges to lay Flat for a while, like it'll, lay flat for a little while, but then like after, like an hour or two they'll, start to like fuzz up again, i need something: that's going to hold my edges down for years. You know like gorilla, girl or girl. You know what i'm talking about the gorilla: stop girl, whatever something like that, but not as intense. I need something good for my edges. So if you have any recommendations, please let me know um now for the style. We'Re mostly done the last thing i'm going to do is just add some finishing touches, i'm going to try to blend my natural leave out with this hair. So i'm just going to take my crimper and mix my y'all, i burnt my hair right, so i burnt my hand right there, but what i'm going to do is try to blend my leave out in the wig hair, with the crimper kind of like crimp it Together, um, which worked really well but be careful not to burn your hand, because that really hurts stay solid one time and that's it y'all this style is done. Look how cute this is. Okay, i'm at my favorite part of the video, because i want to talk to y'all about this hair. Okay, i personally usually don't like v part or, u part wigs. Only because, like my leave out, you know, like i hate leaving out my natural hair, but this wig is hands down my favorite v, part wig. So if you ever want to know what my favorite v part wig is, is this one? That'S why i'm dancing like that like it is so thick and it is so full and the texture is so freaking pretty like. I love this wig so much like. I wear it a lot now like this one is my absolute favorite, um yeah. I had no problems with this wig and it just looks so pretty and it blends so well with my hair at the top, even though, like i hate, leaving out like my natural hair, like i won't mind with this wig, because it's it's very easy to blend. So yeah that is it for this video you guys thank you so much for watching if you're interested in this hair, like i said it's from ali pearl, all the information for this hair will be in the description box below. If you have any questions about anything. Definitely let me know in the comment section i will get back to you, but that's it for this video. You guys thanks so much for watching adios till next time.
Comments
Jerica: Pretty definitely giving SUMMER VIBES ☀️
Tracey Allen-Jones: Came out great
Khalie Shields: Just use a little bit of hair spray on your edges. Then some oil when you’re ready to remove it.
Ali Pearl Hair: Pretty!
Dee Luther: First Comment Cute thumbnail tho U Did a Good Job Your Beyond Pretty you are Cute Ass eyelashes tho GoodmorninG EnJoy your Wonderful Day Too Happy Fabulous Weekend ahead STAY BLESS N BE SAFE ALWAYS