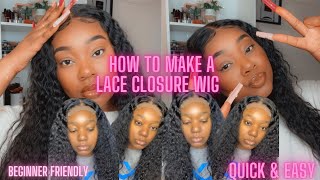
How To Make A Full Wig With A Lace Closure: Beginner Friendly- Kimberly B
- Posted on 12 April, 2017
- Lace Closure
- By Anonymous
*Recommend ( i misspelled the word in my video lol) but Hey YouTube, i hope this helped you in your process. Thanks for watching ! Subscribe, like, and comment.
-Kimberly B
Hair Info:
Company: Unice Hair
Type: Peruvian Hair
Texture: "Straight"
Hair Color: Natural Black
Bundles: Lengths- 22, 20, 18 in
Closure: Length- 16 in
This is not a sponsored video.
A YouTube I'm Kimberly B, as you can see below, and today, I'm going to show you guys how I created my own way so without further ado further or do let's get right into it. So these would be all of the things that you'll need. You need some hair bundles. Of course I have some unis or unit. I really like to pronounce it here, and this is the Peruvian, the straight bundles. I will have an initial review as well as a big review coming. I'Ve had this here for a while, and it's been a while, since I decided to create this video but yeah, I'm finally doing it and the links for clenteen, 20s and 18, I believe in the closure was 16 inches. Of course, you will need a domed head as well. I think this type of my local Beauty Supply is smaller than my row head size, but I'm definitely going to work with it as well. You need a shampoo and conditioner of your choice so that you can wash your wig once you have made it. Don'T use ASEAN, this hair, it didn't stand up to it. So you'll also need some scissors, some ballpoint pens to stick and to your closure in the West to keep the hair in place while you're sewing and then other than that you will also need a dump cap. This is a weaving cap that I have picked up at my local being supply, it is adjustable and it is, I guess, a one size fits all and it has a little shaft in the back. It also needs some combs and brushes your regular needles and threads. If you want to, you know, have multiple needles so that you don't have to keep on doing the thread, it's your choice and then other than that we are ready to go. So, as you can see before you even getting started, you want to make sure that I'm just so ugly but yeah. You want to make sure that you don't cap, can't fit your head and cover the area that you need. It doesn't cover like my baby ears, like you know my edges necessarily, but that's great because honestly thought about these wigs. Now, I'm just putting the dome cap on my head, I'm going to call her shiny PETA. Shaniqua is but yeah, so I'm really just giving that in place so that I can put some pins into it to hold it in place so that I can put my poster on. I like starting off with the closure, because everything pretty much revolves around it and, as you could see when I had chose to do to the side that the head or the last Waller and my actual head size is, and that's a weeding cap is but because That is smaller, as I work around my head. You'Ll see that I'm readjusting the dome cap on the head to make sure that it's be like it's laid down flat in the different areas, so yeah at first. What you want to do is just go right around the head, using those ballpoint pins and you're just holding the dome cap in place. So now that we have leg and dome cap on Shaniqua, it's time for us to get our closure and I'm taking a regular scrunchie and I'm pulling the hair around the closure back just so that the edges aren't covered at all. You can definitely use some clips to do this as well. I didn't have any clips, though, so I made these with what I had so now that we float. The closures here is out of the way, we're taking our closure and we're lining up that gauge, where the lace and the hair start to meet with the edge of the dome cap and then as well. You will see on the dome cap that there is a line that goes down the middle of it and you will need that line as you're you guys for where the parts should be so I'm just lining it up and then, as you can see, I'm taking Some more of those ballpoint pins and I'm sticking them right through the area. So now we went all the way around our closure used in those ballpoint games, so pretty much map out where we want to put our sewing stitches at and definitely in constructing your waste. A waste bin will help a lot in the instance of you know, being able to stand up and do the hairstyle. But if you are using a Styrofoam head such as mine, you can easily put it in between your thoughts, so hold it in place. While your fill in the hair, so we are now ready to start stitching our hair. So first of all I'm starting off the closure. As said before, and then I'm going in with a loosen motion right on the edge I can get it subscribe. She was my birthday nails. Yes right, yeah, you just want to stuff we're knotted at the end and I'm just doing a couple loops, so I'll get that really secure in place and then as well. While I am going around because of my captors and necessarily fit onto the styrofoam heads that, will it's even more important to make sure that you're holding it down slightly so that you're not like taking extra bunches of your weaving cap up with set three. So I'm going to simply go right around and continue going in that looping motion and then it's also great and important that when you are going around your closure that you are doing your writing pretty close to each other so that you don't have like anywhere to Get I don't think I did the best job myself was making sure that I was holding down my mesh cap onto the styrofoam head well enough as well as using enough pins but yeah. Definitely the tips obligate, so everybody else is going to be making this learning from my mistakes, make sure that you hold it down while you're going now when it comes to sewing down your closure, it's important that you do one side first and then you use your Palm to hold down the potion and do the other side of a poster section and then lastly, you'll be doing the back of the closure occurs. Now we get to the end Ochs on one side of your closure down to the mess cap. I am wrapping to the thread around towards two or three times so form of knot, and then I'm pulling it through other than that. That is how I leave my knot at the end of each side up closures, so that I can seem to continue on and then the final thing, as I said, forms will be to sew in the back person. Is me show you guys how I roll along the side and the back of foreclosure when it comes to me and my sewing method, I simply loop around the track or the base edges of the closure. I'M not the type of person that will not in between each loops or so because I feel like it doesn't really need it. I just make sure that I'm not when I start and when I three million years later Jimmy will finally have her enclosure installed for her mesh cap so yeah. This is me, showing you guys how my, if you look a little bit better of doing the back same when I had first started out, it's just good, oh yeah. What else and you just want to make sure that you get both speaking carnivals to each other and then we already start sewing on our tracks. So well, one laugh at you or phone on your tracks. You want to make sure that your closure is lining up where you would like it to be so that, when you put your weight on, you know is coming on straight forward. So for the next part, because Shaniqua say it is so small - I don't have to reposition the dome caps for this, and I guess so by using the ballpoint pins and pulling the hair towards the front that I heard artists alone, which was a closure. So we already suspected so of course, but if you were doing a sewing, you'll be taking the longer length of Rundle first and putting that at the bottom of the hair. This is my 22 inch bundle, and I'm just using some of those ballpoint pen depends the track lines along the size of the mesh hat and as well with the adjustable straps in the back. You do want to make sure that when you are sewing that you're not sewing when you're, not including the elastic adjustable caps with I can I thought. Okay, you want to make sure that you are not including the adjustable straps as well, because saying we go to try to straighten it up, so you're not going to be able to move it instead. Oh yeah of all point things to take some ease off of you having to hold that track in place, so the hair on and then as you're. So - and you just want to make sure that you move them out of the way or you actually just leave them in place, then is just remove them after you, so all of the tracks down, so that in every move until you're ready, you know, oh yeah, So this is just myself: we've shown you guys how I sold the hair down onto the mesh cap and as you're sewing, you want to make sure that your phone here in like a new shape. This is any typical, so let's go, and then you take a little ball turns out every week, and that is pretty much it on constructing movies, as you come closer to the top. It is your choice whether or not you feel that you would like to go once that was one with rather than go and double wefted, I wouldn't SS it on my whole thing, but as I'm saying it's really your choice and if you wanted to look more Full towards the top or, if you wanted, so I guess, with a little bit more natural processes, it really depends on the blending such I wearing a school and then as well when it comes to the end and applying your way. It is your choice on whether or not you wish to add an extra elastic band. I did add an extra elastic band once I have applied for here, because I want to extra security, but you also can just get by with the additional shell, and this was my final product. So thank you all so much for watching. I hope you enjoyed it. I hope you learn something as well. If you have any suggestions for anything else like to see from me or if you have any questions, just leave them below subscribe. Call me. Thank you. So much for watching and

Comments
Ebony Thomas: Was 3 bundles thick enough
Shuntanese Knox: U not ugly