Beginner Friendly Janet Collection Diy Wig Kits | Wig Head, Frontal + Bundles Included!!
- Posted on 21 October, 2019
- Lace Closure
- By Anonymous
DIY WIG KIT
- https://www.hairstopandshop.com/shop/p...
EZ DIY CUSTOMIZED WIG KIT
- https://elevatestyles.com/ez-diy-kit/1...
________________________
⚡️SHOP MY HAIR EXTENSIONS & CUSTOM WIGS
⚡️SHOP AMAZON MUST HAVES
https://www.amazon.com/shop/withariell...
________________________
⭐️ PROFESSIONAL EMAIL
__________________________
INSTAGRAM- https://www.instagram.com/witharielle_...
SUBSCRIBE- https://www.youtube.com/channel/UC_7S-...
MAIL ME ❤️
withArielle
P.O Box 15166
Newport News, Va 23608
__________________________
Name Necklace- http://bit.ly/2KCP4Z6
Use “ARIELLE20”
20% off orders $20+
Name Necklace Video- https://www.youtube.com/watch?v=4YZZoP...
__________________________
HAVE YOU SEEN THESE VIDEOS?!
Baby Hair Tutorial- https://www.youtube.com/watch?v=uSeEjf...
Eyebrow Tutorial- https://www.youtube.com/watch?v=FUEVFl...
Mini Big Chop 2019- https://youtu.be/pQwYOL_PrcI
How To Make A Lace Closure Wig- https://www.youtube.com/watch?v=-9DdOk...
How I Melt A Lace Front Wig- https://www.youtube.com/watch?v=1TIY0g...
How To Make A Lace Frontal Wig- https://www.youtube.com/watch?v=I-13dC...
Quickweave Wig Tutorial - https://www.youtube.com/watch?v=ifhr3z...
Securing My Wigs- https://www.youtube.com/watch?v=vqA2Bp...
Everyday Makeup Tutorial- https://www.youtube.com/watch?v=DGkiEq...
Cheap Aliexpress Hair I Love- https://www.youtube.com/watch?v=2qo3d2...
Get To Know More About Me- https://www.youtube.com/watch?v=2vrlwA...
________________________
DISCLAIMER |
This video and (or) description contain affiliate links, which means that if you click on one of the product links I’ll receive a small commission. Thank you for your support!
NCS |
I DO NOT OWN RIGHTS TO THIS MUSIC.
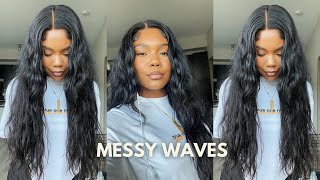
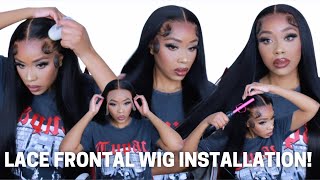
Hey y'all welcome back to my channel, as you can tell by the title today we are making a wig and I'm really excited about it because we're using the jana collection, wake kids, starting with the DIY we get. We get you a clue in case. You want to glue your charts in your curved needles and tee pins thread. A table stand a cap with adjustable straps and combs some clips and your canvas block mine is a 22 inch circumference and you have your little hole to put on top of your stand. Then we have the easy DIY customized make it now. It is very similar to the first kit, except it has the hair. You guys, the bundles in the frontal, it also includes some oil rose, aromatherapy oil and the asha absolutes, now onto the frontal photos. This is how the father looks. This is 1/12 inch, I believe, and then the bundles you get 14 16 and 18 all of body weight. I'M just showing you right now running my fingers do and the hair is super. Soft, no tables didn't have any Chevy. Then I moved on to washing the hair. I ran some water, a few drops of shampoo dip, the hair in rinsed it out, and then I went on to condition the hair. Any shampoo here to show you conditioner you choose is fine I'll. Let the conditioner sit and then I move on to bleaching the nuts I'm using quick white bleach and a 30 volume developer to bleach the nuts. I was really interested to see how the hair would take to the bleach, because this was my first time with the specific hair. As far as how long I let the bleach sit, though I think it was like 40 minutes just because the knots were very stubborn. The front was good that bleach no problem, the back in the middle, not so much it really didn't take to the bleach at all. So I went ahead and rinse it out and I'm showing you the aftermath of what happened with the knots. The front did pretty well and I'm going to show you where some leech got on the hairline, which really isn't that big of a deal. But it is good to know that the hair can take two bleach and using my proportion who on the front of the front tool just because it doesn't make sense to put it all over when they're not sticking bleach there. And I'm also going to make sure. I get the part where the bleach got on the hair to tone that back down, I washed out the conditioner and took off the wrap that was holding the bundle together laid the hair out to dry now we're moving on to plucking. I didn't want to do a lot on the sides. Well, no, I couldn't really do a lot on the sides because of how this front was made. The sides have like an inch or maybe half an inch of hair, and if I plug back too far, they were just like you'll see the tracks in so I just did a little bit very minimal. Hopefully, you can see what I'm talking about just enough, so that it can look realistic. Now, I'm showing you how you would set up your table stand and it's pretty simple. I started out using these dents, so they're very convenient. This part that I am unwinding is how you would adjust the width to fit onto your table. I did not use the stand because it would be hard for me to film the video, but you see where my finger is. That is where the edge of the table would be and you would adjusted to your liking and of course, this part will go into the hole. But, like I said, I was using my floor. Stand because I can't film the video if it's my Makino, and the recap I chose to use is the one that came in the box with the hair because it didn't have combs and I looked a little bit more sturdy. This is the front of the cameras block which would be our face, and this is the bag so put the cap, get it into place and pin down the back, so it doesn't move and it can fit our head properly want to take it off it. Has these weird little flaps? I don't know why the way capitols mate like that, but this is the right way to put it on and I'm showing you the band, because I'm going to tell you something about a little bit later. This is how the frontal looks as you can see. It doesn't have anything to sew on it's not like a traditional front. Oh so I really struggle with getting this thing on. When you do sew down front holes, you should always pull it down three or four inches so that it does fit when you take it off of the canvas head now in the front. There'S no problem with that. I pinned down the back no problems. The problem came on the sides because there's not that much hair to pull three or four inches for it, because if you do there will be a big, empty gap of space with just net. So someone disgruntled down trying to figure out how to do it. I'M not gon na lie. It took me a while now, if you've never made a frontal wig, this would be perfect for you because you won't know any other way to do it. But for me I stole it because I really wanted to do a good and I wanted to fit my head afterwards. So the material on top of the elastic band, because you don't want to soak through that elastic band, make sure you check out my how to make a wig feel because it's very detailed beginner-friendly and I don't want to be repetitive but yeah I did show we Were trying to sew on top of the material that's on the band instead of through the beam after I finished, sewing down the front hole. I sewed down all three bundles, which I do show in my detail: how to make a wig video, but now we're gon na move on to styling it, which is the best part, because it means we are almost done so after the wig is made. You want to cut out the extra material that you don't need, because it's just gon na make the wig fit better. If you leave it, it's not gon na fit as good, and this is how the way is looking we're going to smooth out the edges with the Caracara wax stick and the hot comb. I decided to use the got to be spray instead of the Asha absolute bond, just because I know the spray isn't gon na last that long and I'm coming up on a wash day soon. So I don't need a super long hold. The rest is pretty much self-explanatory, so I'm not going to spend time laughing about it, but I want to talk about both of these kids really quick. I think these were made very, very well if you've never made a week before and you're itching to you don't know where to start how to start what you need, what you don't need. They literally have everything made for you, so it takes a lot of the stress out of it. I can honestly say I would rather spend money on this kit. That has everything I need, and maybe it doesn't fit. Maybe the hair isn't to my liking, then, to spend hundreds and hundreds of dollars on hair, buying everything you need individually, which will add up. I think they did a really good job like I've. Never seen anything like this, I was super excited to try it. I can't say anything bad about either of these kids looking through the eyes of a beginner, it's just it's beautifully made now. Personally, there are things I would change like the way the frontal is made. I really didn't like that. I also would like more hair on the bundles, but I get why they did it. Plus the hair was beautiful, like the hair I had. No cons with the hair is absolutely gorgeous and I did love my overall finished look. The lace is beautiful. It melted into my skin, really nice, a color as well. I am going to leave the links to the kids that I could find in my description. There aren't many links that I personally find because I think it is so boring the beauty supplies, but make sure you check out those links anyway, if you're interested in either of these kids. This is my finished. Look I'm running my fingers through it. It'S beautiful its soft, its flowy. It blends really good to be so light intensity. I really loved well for these kids and I hope that if you get them that you love them as well, you ready to take pictures and go on about your life. Thank you. Guys so much for watching this video leave me a thumbs up subscribe to my channel and I'll see you in my next video


Comments
9ninakapone: Your video came down my timeline and I have never seen a kit like that. I am a beginner at wearing wigs and I was interested in the video because I want to start making my own wigs and this kit is great for that cause it has everything that you need. I like your personality. I’m a new subbie.
Jetime Love: You are so pretty and the wig is amazing keep it up Love it!
Kelsey Rodriguez: Amazing. Your own DIY kit !!
ROS3GOLD BABYY: This came out really nice. How much did you pay for it including the mannequin head if you don't mind me asking?
KASH HAUSE: This hair is gorgeous and soft and it lifts pretty good. I also had the same complaint I wish it was a little thicker
Jasmine Wilson: It looks nice sis!! I was iffy at first because that frontal had minimal hair on the sides like you said, but you did great!
V Jones: Such a great idea!❤
Mckee Gardner: I know right!!! I always been wanting 2 make my own wig. I been watching alot of videos. But this 1 is a keeper....a dyi wig kit.
Angel Thomas: Oh this video popped up in my suggestion and I LOVE this. I have never seen this kit before but I will buy it
Cheray Miller: Would you truly recommend this kit for those just starting out with making wigs?
~Daphne Amy's World~!: Ok Janet Collection I like I think I saw this at Feel beauty supply store I might get it ♥️
Darlene Gierke: Wow! That's for me. I am a beginner and have no idea which way to go. Thanks!
Joy Great: This is amazing I love your video thanks for sharing, new friend showing love to this video
Dani Davis: You should have more views b/c ur channel is amazing! New subbie!
tamika young: Great job! I just wanna see hiw u attached the bundles to the lacefront though... the concept is dope.
Serafina: Your simply gorgeous n did the damn thing like theee hairstylist of the year no gas dead ass I done waych your vid 5 time in a row so I dont mess up when I go get one
Clarissa L: Since the frontal didn’t have anything to sew on did you sew on top of the lace or follow how it is
mariya williams: Where did you order it at?
Dominique Barlow: Wow! Lovely sis....
SEWINQUEEN: Hello, can I send you a wig from my hair company to review?
Shavonda Tucker: This is nice
asianiis: This looks SO GOOD! And you are so pretty! And we're neighbors; I live in Suffolk.
Aulpho Lupa: What is alternative for people who don’t have the bleach to bleach the knots ?
SOLÈIL: How did the hair hold up it’s looks bomb
Mecanical Pencils: it came out cute ...
Brit Bad: What is the curling. Iron that you used called?
Becca M: can I get this kit in blonde?
MSFORD2001: I been looking since yesterday and I cannot find these kits online. I stayed up til about 5 this morning looking with no luck
ZaZha Ahll: So was there not enough tracks in this kit, there is a big gap?
Naya Dianna: Is the quality of the hair good ?
Ione Alece: Onde pôde conprar
Elle: This dope !!
Ec Ytb: Don't cute your lace straight like that!
Morguemya: are the bundles synthetic
Madi W: How’s the quality of the hair?
CassieThatGirl: I’m intrigued
Gervie D: You are beautiful but your brow really looks so weird. Can you please try to change the shape of your brow?!
Sea: What is the outro song please?
Stephanie Tracey: Wow what a steal
Candy Sands: Yes boo
Mahlet Girmay: Cch