Lace Closure Wig Red & Black Graduated Bob Haircut Tutorial Pt.1
- Posted on 22 June, 2022
- Lace Closure
- By Anonymous
#bobhaircuttutorial
#graduatedbob
#graduatedbobhaircut
Hello and Welcome to the TIGRE.PUP channel.
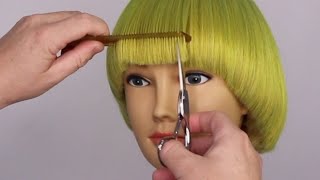
In this video I will be showing you how I performed a graduated haircut on a 5×5 lace closure wig.
This is part ONE of a TWO part series.
The 2nd part will show you how I preformed the highlights and all over color on the same wig to complete the look.
If you would like to watch the part 2 haircolor video please click the link in this description
Here's the link for part 2:
Lace closure Red & Black graduated bob haircolor tutorial pt. 2
If this topic interests you then please keep watching.
Don't forget to LIKE COMMENT & SUBSCRIBE
And as always THANKS FOR WATCHING
Hello and welcome to the tea grape channel. This video is a part one of a two part series uh this one, i'm gon na just cut the hair in the second one i'll do the color. So if this interests you then please keep watching okay. So this is what the hairs look. Looking like once, we begin, i'm gon na have to move that mannequin, because the camera focuses on her so right here, i'm just flat out in the hair to make sure it's nice and straight so that when i do go to cut it, it's uh, nice and Even so, this is the finished product of that up. Next, i'm going to divide the hair into two sections: um the right and left and then i'm going to start cutting. As you can see, i'm cutting like a little uh triangle in between the hair and i'm going to use it as a guideline to determine um what length i'm going to cut the other hair um, the surrounding or the the remaining hair. As i bring one section of hair down and uh move on to the next section and stuff so right here, i'm doing point cutting, because if i just do a blunt one cut straight across it makes lines in the hair. So i'm just kind of like point cutting it because it kind of like blends it a little bit better. So i have to do this throughout the entire head, which is very time consuming and it kind of like hurts your fingers. So i'm trying to make sure that this particular uh wig that it looks pretty good so uh in order for me to do that um. These are some of the steps i have to take in order to make that happen. So right here, i'm just making sure i have balance and that i have both sides are generally the same length. So uh, that's what you see me doing here, making sure um both sides are even okay. So, basically, i'm going to do this until i reach the top of the head, i'm going to include the sides, so you just take a look at this and maybe um it'll uh serve as a few tips and helping you do. If you were interested in doing the same thing so now you have like a template and you can try this at home. If you so choose. Thank you do do do do done. My do. Do okay, so right here, uh well up! Next, i'm going to be doing something called like a cross check and that's when you um take the hair and put it in a different direction, safe as if you're cutting it across. Then you go diagonally in order to see um. You know any um discrepancy is stuff like that to see what you missed. So that's what you see me doing here. I went across when i was doing the haircut and now i'm going like a vertical uh type of way in order to try to see if everything is well blended and i'm just taking the excess off. So yes, what you see me doing here, okay, so up next up now that i've decided that um, the back is pretty even i'm going to work my way up along the sides and the tricky part is to make sure that the both sides are even assuming That you have the wig on properly and it's even on both sides, which that's something i'm going to try to have to work on a little bit more, but i'm starting to get the hang of it with more wigs that i'm doing so, uh right here. I'M just starting on this side and i'm just working my way through and trying to make everything as well blended as possible, so uh just check that out and uh. Maybe this might help you, if you were doing your week at home, do do okay, so right here, i'm going back in and doing a little final check to make sure everything is nice and even as you can see here, i guess off camera. I may have gone ahead and checked to see if it was even on both sides, the lens, and i did it until i was satisfied with the length so um up next is the finished result and, like i said, there's going to be a part 2 to This video, so if you want to check that out i'll try to leave in a link in the description. So thanks for watching don't forget to like comment and subscribe and as always thanks for watching


Comments
nunya bizz: Great job!