No Glue! How To Install A Sew-In Closure On Dark Skin | Very Detailed
- Posted on 17 July, 2020
- Lace Closure
- By Anonymous
#closuresewin #sewinnoleaveout
Facebook : londoncurlstyles
* Instagram: @thelondontayy
* Business only email : [email protected]
Location: US -Columbia, SC
****products used::
Ruby kisses cream pallete: https://amzn.to/2CL0t66
Andis hot comb : https://amzn.to/30njV0S
Camera I use : Canon t5i with standard lenses
Lighting : Box lights
Editing software : iMovie
Keywords
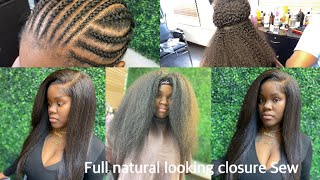
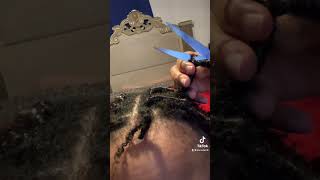
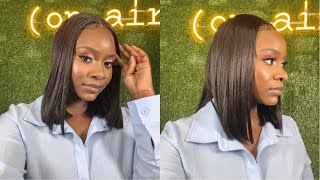
What'S up y'all welcome back to my channel, so I'm doing like a five part, so in closure tutorial five parts for me, five different videos on this exact same hairstyle, but it's gon na be super detailed for all of those people that are looking for super detailed Videos - okay, right here, it's a free part closure. This is called a free part closure with medium brown, lace. Okay, it is 14 inch closure. It is in the texture body, wave okay, so I'm gon na use that for her today, I love free park closures because I don't like a definite part, especially if you want to use it one time for a middle part, one time for a side part. If you have that one part closure a lot of times, they don't look natural, especially sometimes I like to do curved parts. So if you get a one-part closure, they usually are very very straight and they only work for middle parts. You can get that, but I feel like I just like the diversity of a free part closure, because you get to glue it on and it be parked anywhere or you get to sew it on and party anywhere. You get what I'm saying so free Park closures is the way to go. That is just my opinion. Okay, so I did use the Ruby kisses. Palette. Is the cream contour palette, I'm picking one of the darker colors, because she was dark-skinned, and that is what I'm going to use to apply under her okay, that is going to allow it to melt into her skin a lot better without it. It'S just kind of like a little off so, like I said it just just makes it look better, so I like to just apply the closure. The closure is a little wet because I did bleach the night, so I use quick blue bleach with 30 developer. Making a tool like a creamy paste apply it on leave it on for 25 minutes rinse. It out apply purple shampoo and then rinse it out after 5 minutes and then I'm ready to apply make sure you're not applying the cream color. When the closure lace is still wet, you're gon na kind of want to dry it a little bit and then apply the contour color. So what I like to do is you want to want to place your closure to where you want it to be? Okay, so recommendations when it comes to that, have your client hold each side of the closure, so that way you can get a definite space where you want to go now. You can't just pop the closure off out and they just kind of find the part as you go, but to me that it's a lot harder and it's a lot harder to find how to keep the closure flat. Again, I'm saying when you're sewing in you're gon na want to know where the definite part is going to be to help. You know how to sew it down without any bunches. If you don't know how to do closures - or if you try to you, realize that sometimes the closure will fold, if you do not sew it down flat enough giving this part you're allowed you're able to put your finger where the part is so that, were you Able to pull tightly in the certain spots so that way it can live very foolish to her scalp. Okay, but, like I said, I'm just gon na go back and forth. You just gon na see me going back and forth finding the part find out how I want the part and everything like that. I tend to follow the part that I already made into their head. I usually don't do a straight straight part. I do it with a little curve because I feel, like it looks way more natural, okay, also, let's say: okay, she has a right side, part right, so she has a right side part. So the closure is going on the right side of the closure. It'S gon na be little less space and on the left side of the closure, I'm gon na have more space where the bank area on the left side is gon na, be where the part is on the right side. I'M going to make sure that you know that her part is literally on the right side of the closure and not just like in the middle. You get what I'm saying like her parts on the right sides of that free part: closure. Okay, I hope that explained it well, but yes, so you're, just gon na, like I say, you're gon na figure out where you want your part once you get everything good and you know where you want it to go. You'Re gon na make sure that the closure is at least like one inch or a half an inch in front of her hairline okay, because you're not gon na, want her hair to show underneath. So once you do that now, I personally like to braid the hair out the way I feel like it just allows me to see where it is so better. I'M sure you guys probably understand what I mean like you're, able to see underneath the closure where you need to so if the hair is in the way it's harder to see. So I like to just do two little braids put two little rubber bands on the end, just to make sure everything is out the way. Okay, as I line everything up and I'm ready to start sewing in a minute. I do cut the lace off to me that just makes sure that I don't have any extra lace that needs to be laid or any extra lace that I do not need it just makes it easier for me. You can do it or not. It'S just easier for me just to cut the lace off before I apply it. This is no glue guys. Okay, you're gon na see me apply something on her edges now, when it comes to that, you can literally either do edge control or you can do some type of you know spray to kind of lay her edges back. I use got to be blue gel because it's just a better hold, but I wait and make sure that the gel is completely dry. I do not apply the closure when the gel is tacky, because I'm not using gel for that purpose, I'm not using anything. Any adhesive two-layer closure down. Okay, I'm promise, there's a method to my madness. So once I figure out the part and everything is ready to go, I place my hand and I'm not sewing down with a place out on the part just to keep that flat and where I want it to be, and then I started sewing the corner of The closure in the front, okay, I like to sew on the side where the part is Ellen, because it's just that needs to be more precise. In the other side, the other side has a little bit more wiggle room, but when it comes to the parting, the side where the part is that needs to be pretty precise. So I like to start on there and just kind of maneuver when it comes to that, and then I like to switch on the other side. Now I'm going to sew the corner down of the closure, so it oh, it's in front of the hairline or a half an inch in front of the hairline and then after I sold the corner down really really good and had that secure where the front braid Is that as well? I then, like the part where the front braid is at horizontally, and then I like to sew in front that is gon na keep the closure to the front. There'S gon na keep the closure laid down. That'S gon na gon na keep the closure where it needs to be, after that I'm gon na switch to the other side and do the same process. So the corner down on the first braid then part in the front and in parts and so where that first braid is so that way, the front of the closure is flat. I don't know if I mentioned, but whenever you do sew the front braid down where the front of the closure is, I sew up toys the part and then I stop before I get to the part and that's dinner so back down towards the corner of the Closure again, and then I start to sew backwards, like so on. The sides of the closure towards the back of the closure - and I do that on both sides, so do not start sewing to the back of the closure until you have the corners stitch down in the front stitch down. That is a major key. After I'm done sewing on the both sides of the closure. Then I'm going to proceed to sew in the back and then I'm just gon na literally just like so on top of the sole that I already did a couple times just to secure the closure. So, as you can see, I'm just going back and forth for a couple times just to make sure that the closure is sold all the way down. This is how it looks when all of the tracks are sewn on and closed the closure, and you shouldn't see any gaps or any braids underneath and y'all. This is basically how it looks whenever everything is kind of flattened out. I do use the wax sticks and I use a hot comb and then that's how used to flatten the closure out really really really well, if it's curly hair, I just use mousse and a blow dryer and that's how I flatten the closure out. But yes guys. So I usually just use on the highest setting. I have the hot comb that gets really hot too, like 450, so I use that and then I use a white stick. I literally will part through the closure and use the white sticks and hot comb on that part, make sure you're very, very careful because you don't want to bring a client. Even though there's like a cloth, you know in between the scalp and the client. You still want to make sure that you're, careful okay, so that is basically it part. Two will basically show you how to curl with the flat iron part. Three will show you how to close the space behind the closures and part. Four will show you how to sew the tracks and to prevent slipping, and that way you don't have any. You know tracks that are in the being loose or tracks that has to be researched or retightened. I don't ever do retighten because I don't need to base guys hope you enjoy this tutorial right here. I meant to tell you guys. I do part the closure like I do not party give me some. I do part the closure. I had to do. Tweeze, the closures part to make sure it's a little bit of wider a little bit wider. Look at me. I can't even talk today, but you want to make sure that it's wider, then you know what it originally comes to just look a little bit more natural, and also it's like the color is a little off. I will like get some concealer or something and I'll just apply a little bit on the back of my hand, something more towards the color of the client. And then I use like a skinny brush and I'll kind of just go inside the the parts and kind of just kind of clean it up a little bit. You know just make it a little bit more, a natural, more precise, and you know you know how that goes. But, yes guys. I hope you enjoyed this tutorial and look out for parts two three and four and I'll talk to you guys in my next video. I hope this was detailed enough for those who don't know how to a closure. I was at you guys in the next video bye, guys

Comments
Vivian Fahnbulleh: iam a student stylist and I found your video very helpful thank you I subscribed
Niko Lion: You have so many beautiful hairstyles!❤️
Likedbymany: Nice. Very informative
Lovely Mya: Hay