Lace Frontal Sew In Tutorial *No Glue* Maxtress Hair
- Posted on 26 September, 2017
- Lace Closure
- By Anonymous
HAIR SENT FOR REVIEW
18' Lace Frontal
20, 22, 24 inches curly bundles
Maxtress Hair Company ( IG:@maxtresshair)
IG link: https://www.instagram.com/maxtresshair...
Website: http://www.maxtress.com/
Shop page: http://www.maxtress.com/shop/
SOCIAL MEDIA
@CICIMYSTYLE
Booking info
https://www.ciaralilymakeup.com/
HAIR TUTORIAL INSPIRATION
peakmill
https://www.youtube.com/watch?v=Ix13j5...
tiarra monet
https://www.youtube.com/watch?v=38M1ZE...
ForeverCryssy
https://www.youtube.com/watch?v=XRPbXZ...
Sophiology
https://www.youtube.com/watch?v=hPTLeM...
FAQ
Where are you from?
Im Dominican born in NYC living in FL
How old are you?
26
What Camera do you use?
Sony A5100
Lighting
Ring light on Amazon
**not a sponsored video I actually offered to do this review of the hair because I LOVE my straight hair from them so much.**
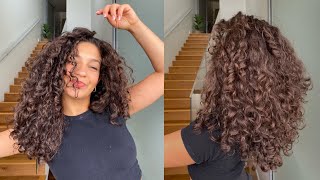
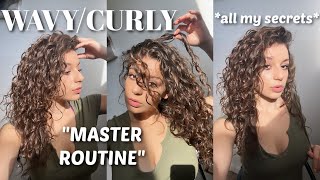
Hey guys, so this video is all about making at least week my first laced way. Y'All don't make fun of me. Do not come for me in these comments. This is my first wig so actress here. Thank you so much Max's hair company for sending me the hair. You can find it at Mattress, hair, calm or matches that comment. Sorry, they sent the Brazilian curly. I got an 18 inch lace, frontal a 24 inch, a 22 inch a 20 inch and that's it. So three bundles and a lace front of a little mat, mattress hair so on Instagram. So if here is the lace frontal you can see it has like those dips and curves kind of making it look more realistic to see. I can't really tell if it's pretty plucked or not I'm not like a lace, frontal guru or anything. I love the curl pattern. It'S like tight, it's bouncy, it's like perfect, so the first thing I'm gon na do is bleach. My lace, frontal, guys disclaimer. I am NOT a hair stylist. I do not know what I'm doing again. I don't know what I'm doing. I watched like a million YouTube videos and kind of taught myself so yeah. You just mix the developer and the bleach together, and you want to kind of make it like a pasty consistency. So it's kind of like two-faced, and then you put that right up on the lace you kind of just want to like swipe it across the lace and not poke it cuz. It will go through trust me. I learned the hard way and bleach your roots, which would be bad, so yeah just get that evenly on the lace until it's completely covered. Then you put this aluminum foil there. I don't even know why. I just thought everybody else do it. I think it like speeds up the process. I left it on there for 25 minutes and then I just rinsed it off like so you should have something like this. It should be nice and see-through. You should see no nuts, it should look like a scalp. Then I'm gon na wash it with this shimmer like shampoo, the purple one eggs away like the orangey look of the hair of the frontal I'm going to show the frontal on to my cap on my styrofoam mannequin head here and people I do have to let Y'All know that I'm being real ghetto right now and using an old cap that I used for a quick weave with glue this video was filmed during the whole hurricane Irma here in Florida. So I didn't have time to like go buy a new wig cap. I mean there was nothing open, so anyways you see me Here. I am sewing the frontal down to the front of the cap as their that is successfully sold on. I take this first bundle, which is the longest one 24 inches. I love it so bouncy and curly, and I am going to start sewing that on the back portion of the cap, so you just sew it basically all the way across. I don't know if you guys know how to sew, but it's pretty easy and you're. Basically, you're just gon na continue sewing the tracks onto the cap until you reach, obviously the end, I'm sorry. This is not really like in-depth, but there's plenty of videos on YouTube. That kind of show you in depth how to do this cuz. You know, I really. I'M not the one to learn from I'm doing the flip over method, I think is called where you just kind of overlap the tracks. Instead of cutting them just securing the edges, you can see here making sure that you not it by wrapping the thread around the needle and making that secure knot. So, as you can see here, all my bundles are nice and secure. So here is two bundles already sewn on. You can see how full it is, how bouncy and currently it is you don't see the cap, it's there nice and close together. So now I only have this little area to work on which I have one bundle left, which is the 20 inch, and I am going to sew that all the way up now that I have a little bit of the cap left, I am sewing the top Row of my track onto like the lace frontal and then I'm gon na work, my way down doing the flip over method until it's completely finished and you don't see the cap anymore, I don't know if that made any type of sense, but you can see what I'M doing right so I'm just basically attaching the weft to the lace frontal and then, instead of flipping over I'll flip under until I cover the part underneath. So this is how much hair I have left over after sewing on the whole hair or after constructing my whole wig. So all there's left to do is to cut the excess portion of the black cap. That was underneath, like so don't cut the lace, because if you cut the lace, obviously everything will fall apart and that would probably be bad. All those little white pieces are just basically the styrofoam it'll fall off, so I don't throw away the band that I just cut off. I use it to secure the inside of the wig. I just sew it on to the wig like so like right behind your ears, and this is gon na help put it on so now we get to try it on yay. I love how the video makes it seem like. I just did this in two minutes girl. This took two days, so you just adjust. It hope it fits and flip your hair over and voila. Look how beautiful this hair is. Yes, come through natural curls. So, basically, that's how I made this lovely lace, wig with no glue all sewing and lots of patience. I love it. It'S so curly it's so full as a beautiful natural shine, it's so so natural. So all that's left really is to cut off this lace to pull out your baby hairs and slay one eternity later. All I really did was cut some of the hair in the front to make it really really short, like baby, hair and swoop it down with some gel on both sides. I didn't do too much plucking because I'm not about that life, but I'm sure that if you could have patience and sit there and pluck and make your hairline look really super natural, you could make it work. I just don't got patience for that and I don't know if you can tell, but I only put a little bit of the one gel that I use the got to be glue gel on my edges and with the band inside it's pretty secure. Now this clip is from wearing it for about a week, I've been washing it in conditioning conditioning it like. I would my natural hair, the only thing that I would say that I've noticed so far is the immense amount of shedding that I'm getting with this hair. Yeah I mean it's natural, my natural hair is curly and I experience a lot of shedding. So I don't know, I guess maybe that's just a thing with curly hair, but that is the only complaint I have like right now. I'Ve noticed that I don't know what I'm doing. Maybe it's the way I'm applying it with the gel, but the lace is kind of turning like really light, so I think I may have to go and in tint it a little bit darker because it's it's looking a lot lighter than my scalp should look. I am absolutely obsessed with this hair. It is stunning it is gorgeous. It is like everything any who's guys. Thank you for watching the whole construction of my lace wig. My first time doing it go easy on me. Let me know if you liked it. If you want to see more hair videos like this also, let me know thumbs up the video subscribe to my channel. If you haven't already - and you see me on my next video thanks bye


Comments
W Mandy: Sooo pretty!