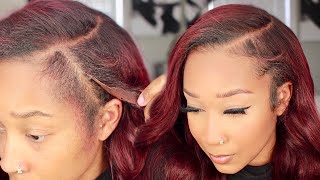
Very Detailed Wig Re-Install From Start To Finish | 5X5 Hd Lace Closure| 28 Inch Deep Wave
- Posted on 19 April, 2021
- Lace Closure
- By Anonymous
HEY LOVES❤️ I am so happy to be back and this time I am back for good. Of course, I had to give you all a hair tutorial because it is only right ‼️ Today I will be showing you how to reinstall your lace wig step by step from beginning to end. This tutorial is very detailed. Even a beginner could do it. Get the most of your wig girl!!! One wear is just not enough. You bought it!!!
If you are a returning subscriber WELCOME BACK❤️!!! If you are new here don’t forget to SUB❤️. Remember to like and comment. (Watch in 1080p)
Instagram: @zakiya_linn
TikTok: @zakiyalinn
Snapchat: @zakiyaa26
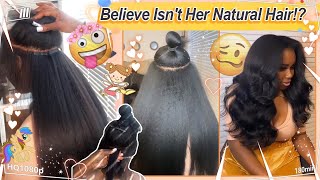
I haven't said this in a minute: hey guys, welcome back to my channel, it's your girls kayla and i'm back again with another video, and i can't believe it's been a year. But i want to thank you guys so much for getting me to 4.5 k subscribers and getting my last video to almost 200k. My last video is almost at 200k views like what i just want to. Thank you guys so much for all of the love and support and baby, i'm back, i'm back and i'm better i'm ready to post consistently and be back active on my channel, because i missed all of this. All of this i missed all of it, and i missed you guys so much so with that being said, i'm just going to jump straight into the video today, i'm coming at you guys, with a hair tutorial, of course, and i'm going to show you guys how To reinstall your wig, so if you got an old wig, go get it because hair stylist be acting like. If it's not a fresh unit, they don't want to touch it like a lot of hair stylist, don't re-install wigs! I don't know why, but whatever so. If you got a wig right now, go get it pause the video and go get your wig, because i know me if i'm paying 300 400 to a wig, i'm wearing my wig. It'S going on my head more than one time! So if you're like me - and you want your wig reinstalled, go get your wig, because right now, this video about this guy right now and we're about to put your wig on your head right now go get your wig right now, because the video is starting right. Now so, first things: first, i'm going to pull my bonnet back a little bit, i'm not going to take it all the way off, because my mix is not fresh in the hair and i'm not going to embarrass myself with these fuzzy braids. So i'm taking some alcohol and a cotton round and i'm just going to use that to remove any excess oil, any old makeup, any old glue, so that my lace will stick. If you have any oil or any makeup anything on your forehead, where your lace is going to be laying down, your lace will start to lift because it just can't grasp onto your skin as much as it's supposed to okay, y'all, don't judge me. I did not realize how off my foundation shade was and how much of a tan i got until i actually made this video but anyways. I am going to use the got to be in the black bottle, not the yellow bottle the black bottle, along with my edge brush to just brush back my edges, because you want your edges to be out of the way as much as possible. You don't want any wiggles getting stuck on it. You just don't want nothing to happen to them like yeah. It just is your babies, you don't want nothing to happen to them. So just do this step to make sure your edges is out the way. Now i'm using my blow dryer along with my edge brush to brush my edges back because you want that glue to dry, because if it doesn't dry, it's going to get stuck on your wig cap and believe me, you don't want your edges and this glue to Get stuck on your wig cap because removing it is going to be a pain, you're going to lose some hair in the process and who want to lose energy. Nobody want to lose no edges, so just make sure that you blow dry this glue. It'S all the way dry before you put your wig cap on your head. When applying your wig cap, you want to make sure you pull it all the way down and stretch it all. The way out, my head is a little big, so this is the furthest down that my wig cap could go, but the more that you stretch out your wig cap, the thinner it would be and the easier it would be to actually melt it down into your Skin, when i'm applying my got to be spray, i spray it along my hairline and i don't just spray it straight across. I spray one spot and i'll kind of spread it out spray it in the spot, kind of smear it out. Some people say you're supposed to spray it before your hairline, but i just feel like that. Just makes my sit too far down on my forehead. If you know what i'm saying the key to a good wig install is a good foundation, and this wig cap here is your foundation. So you want to start off with your wig cap looking right, so that your wig can actually look right when you're blow-drying. This glue, you want to make sure the glue is all the way dry, not sticky, not tacky, not kind of wet all the way dry you're going to know when it's dry, when you scrape your nail across it and you kind of get this crusty sound. That means that this glue is completely finished drying. Sometimes it might take a minute. So me, personally, i just put on some music kind of try to distract myself, so i can actually make sure that this glue is dry. Some people might use lace tip, but me i just use my foundation to spread it across my cap so that, when i put my wig on the color that you see underneath is not this white color that you see in my wig cap. It is the color that i actually use on my face, so i'm just spreading this all over i'm going to spread it all across the front and along where my part will be. My wig is a four by four closure. If you have a frontal, of course, you would put it like all over the front of your cat, but me personally, i don't have to do that and yes, you need to blow dry the foundation after you put it on your wig cap. The same way you put foundation on your face and it is wet for a minute and then it dries. It'S the same thing when you put it on your wig cap and you don't want to give your wig cap any reason to start lifting. I usually use eyebrow razor for this part, but i could not find an eyebrow razor anywhere, so i'm using these hair scissors, they are very sharp if you're going to be using a pair of scissors like i am make sure that your scissors are very sharp so That you can get as close to your face as possible. I usually cut my socket cap straight up the middle first and then i'll make little tiny, tiny, tiny cuts as close to my face as possible until i have cut the entire stocking cap off of my forehead. If you need to pull back this backing cap a little bit so that your stocking cap is not so far down on your forehead, do that because i did that a few times in the video. Also, i'm starting this with a freshly washed wig and you want to make sure that there's no glue left over on your wig whatsoever. So i've seen a lot of videos on youtube where girls will try to style their wig while it's on their head. There'S absolutely nothing wrong with that. But for me it's just a lot easier for me to put on my mannequin head first, don't you guys think so as soon as i get my wig on my mannequin head, the first thing i like to do is push any hair that is attached to the Lace backwards because baby, it's time to do these baby hairs. I love me some baby hairs on a closure on a frontal anything. I love me some baby hair, so that is always my first priority, so i am section out. My baby is right here: you're gon na see me constantly doing this over and over and over, because you want your babies to look natural, you don't want them to be too thick, you don't want them to be too thin. You want them to look natural as possible, as you can see on this unit. It already had baby hairs in it. Your unit might be the same exact way so suction out your baby is first, that's just that section out your baby hairs and play with them. If you have some short parts, some long parts, you can always make new baby hair. That is a good thing with a lace. You can always make some new baby ears. Once again, my baby is perfect and not too thin they're not too thick. I just like to twist them up so that they don't get caught up in this hair anymore. Like you guys see how much i reparted these baby hairs, i don't want them to get caught up in this hair at all. Sometimes, moves just is not enough, and this edge booster stick right. Here is a blessing because it'll hold your hair in whatever position you want it to be held in. I'M sorry, i'm a perfectionist. So i have to go over things like a million and one times so i'm taking my edge brush and i'm brushing those hairs back in the direction it's supposed to be. I'M brushing my baby hairs in the direction that they're supposed to be, and i'm still cleaning up this part, because i just like things to look clean and precise, and this wax stick really does it for me, i use this razor comb to cut my baby hairs And i cut them a little bit long, but i honestly just like to have one to play around. Sometimes i, like my edges, a little bit more dramatic than others. I kind of overestimated my baby hairs in this one, but we're gon na fix that a little later on in the video now girl. It is time to get your hot comb. If you don't have a hot comb, invest in a hot comb, because this will transform the appearance of your wig completely y'all. Probably didn't even notice that my pink lights went off in the back. But that's because i needed to plug in my hot comb, because you cannot do a wig without hot comb. I like to use my hot comb to hot comb, my baby hips forward and the rest of my hair backward you're using a hot comb to train your hair in the direction that you wanted to go. So your baby hairs are coming forward onto your forehead. So you want those to come forward and the rest of your hair to go backward once my baby hairs all out the way i like to focus on my part. I love my middle part. So that's what i'm doing here in the video i'm just using the pointy end of my comb to part my part, if you don't have a rat tail comb with the metal in, go, get you one, because these are a holy grail like. Why? Don'T you have one these are so good. Your part just looks so crisp everything just comes off so much neater with one of these combs as i'm fixing my party, i also like to make sure that my hair is laying down and molded in the direction. I want it to be in, i love the push back. Look, i don't know if that's what it's called, but i love when my hair is kind of pushed back before it comes down and frames my face again, i'm taking my wax stick and i'm just making sure things are laid down in the direction they are supposed To be laid in, i made my middle part and i don't want my hair's getting all crisp across up again. So i'm using my wax stick to make sure my hair is, is laying now i'm taking my mousse and i'm just doing the same exact thing. Making sure that my hairs is laying down and my toothbrush making sure my hairs are laying down you want your hair to be laid down. I go to the toothbrush. I forgot that i done upgraded to a real edge brush this time, but, as you can see, my perfection is so for just brushing brushing brushing mainly and laying making sure things are looking good, and here goes my hakum again, i'm just making sure this section is Definitely laying and the way that i want it to be laid in. Sometimes i like to use the back of my hot comb. My hot comb has these little grooves on the back that i can use to like use the back of my hot comb to make sure things are flat flat, and i love that, for the most part i'm done with the top of my wig. It looks good and i'm just going to work with the bottom half of my hair. If you have a straight wig, this would be the point where you would flat iron, your hair or curl it or style. However, you want to style it. My wig is deep wave, so i'm just going to add some mousse and make sure that my curls are defined. This is a freshly washed wig, so there is no product in it whatsoever. So i just like to use some mousse to define my curls a little bit. I'M pretty sure that you guys seen that my hairs on my leaves are a little bit over bleached. So i like to take this temptation spray by kiss and the color natural black. I believe it is along with the makeup brush to fix any over bleach here. So i just spray inside of the top dip. My makeup, brush inside and i'll, go along my part any hairs in the front that are a little bit too over bleached to fix them. You see now that my part looks a lot better. It doesn't look as wide as it did before, and the gap between my baby hairs and the rest of my wig doesn't look as wide either. So this is the finished product of me, styling, my wig, and now it's time for me to actually put it on. My head, i like to use the got to be in the yellow tube to apply my wigs. A lot of people say that it doesn't work, but i honestly think that they're, just not using it correctly, if you use a generous amount, it actually stays on for a pretty long time. My wigs will sometimes stay up to a week, so i like to make sure that i'm applying it with a width, that's probably an inch or more now, it's time to put your wig on your head. Don'T put it all the way on your head, put it like midway your head, because we still have to blow dry this glue girl, so just put it on your head make sure that none of your edges are stuck in the glue. There'S no hair in the glue whatsoever if any hairs do get stuck in the glue, just gently pull them out and try to keep your baby hairs away from the glue at all cost. Just keep constantly brushing them back if they keep moving forward brush them back. Brush them back brush them back, just keep brushing them back. It'S time to blow dry and people usually say blow dry till it's clear. Do not blow dry it with glue until it is clear blow dry it until it is tacky. It'S kind of dry kind of wet, not too wet, not too dry. It'S an in-between point right there. That is a perfect time to apply your wig when you're applying your wig. You want to make sure that the beginning of your lace in the beginning of the glue are lined up perfectly again. You want to make sure that there are no baby hairs getting stuck inside of the glue, and you want to make sure there are no baby hairs getting caught. Underneath your lace, i like to use the end of my rat tail comb to push the lace into the glue, as well as to brush my baby hairs forward, so that they aren't too stiff as well as brush the rest of my hair back. So it isn't too stiff and stuck in one place remember we did not completely draw that glue. So now i'm going to take my blow dryer on the cool setting, of course, and i'm going to blow dry my glue, i'm going to continue to use the end of my rat tail comb to press the lace down into my head and i'm going to keep Combing my hairs backwards and my baby hairs forward, so i really love to just go in one last time i got to be spray and just make myself 100 sure that my lace will not lift up. I hate when i get to the end of an install and my lace starts lifting or there's a part that you miss, and this spray just makes sure that there's nothing lifting up and i like to use a spray, because the spray just dries so much quicker Than the glue does i'm just going to pull my hair back because it's time to get into these baby hairs, we got to mold, shade and perfect our baby hairs right now. My first step with molding. My baby hairs is to use some mousse to just shape them. The way that i want them to look play around with them a little bit before i put any glue on them, because sometimes baby heroes are just hard to perfect and it is easier to make your mistakes with the moves. First, before you put some glue on them and they start drying and things are getting crusty, we don't want that. So just go in with your mousse first play with your baby hairs a little bit, so you can get them the way that you want them to. Look so remember all of the excess baby hairs that was on my lace before i like to have a little extra, because it's just so much easier to mold them, because now we can go in with our scissors and snip snip away any pieces of hair that We don't want i'm using the mousse to define my waves just one last time, sometimes i'll use water, but for the most part i don't really like the wet look. So i'll just add a little bit of mousse to my hair. So it can still have a little bit of volume to it. I don't like when my hair is dead and limp. I love when my hair has a little bit of volume to it and we're basically finished just tie your scarf around your head so that everything can just melt down, make it just melt just give it some time to just melt down underneath the scarf. I left my scarf on for about 10 minutes, but now i'm just taking a little bit of alcohol to remove any excess glue that might be left over on my forehead. Okay, so i know you guys are probably looking like girl. Your lace is right there like it's right there like. We see it, but let me explain so what i do is i get my makeup that i wear every day to match my wig cap and i just got back from vacation, so i am a little bit darker than i usually am, but once i fill in My makeup, i'm just like every now once i put my makeup on back on my forehead because you know we wiped it off once i put my makeup back on my forehead if it may be a little less noticeable all right. So, as you can see, my laces are a lot better than i did before and i'm not going to be one of those things, but, as you can see, things is looking good. It'S looking good. So if you take anything from this video, you want to make sure if you are placing that with makeup. On a day-to-day basis, like i do that the makeup that you put on your stocking cap and on your legs is the makeup foundation and true you're on the table. What colors you want, what it is to look like it is one like it is merged together. It'S given you want it to give you want it to serve so so that's it from this video and i think i did a good job, which i think i do so. If you guys enjoyed this video remember to like comment and subscribe and turn on your notification bell, so you guys can get notified every time that i post and i'll see you guys in the next video


Comments
Triplegoddess: Loveeed it boo , very detailed & keep going
rebekah's Journey: Yesssssss it looks so good
CHANNCE 2016: Glad to see you back ❤️
Flashy Naz:
AllThingsJuuu: Frennn