How To Make A Lace Closure Wig|Ventilated Cap|Sewing Machine|Detailed|
- Posted on 14 November, 2020
- Lace Closure
- By Anonymous
Hey loves! Welcome to my channel! In this video I am going to walk you through steps in detail, demonstrating how to make a lace closure wig on a sewing machine using a ventilated wig cap.
Thanks For Watching ❣
____________________________________________
☆Shop With Me☆
(wigs, bundles, closures, frontals & More)
☆Follow Me☆
Instagram: @acsignaturewigz
Facebook: AC Signature Wigz
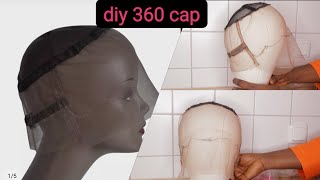
Hey loves: welcome to my channel, i'm amanda, the owner of ac signature, wigs and today, i'm going to show you how i construct a wig unit using a ventilated cap and a sewing machine. This is um. The hair i'm using is from a unit that i previously created, but i deconstructed it and chose to go ahead and recreate it on or using, shall i say, a ventilated, wig cap, the mesh dome cap that i tested out was trash and we got time for That so, as you can already to see, your first step will be going ahead and putting on your guidelines um, you want. Usually, you want your guidelines to be about an inch apart, no more than an inch apart, you can go smaller, but especially using a ventilated, wig cap. The back of the wig cap y'all, can see later on in the video you'll, see three straps in the middle of it. Once you remove the plastic off of this ventilated cap, your stretching is beyond you know you it's very, very stretchy um, so we'll get into that soon um. Secondly, you want to go ahead and place your closure. I can't talk, you want to go ahead and place. Your closure um on the front of the um wig cap, and you want to make sure you pull the lace just a little bit. Maybe a couple centimeters down in front of it and you don't want to set it directly on top because once you pin it in the back of it, it's going to slide a little bit. So, of course, we don't want our uh realistic hairline to look like. We ball headed. We then lost our edges, so to speak, so you want to go ahead and pull that down a little bit in front that way when it goes to pin in the back it will be even next. You want to go ahead and thread. Your needle, i prefer using the curved needle as you can see it's easier to get under the lace and to you know, wrap it around the closure as well. So once you get that all threaded and good to go, you want to go ahead and cut off the excess thread shown here. Less is more, it really doesn't matter at this point, the way you sew or how you chose choose to sew um, because when you go ahead and sew on your last weft, you um are going to lay it directly against each other and you're going to use A cross stitch is what i usually use as a cross stitch. When i go ahead and blend my last weft of my unit and my closure together, it leaves you know, more smooth, sleek, seamless, um appearance, so to speak now, as you're sewing on the tracks. Um, excuse me, as you're sewing on the wefts themselves, starting from the nape of the cap and working your way up. You will use a a regular stitch, a straight stitch. The reason being is when it comes to removing that plastic is going to be 10 times horrible, to get that plastic off versus using a straight stitch, you're going to be able to remove that plastic, easy and you're going to be using tweezers. So you got to imagine taking some tweezers and you got zigzag stitch or you know stitch, that's not in line, and you got to be able to determine the your regular sewing thread stitching compared to the factory or manufacturer. Who makes your wig cap that you're, using in order to make sure you do not separate your um dismantle? Shall we say your unit that you just sold that took you? You know 45 minutes to an hour to create you know once you get the hang of it, it may take you just 30 minutes to make a unit, so practice is key. Then also, once you get um your closure unit sewn down, you can make sure double check it. As you can see, you want it flat all the way around all the way around, then you want to go ahead and finish on drawing on your guidelines, and your last guideline would be that last weft that you will lay against your closure. So once that's all done ready to go, you want to go ahead and get your sewing machine threaded ready to go as mine is already as i do this. Quite often, you want to go ahead and line your first guideline up with the needle in the foot head, i believe, is what it's called correct me if i'm wrong, and then you want to go ahead and start your sewing when you first do it, you want To go ahead and when you first apply your weft, you want to backstitch on both ends and you're going to do that all the way through the unit to secure it, because you don't want you know, you don't want your customer to get it and they'd be Like, oh, my god, it's lifting on you know both sides and then they paid two three hundred dollars hell, even a hundred dollars with you, you know and your quality is bad and you always want to double check your quality too. You know before sending out any inventory to anyone. Um again, this is pretty repetitive. You'Re gon na line up your needle up with your guideline you're gon na. Do a couple of stitches forward back stitch, a couple stitches forward, and usually i do it about once, maybe twice it depends on. You know you can manually, look at it or manually. You can physically look at it and see. Okay is this lifted, or is it not now again? This is just a unit um, a previous unit that i deconstructed and i'm using the actual uh hair to create me another one, because i mean this is a unit that i've created for myself. So this is my hair um, so um, if you notice any gaps in between any uh wefts or anything that i'm laying down, then i got ta grab a piece to finish off, maybe another two inches um of the cap. You know it's because i had you know, removed it from the mesh dome that was terrible, trash and chose to go ahead and put it on a ventilated cap. Now i do offer my customers two options on my website: acsignaturewigs.com wigs with the z on the end, dot com, and i do offer my customers the option of go ahead and go ahead and either purchasing a ventilated, wig cap or a mesh dome wig cap. Now the mesh stone wood caps that i have is not the trash ones that i'm talking about in my video, they are um of quality and i have no problem with them. I just happened to had waiting on my order to come in and um had another one laying around and turned out. It was garbage. So, needless to say, i'll continue using what i use all right. So we are almost at the. I would say midpoint at this point, as you can see, of completing this cap construction. You just want to keep going. Okay, here's what i was saying that had a complete, you know pull out a weft. That was, you know, maybe two or three inches and go ahead and add on it, because once you once you get your bundles and you unravel them, you're going to you know double your wefts, which makes the process 10 times easier. You know it's it's prepping, as if you were cooking dinner. You know you want to prep your food to cut down the cooking time, so you know double in your wefts and everything, and then i constructed on that mesh dome cap first and then i deconstructed it took it apart and i had to cut so um the Cap sizing is slightly uh differently made. You know, you know you got your dome cap, that's all the way around of elastic band and these ventilated caps. You got the ear tabs on them and everything. So it's not going to be 100 even so, and even sometimes when you are constructing um wig units for your customers, you're, probably going to um after you're done, you might have to look back there's nothing wrong with this. You might have to go, look through and be like. Oh there's, you know a bigger gap than what i would like. It'S okay to you know fill it in a little bit because you want quality, you want it, you don't want the customers to complain so um. I never had an issue, you know with you know filling it in if need be, but i don't have to do that often either and you wouldn't either once you get the hang of everything and you'll see once you use them tracks once you'll know that you're Not going to have to you know, go back and keep filling in anything and usually where the feeling comes of uh comes into play is at the top, the top of it uh. Maybe a wife about two or three wefts about two wefts from the top from your closure. You know you'll see it like it's a little thin, you know and that just secures the fact that if the wind blows you know it's not going to show any any wefts or uh netting. That'S you know associated with the cap construction or unit itself, all right. So we are, let's see from the looks of things we are about. I would say about two two or three wepts away of completing this cap construction here zoom in a little bit there, so y'all can see now um some people when it comes to your closure and applying that on there some people choose to go ahead and apply The closure on, and just by pinning it and not sewing it down right away and go ahead and draw on their guideline around there to where it would be, and just unpinning it and removing it, because some may feel like it can get in the way. Um or you can just go ahead and sew it down. I mean it's totally up to you what's easier for you. If you feel like that, hair um from the closure is going to get in the way you know you can uh not tie it braid it down, clip it down and everything and i it depends on my mood i'll go back and forth. So i do believe we are on our last and final track here and you want to make sure it not on top, do not lay it directly on top, as you can see, i spread that see it's a little bit hard for you guys to see, but You want to lay it directly together, like line it up with your last uh line that last weft up with your closure, and then you're done so. The next step after this would be removing the plastic with tweezers and some simple styling


Comments
Destiny Adam: This was so helpful! Thanks a lot Please what were the settings on your sewing machine?
Amanda Jackson: Nice work