Sewing Machine Closure Wig Construction || How To Make A Closure Wig On A Sewing Machine.
- Posted on 02 March, 2022
- Lace Closure
- By Anonymous
Heyyyy Ladies. Today I will be showing you all how I create my custom Closure units. I will be going Step by Step showing you exactly how to block measurements, apply closure, double and triple wefts and more.
Looking for Quality Raw Vietnamese Bundles? Check us out at
Need a Custom Unit? No prob shoot us a text at 929.340.9028 and we’ll get you situated!
IG:
@Kymbiaaa
@bleutifulstudio
Tools I Used in this Video:
1. Sewing Machine: Brother XR3340
https://www.amazon.com/dp/B08777CX24/?...
2. Thread: Gutermann’s Polyester Thread
https://www.amazon.com/dp/B0001DUTAW/?...
3. Cap: Mesh Dome Cap
https://www.amazon.com/dp/B0101V1K6A/?...
4. Canvas Head: GEX Canvas Head 20”-24”
https://www.amazon.com/dp/B00W1BT1GU/?...
5. Weaving Thread: Also can Be Bought at Beauty Supply Store Near you.
https://www.amazon.com/dp/B07ZDH2JWP/?...
6. Sewing Scissors
https://www.amazon.com/dp/B07QQ398H5/?...
7. Measuring Tap
8. T-Pins or Sewing Pins
Hope you Guys enjoy! Leave any question or comments below!
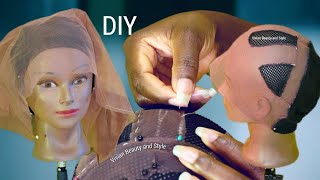
Hey, ladies today, we're going to be working on a 5x5 closure lace, wig um and we're going to be doing this on the sewing machine. So if you want to know more, i'm going to show you step by step so stay tuned. Okay. Ladies, let's get this popping okay today we're going to be using a 5x5 hd lace, closure from my company of course, studios and also three bundles of 20 inch kinky loose curlies. We got to see the juiciness in these raw vietnamese, bundles, yes, ma'am. Okay, all links will be below in the description box if you'd like to purchase when you want a custom wig. Okay. So today we're going to be using a make your own wig mesh, dome style, cap, okay, so we're going to start by blocking out our measurements. Um, the first measurement you want to do is from the front to the back next you're, going to do the over the head ear to ear so you're, going to if it's 12, which mine is you're, going to divide it by 2 and place the 6 right In the center - and that's how you know, when you're, even on both sides, i'm going to do the nape and you're going to do the same thing you did with the over the head. If my nape is 5, the middle mark will be 2.5, so you're going to put a pin it first and the 2.5 and then you're going to measure out both sides and just kind of you know, stretch it out and make it look good temple the temple Measurement just to make sure that your temples are covered um and that that hairline is um even so um i think mine was 14 and a half. So once again you want to split it in the middle 7.25 and you're going to go around. So now you see that extra room - you don't want to just leave that so you're going to pull that and tuck it all the way to the top so that it's nice and flat and you're going to pin it down and then you're going to go around And sew, and i'm going to show you exactly how i'm doing that day long? It'S not that i don't want you here, it's something about the way you stand, i know, is i just wan na get away so now that our cap is all completed. We'Re gon na go ahead and start um applying the lace closure. Some people are able to do it after they've already applied their tracks and stuff like that. But i like to do mine beforehand and i sew it on so i'm just going to braid it down and make sure it's put away. So now what we're going to do is we're going to bring it a little bit forward. So i would say, maybe about a half inch um away from the cap and you're going to kind of line those uh little sides up you're not going to tug it and make sure it's extra stretched, no just kind of like place it and go. Then you're going to pull the back of it, just to kind of align it and make sure everything kind of lays nice and flat, and you don't want to stretch it too hard like if you stretch it too too much it's going to make your your closure Kind of like lumpy when you're sewing and stuff like that, it's not going to look good, so just gently make sure it's laying nice and flat don't have to stretch it all crazy, beautiful and then you're going to go ahead and you're just going to sew it Right on down um, i like to sew from side to side and when i get to the center i stop and then i start on the other side. Oh, oh, is, is me okay. The next step is going to be blocking out your um, where your tracks are going to lay, so you always want to do it an inch apart, um and i always start on that line at the bottom. You see where, where i place my first line so whatever that mark is you're going to do an inch above that i'm going to go to the next one, then the next one to the next one. Okay, to make sure that you have enough space. You have to make sure it's at least an inch um of space in between, because if it's too close when you're sewing on the sewing machine, it's gon na bunch and it's gon na like make your cap really small. So you don't want to do that. You just want to make sure that it's perfectly perfect. Okay, so now we're going to move on to sewing i'm using the brother, four xr3340 um sewing machine, and today we're going to be placing it on number. Five and you'll know the type of stitch that your your machine is on, based on these little numbers on the side here so number five is a nice zigzag stitch and that's exactly what i want to be using. So we're gon na keep our tension on about seven um, and you know the tension is important, because i make sure that your it's nice and tight that you're you're sewing nice and tightly and at the top it shows you exactly how to thread your machine um. If you guys want more details on that, please let me know in the comments below and i'll make sure to give you more detail, but it definitely tells you right on your machine. So first we're going to start by doubling our tracks. You want to make sure that you know um. The center of the two tracks are lined up with that middle line right there on the presser foot, um and you're just going to keep on going sewing it right down the middle now the same way that you doubled your wife, you're gon na triple it. But now you're gon na focus on that bottom left and the newer that you're adding you're going to line it up right there in the center and you're just going to go ahead and sew. He my so now we're going to sew down our first track. So what i'd like to do is i cut on an angle so that when i place my weft to my wig cap, it kind of just blends properly um you'll see what i mean so when we line it up, it looks really good. You see how that just fits right there like a little puzzle piece. It'S perfect place it right there. It should be right in that middle line and you're just going to sew. Don'T pull, don't try to overdo it. I like to back stitch so that way it kind of secures the weft even more um and you're. Just gon na sew straight. Don'T try to pull it, don't try to make it extra flat, it'll flatten itself out, as you go so just sew as regular and use your guidelines and just follow the lines. What i love about the sewing machine and making your wigs on the sewing machine is just make sure it's so much more sturdy and durable and um. Honestly, the only thing that you would have to change on these wigs - you know throughout time is the closure or the frontal like. That is the only thing that would ever be changing, but for the most part like these wigs are so sturdy and so well put together um, but it takes time and practice to really catch the flow and the hang of it once you do like it's like Riding a bike: you'll, never forget me, i'm here: okay and there you have it. My loves a perfectly stitched. Um closure, wig um. I love this method. I love everything about sewing. My wooden sewing machine because it's so much more faster and durable. So um. If you have any comments, questions anything make sure you guys comment below and make sure you subscribe to this channel. So you don't miss anything else that i'm doing and all information for the tools and um purchasing, bundles and custom. Wigs will be all in the description box below and don't forget to turn on those notification bells so that when i drop new videos, you guys are always the first to know. So i hope you guys enjoyed and learned a lot, and i appreciate you


Comments
Janice Hamilton: Talented.
Janice Hamilton: You’re so beautiful