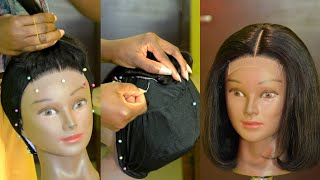
New Style Wig Cap For Crochet Wigs | 2 In 1 How To Make\Sew Wig Cap By Hand & Sewing Machine Method
- Posted on 28 July, 2022
- Lace Closure
- By Anonymous
Hello guys, welcome back to my channel!
DIY three-part lace front wig cap for crochet wigs
Thanks for watching
Please LIKE, SHARE, COMMENT, and SUBSCRIBE for more videos!
How To Fix unnatural Knots On A T-part Closure https://youtu.be/CPIpoLDSUig
✨IG: https://instagram.com/vivianbeautyands...
✨ Email: [email protected] (For business inquiries)
✨ Based in Abu Dhabi (UAE)
✨ My second channel https://youtube.com/c/StylebyViv (Sewing channel)
How-to Sew A Closure On A Wig Cap For Beginners
CLOSE-UP: How-to Ventilate Hair Lace Closure/Frontal wig Using Ventilating Needle
$15 Hair | How To Make A Beautiful Wig Using One Pack Of Kinky Straight Hair https://youtu.be/Lg9RFZ9A4UU
Where I purchase my materials/tools (Aliepxpress Links )
Wig mannequin head https://s.click.aliexpress.com/e/_Dkju...
Adjustable Wig Stand https://s.click.aliexpress.com/e/_Dl05...
✨SWISS LACE NET FOR WIG MAKING✨
1/4 Yard Swiss Lace For Wig Making https://s.click.aliexpress.com/e/_DC6i...
Closure/Frontal Lace https://s.click.aliexpress.com/e/_DmlJ... (4x4'' 13x4'' 2x4'' 2x6 and more)
3 Pcs Pin ventilating needle https://s.click.aliexpress.com/e/_DnkE...
Small/ Tiny Latch Hook https://s.click.aliexpress.com/e/_DBI0...
✨✨CAPS✨✨
Mesh Dome Caps (Small-Large Size) https://s.click.aliexpress.com/e/_DkWv...
Spandex Dome Cap (Small-Large Size) https://s.click.aliexpress.com/e/_DFnF...
Thick Mesh Dome Cap (Net Free Size) https://s.click.aliexpress.com/e/_DdLN...
Elastic Band https://s.click.aliexpress.com/e/_Dk8o...
AMAZON LINKS
Swiss Lace For Wig Making https://amzn.to/3tiErPJ
Small/ Tiny Latch Hook https://amzn.to/38U5Kc2
4 Pcs Pin ventilating needle https://amzn.to/3tk64Yz
Spandex Dome cap & Mesh Caps For Wigs Making (Small-Large Size) https://amzn.to/3NYCxLU
Black Elastic Band For Wigs https://amzn.to/3NpendS
#ventilatinghairline
NEW Style Wig Cap For Crochet Wigs | 2 In 1 How To Make\Sew Wig Cap By Hand & Sewing Machine Method
This video is not sponsored. The links above are affiliate links. This means I'll make a small commission if you make a purchase using any of the links
Hello guys and welcome back to my channel if you're new, here you're welcome - and i hope you all are doing well so in today's video, i'm going to be showing you how to make this uh three part crochet wig right in this video. So with that said, let's jump right into the video and also the links to the um to everything i use in this. Video will be in the description box down below like the lace, the black cap, the mannequin and stand will be in the description box down below so be sure to check it out. Okay, so i already went ahead and pinned the black cap onto the mannequin head. So right here, i'm going in with lace i'm starting by securing the middle part of the lace in place. So next, once that is secured, i'm going ahead to walk on the side of the cap, so i'm just smoothing and painting smooth and paint. So since i'm going to be having three parts on this cap, so for my main, focus is to make sure the middle part is properly lined up like the straight line. Is there and before going ahead to walk on the side so right here, i'm going ahead to make a plate to smooth out the side part. So the part where i made the pleat right there will be cut. So i'm just going ahead to smooth where i want the side parts to be, because i don't want any wrinkles on bump on that uh pad. So, as you can see right here, i just went ahead and smooth and pin in place. So i'm going to repeat the same thing on the other side of the cap, so here it is all painted place. Okay, so next i'm going ahead to measure the length of the side part and the middle part i'm going to hit and mark it before going ahead to draw in the shape. So you can make these three parts a bit smaller if you want um so to you, can reduce the width of it and the length of it depending on what you want so yeah, okay. So here it is after cutting off the uh excess lace. So for this crochet wig, i'm planning on making and one i want to be able to put it into a ponytail, a half pointed like a half up and half down hairstyle, and also i want volume, okay, some volume on the crochet wig. That'S why i have this little lace situation going on right here, but you can make it all lace if you want and yeah so here it is all paint in place. So in this video i'm going to be showing you two method. Well, the first one is showing you how to sew the the lace and the cap together by hand uh, and i'm also going to be showing you how to sew it using uh the sewing machine so right here, i'm going ahead to hand sew this. I mean these very parts in place in this clip and also going to be showing you how to connect the lace part by hand. Okay, let's just fast forward, a bit okay. So if you're going to be sewing, it by hand go ahead and sew all the parts you need to sew in place, connecting the lace to the black cap and go ahead and sew everything in place. So once that is done so right here, once you're done sewing the lace and the black cap together. The next step is to cut off the black cap under the lace, so go ahead and cut off the black cap under the lace. Be careful pay attention to what you're doing you don't want to uh. You don't want to cut off the lace accidentally, so here's how it's looking after cutting up the black cap under the lace? Okay, so right here to sew the lace part where you, you join the lace, the lace session, you're going to need a clear trade and a very i mean tiny little needle that you can easily pass through the hole on the lace without stretching the hole. So the size of the needle you need to use need to be smaller than the hole on the lace. Okay. So once you have your needle, take your clay, trade and sew the lace parts together and don't forget to secure the trade once you don't sewing. You have to tie a knot to secure the trade in place. Okay, so right here, i'm going ahead to tie both straights together to secure it in place and also to sew this part. You need a single trade. You don't need to double rate. Okay, a single trade - you don't want to try to be too thick, so a single trade would do okay. So next i'm going to be showing you how to sew this on a sewing machine. So before you remove the cap from the mannequin head, you need to attach or secure the lace to the black cap using a controversy trade, as you can see in this video i'm going to here to secure the lace to the black cap. So that way, when i take the uh the cap from the mannequin head, everything will be properly secured again, like i said you need a tiny tray. Sorry, not a tiny trade. You need a tiny needle that can go through the hole on the lace easily without stretching it. So once you're done securing the lace to the black cap. The next step is to take it to your sewing machine and sew it and secure the lace to the black cap using a zigzag stitch. So, as you can see right here, i didn't have to like do much, because the lace is already secured to the black cap. All i'm just doing is to just sew it through and i'm sewing it close to the edge of the like close to the edge of the lace. You don't want to sew over the contrast right because it would be difficult to remove the thread if you sew over it. Okay, so doing the same thing once you're done sewing the lace to the black cap. The next step is to is to cut and remove the contrasting trade. Okay, once that is done, you can go ahead and cut off the black cap under the lace again be careful when doing this, you don't want to accidentally cut the lace, so pay attention to what you're doing take your time and cut it the right way. So here it is all right so right here, i've already went ahead and changed the trade on my sewing machine to the clear on tread and right here, i'm going ahead to sew the lace part to carry the lace part of the cap using a straight stitch. Just like that, go ahead and repeat the same thing on all three parts, and once that is done, your wig, your wig cap is pretty much ready to be used. So here it is perfect. That'S the back. So here is the final result of the crochet wig cap is the front, the middle part and side part and the side so yeah. This is the final result right here. As always, if you find this video helpful, please do not forget to give it a big thumbs up and also, if you're new to my channel, please don't forget to hit the subscribe button down below. Thank you all so much for watching. Thank you for subscribing and i'll see you all in my next one. You
Comments
Macaulay Dora: It would be lovely to see how to use this cap to make a wig.. Please if you can make a video using this cap for a crotchet wig making would be really insightful. Thank you
sweettwiny: Beautiful Thanks Vic
Monsie babe2: Please show how to use it
Gabriella Valentine: Can't wait to see you add some hair to this
Mirrie Pedzisai: Hi dear l need to know how to ventilate the ear to ear closure plz step by step on how to ventilate so it can come out natural like u do plz plz❤️
LAOM officiel: First