How-To Sew A Closure On A Wig Cap For Beginners | Vivian Beauty And Style
- Posted on 03 November, 2021
- Closure Wig
- By Anonymous
Hello guys, welcome back to my channel!
Thanks for watching
Please LIKE, SHARE, COMMENT, and SUBSCRIBE for more videos!
✨IG: https://instagram.com/vivianbeautyands...
✨ Email: [email protected] (For business inquiries)
✨ Based in Abu Dhabi (UAE)
✨ My second channel https://youtube.com/c/StylebyViv (Sewing channel)
CLOSE-UP: How-to Ventilate Hair Lace Closure/Frontal wig Using Ventilating Needle
$15 Hair | How To Make A Beautiful Wig Using One Pack Of Kinky Straight Hair https://youtu.be/Lg9RFZ9A4UU
How To Fix unnatural Knots On A T-part Closure https://youtu.be/CPIpoLDSUig
Where I purchase my materials/tools (Aliepxpress Links )
Wig mannequin head https://s.click.aliexpress.com/e/_Dkju...
Adjustable Wig Stand https://s.click.aliexpress.com/e/_Dl05...
✨SWISS LACE NET FOR WIG MAKING✨
1/4 Yard Swiss Lace For Wig Making https://s.click.aliexpress.com/e/_DC6i...
Closure/Frontal Lace https://s.click.aliexpress.com/e/_DmlJ... (4x4'' 13x4'' 2x4'' 2x6 and more)
3 Pcs Pin ventilating needle https://s.click.aliexpress.com/e/_DnkE...
Small/ Tiny Latch Hook https://s.click.aliexpress.com/e/_DBI0...
✨✨CAPS✨✨
Mesh Dome Caps (Small-Large Size) https://s.click.aliexpress.com/e/_DkWv...
Spandex Dome Cap (Small-Large Size) https://s.click.aliexpress.com/e/_DFnF...
Thick Mesh Dome Cap (Net Free Size) https://s.click.aliexpress.com/e/_DdLN...
Elastic Band https://s.click.aliexpress.com/e/_Dk8o...
AMAZON LINKS
Swiss Lace For Wig Making https://amzn.to/3tiErPJ
Small/ Tiny Latch Hook https://amzn.to/38U5Kc2
4 Pcs Pin ventilating needle https://amzn.to/3tk64Yz
Spandex Dome cap & Mesh Caps For Wigs Making (Small-Large Size) https://amzn.to/3NYCxLU
Black Elastic Band For Wigs https://amzn.to/3NpendS
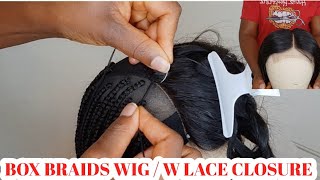
How-to Sew A Closure On A Wig Cap For Beginners
This video is not sponsored. The links above are affiliate links. This means I'll make a small commission if you make a purchase using any of the links
Hello guys and welcome back to my channel if you're new, here you're welcome, and i hope you are doing well so for today's video i'm going to be sewing down this little t part lace, closure right here. So with that said, let's jump right into the video okay, so i've already went ahead and um pin the black cap in place of camera. So the next step now is to position the lace closure. So taking your lace closure, you want to go ahead and place. It where you want it to sit. So if you um doing a middle part, you want to go ahead and place it on the middle at the center of the cap. If you're doing a side part, you want to go ahead and place it there. So next you want to go ahead and position it where you want it to sit so once you've done that you want to go ahead and take a pin and paint the lace in place. So i'm going ahead to secure the lace in place, also making sure to hold it. Where i want it to sit, i don't want it to slide back or slide forward so using my fingers, i'm holding the lace in place and i'm going ahead to pin it in place. So whenever i'm sewing a lace closure onto a black cap, i like to position the lace i like to place. The lace closure a little bit away from the black cap, so i'm making sure that the little of the lace hang away from the black cap. You want to give a little bit of room to style the baby hair without the black cap showing it. So you can place the lace uh about half an inch from the black cap or quarter of an inch from the black cap, depending on what you prefer. But you don't want to make it even you need a little bit of room so to start the baby hair. Even if you don't want to do baby hair, you still need to place the lace at least a little bit away from the black cap. Okay. So when it comes to pinning down lace closure, i like to secure the front part of the lace in place first, before going ahead to walk on the side of the lace. So after painting the front part of the lace closure in place, i went ahead and pinned the side in place. So next right here, i'm going to go ahead and pin the back of the lace in place and also right here. I'M making sure that the lace is laying flat so after painting the back of the lace in place right here, i'm going ahead to pin the other side of the lace in place. So now that i'm done pinning the lace in place it's time to put the hair into a ponytail okay before moving on to the next step, so i'm taking a rubber band and i'm going to put this into a ponytail. You can braid it if you want, but i just prefer putting the the hair into a ponytail okay. So now that the lace is secure in place, it's time to sew it down, and i'm going to be doing that using a curved needle. So i started by securing the thread in place so right now i'm going to go ahead and sew it down so to sew down the lace. You want to make sure to pass the needle through the lace and the elastic band on the black cap. So you want to secure it to the elastic band on the black cap, so you're passing it through both layers. So right here to pull it tight, i'm going ahead to use my fingers to hold the lace in place at the same time pulling on the thread to secure it in place. So again, i'm sewing the um, the lace through the black cap, making sure to pass the needle through the elastic band and the lace so securing it in place and also don't be rough on this process, don't be rough because if you're too rough on it, you Might end up ripping the lace, so you want to be gentle while pulling on the tray to secure it in place to make sure it's tight, so you want to at the same time you want to place your tom or your finger right on top to help The lace to lay flat, and also i like to work on one side of the of the lace. First, i sew one side of the lace in place before moving on to the other side of the lace. Before going ahead to uh cut the trade, i pass. The needle, through the loop two to three times to secure it in place before going ahead, to cut the thread so for the rice. I only pass the needle through it one time and pull on it to secure it in place. So right here, i'm just going ahead to cut it right and also i don't cut the threads too short. I make sure to leave enough thread hanging so that way, once i'm done sewing the other side, i can tie both threads two together. So doing the same thing, i'm going to go ahead and secure the thread in place. First, okay, so i'm just going ahead to secure the very front of the lace in place again doing the same thing by pulling on the tray to secure it in place. I'M also going to be placing my finger right on top of it, so that way, the lace uh that part of the lace will lay flat. Okay, so for this last part also doing the same thing, i'm going to go ahead and pass the needle through the loop two times, okay, before going ahead to secure it in place, just like that, okay, so right now, i'm going to go ahead and tie both Trays together, okay, so once you're done sewing down your lace closure and sewing down the rest of the hair. The next step is to cut out the black cap under the lace. So i always get this question, which is how do you keep the wig? How do you keep your wig in place after cutting off the black cap under the lace? So if you use the right wig cap, the right dome cap, you should be the wig should be able to stay in place. Without you, adding elastic band. The elastic band is for extra hold okay, so for my wigs i use medium-sized cap. So for her, i use a large size cap because i tried the cap on her and it fits perfectly so i use a large size cap for this very wig in this video. So if you're making your wig, you want to make sure you use the right size if your size for your cap is medium size and you use a small size cap, the wig would be too tight. So i've tried all three uh caps. I'Ve tried the medium size, the life size and the small size. I made a wig using the small size cap for myself, and the wig was too tight to the instant of it. Giving me a headache, and also i've used the large size cap to make a wig for myself, but it was a bit too loose, but every time i use the medium size cap to make a wig for myself. The wigs are always perfect. They are always like a perfect fit, but i still use the elastic band when it comes to installing the wig for extra hold. So you have to use the right size, wig cap, in order for you to get that perfect fit all right guys. So this is the end of the video. As always, if you find this video helpful, please don't forget to give it a big thumbs up and also, if you're new to my channel, please don't forget to hit the subscribe button down below if you already subscribe. Thank you so much for subscribing. Thank you so much for popping by today and i'll see you all in my next one. You


Comments
Joan Addo: Just what I’ve been look for
J-Jcomedy650: Wow that's awesome
ieikha merrick: Can I ask why to you pin the cap sideways
Nadhie K25🇨🇮: Magnifique
Laurie Galloway: What's the name of the hair I buy at the store
Addai Sandra: How much it the weave
Tülay Özdemir: Hello First I want to thank you for the very useful content you are giving us I want to try to sew and ventilate my first wig I want to buy hair but I don't know how long i should buy it I want it to be in my jaw line or a little bit more Here the hair is very expensive so I want to buy for example a 60cm hair and divide it in two and then ventilate it . Do you think it's going to work ?
Ezeh Diamond: Please wat is the name of the wig cap