How To Make Your Closure Wig Last For Years
- Posted on 26 June, 2021
- Lace Closure
- By Anonymous
Have you noticed that your custom closure wigs start to slack overtime?
This happens when the attachment between the edge of the closure piece and the wig cap loosens over time. This will make your closure wig less taut across your forehead, causing the lace closure to “lift”.
When your lace closure doesn’t lay flat on your hairline, it can result in a “wiggy” look.
Watch this video to learn how to keep your wig laying flat.
***DOWNLOAD YOUR FREE WIG MAKING SUPPLIES LIST AT:
http://bit.ly/fabluxwigssupplieslistyt...
***Sign up for Online Wig Making Courses
https://wigmakerslab.vipmembervault.co...
Struggling with doubling your wefts? Sign up for this mini tutorial:
https://www.fabluxwigs.com/product/how...
Connect with Sylvia:
https://www.instagram.com/fabluxwigs/
Website: https://www.fabluxwigs.com/
------
#fabluxwigs #wigmakingclass #onlinewigclass #wigcaps #frontalwigs
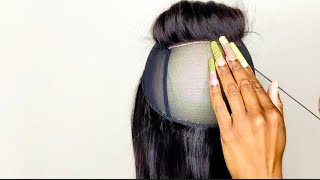
Do you sometimes notice that once you cut out the excess wig cap underneath of your closure wig, there is a bit of slackness over time with your wig. The problem here is, although it's reinforced with constant tugging, this comes undone for this project, i'll be using my singer. Heavy duty sewing machine. The stitch that i'm going to be using is a straight stitch and the length is going to be number three. This is what underneath your wig is going to look like once you finish making it. This is the part of the wig cap that absolutely has to be removed in order to reveal the lace, and this is where we're going to be stitching it i find stitching it while it's still intact a lot easier than cutting it first. The first thing you need to do is place your wig underneath the presser foot. You need to ensure that it's nice and flat, so that it sews evenly. The next thing you do is do a reverse stitch, at least four or five times, ensuring that the wig cap is attached to the edge of the lace. Remember you're only sewing about an inch into your closure. Once that's all done, you can go ahead and cut off the excess wig cap, underneath your wig, ensuring that you cut close to the stitch but making sure that you don't actually cut into the stitch. As you can see, the results are a very, very secure finish, which will ensure that your wig lasts longer than usual. Here'S what it looks like if you prefer to cut out that excess wig cap before you actually secure the edges. This is the piece that we're going to be sewing down. If you prefer the method of cutting out the excess cap, first just ensure that your lace lays flat underneath the presser foot ensure that it is aligned with the presser foot and is not twisted in any shape or form. Then proceed with your four to five reverse stitches, as you did previously, once you get to this stage, if you still have any excess wig cap on your wig, then this is the time to carefully cut out all of that excess fabric to reveal your lace. You'Ll find that, with this trick, your wig will remain taut across your forehead and it won't slack easily. I really enjoyed making this video for you all. So if you enjoyed watching then like and subscribe and share with your wig making bestie i'll, see you in the next video you


Comments
Terrell: Thank you for sharing this trick. Where did you get the scissors? I would love to get a pair.
Lech: Great tips!