Making A Closure Wig On A Sewing Machine Ft Hair Senta | Headmistress
- Posted on 07 June, 2020
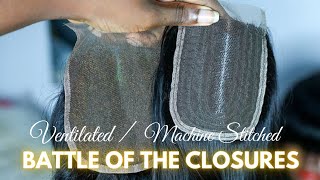
- Lace Closure
- By Anonymous
Hey loves.
This video shows my entire work flow when making a wig on a sewing machine. Enjoy .
I will be posting more tutorials on how to use this to make wigs in coming videos.
Link to an equally good sewing machine from singer for beginners : https://amzn.to/2Y4v6Mw
Part 2
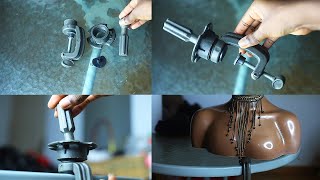
SINGER 1409 SEWING MACHINE REVIEW AFTER 5 MONTHS & HOW TO SET UP FOR WIG MAKING | HEADMISTRESS https://youtu.be/texp-4OcgeE
Part 3
EASY :STEP BY STEP HOW TO THREAD AND USE YOUR SINGER SEWING MACHINE AT HOME | HEADMISTRESS https://youtu.be/h4I_qLV6ZlI
Subscribe so you don’t miss any of my new uploads.
—————————————————
OFFICIAL HEADMISTRESS WEBSITE
http://www.shopheadmistress.com
----------------------------------------
E LEARNING WITH HEADMISTRESS
Learn how to make and Style Wigs
https://shopheadmistress.com/collectio...
————————————————
How to Transfer Head Measurements and adjust Cap COURSE. Click Below
https://shopheadmistress.com/collectio...#
For PR/Business (I make wigs☺️)
—————————————————
—————————————————
SHOP http://www.shopheadmistress.com
For PR/Business (I make wigs☺️)
—————————————————
MUST WATCH VIDEOS
▶️ How to Cut and Tint your Lace to match your Skin tone. https://youtu.be/d0UAt_yEAWU
▶️How to properly Sew lace onto a Wigcap
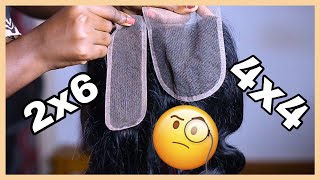
▶️2x6 or 4x4 lace? https://youtu.be/7pR0KTx6Oes
▶️All about frontals, Closure, Hair Bundles and Length
▶️Affordable Wig Making Starter Kit for Beginners
▶️How to Bald Cap or Stocking Cap Method
▶️ I Spent $100/Ghc 450 on BestHairDeals. Was it worth it?
▶️How to Customize Your Lace Closure to Look like a Frontal
▶️How lay Your Wigs Flat On Your Head
▶️The Big Afro Curly Wig
▶️Slick 4c Natural Hair Made Easy
▶️EyeBrow Tutorial With Pencil
——————————————————————————————
♦️LETS STAY CONNECTED ♦️
♦️HEADMISTRESS (Hair and Makeup)♦️
FACEBOOK: https://www.facebook.com/HeadmistressS...
Instagram: https://www.instagram.com/_headmistres...
♦️HEADMISTRESS STUDIOS (Film and Photography)
Instagram : https://www.instagram.com/headmistress...
BLOG
https://www.instagram.com/theakuabudu/...
SNAPCHAT : TheAkuaBudu
https://www.facebook.com/Pennieviolett...
------------------------------
♦️FOR BUSINESS ENQUIRIES♦️
————————————————————————
SOUND : CARPASS NSENKU
https://www.facebook.com/carpass2000
INSTAGAM
https://www.youtube.com/watch?v=F_GNV2...
Hello guys and welcome back to my channel so in today's video, i'm going to show you how i make my wigs inclines now. This um hair in particular, was sent to me for my client thing. She probably sent it directly from her center. So this is the hair center. I think that's the five in one um 14 inch body wave, so i'm going to do a little unboxing so that you guys can see how um the hair looks like because, probably most of you guys have seen it on their instagram, but have not really like You know seen how it looks like in terms of like how full it is, or you know the texture and everything. So this has this kind of ombre to it. They'Re getting to the tip is color four and then the top is color. Two yeah color one color two. I think it's color two. No, no! I think it's color two and then it's in 14 inches and it came with this closure also, which is also um in 14 inches. But then the closure doesn't have the same color as um. The bundles itself with, but then it has the same texture and for some reason i felt that the closure was very very long, but then she said it was in 14 inches. So yeah. I think their closure comes in like extra lengths, because from what i'm seeing is really really long, so i was just trying to compare the length and be sure so, as you guys can see. I also follow the same way. The closure is really long for um. A 14 inch closure, but then the textures are the same as you can see side by side, but then the color is different, so um. What i'm going to do is i'm going to unravel now. I know some of you guys might have seen this over and over again on their page, but then this is an insight to how the bundles actually look like. So i'm going to unravel this particular bundle. Now it comes in five. Yes, five, bundles and a bundle. I think the five bundles is definitely enough for food. You guys are going to see so i'm going to rub all um a bundle for you guys to see because um the way it's packaged, you might not actually see the fullness of it. So this is one bundle unraveled, so yeah. This is how it looks like um one bundle. So five off comes in the set so um. This is just a fast forward motion so that you guys can go through this process with me. So this is five bundles offer you guys can see is actually like a lot of hair and most of the time one hair comes in a lot like six bundles where units or something like that. The hair is not really that full, but this one is actually full and then i'm going to put that in a plastic bag, and then we are going to work on um the closure customization. Now i have a detailed video on my channel on closure, customization and i think plaquing and those things. So i'm not going to go into so much details in this particular video. But then, if you want a detailed, detailed um, you know kind of learning, or course or something. Then you should probably check out my e-learning courses, i'm going to leave the website in my description box so that you guys anyone who is interested like interested in making you know interested interested in this wig making business can also start something because i start from scratch. Where i talk about introduction to hair, to bleach, to developer everything so now, usually what i do is that when i'm processing the hair, i go ahead to work on the bundles, as if i don't have a lot of time. But then i noticed that the hair had already started processing and now, if you have hair and then you apply bleach and developer and it's kind of lifts very quickly, then that is a sign of good hair. So the closure lifted - and this is the difference between bleached hair and not where you can see that not properly bleached yeah, so that is it bleached perfectly bleached. Now i'm going to um customize the closure. Now this is the back of the mannequin, because the front part of my mannequin looks really terrible, and i just want my placket to come out nicely. So i'm going to use the back yeah, that's it! This is because of lace, tints not have to wash it, but i have not washed it. So just stick it like that. Now i'm going to customize this um hairline, and i also have a detailed video solely on blocking on my websites. Please so you you can check that out if you're interested interested in me caring, you know a wig styling, the wig, like everything from straightening to curling, to you know, whatever you need to know is on my website. So please, if you enjoy this one and definitely if you enjoy any of my videos and you're going to enjoy that, so this is me um done with a plucking. This is how it turned out the plaque in process. This is how it turned out and then yeah um. I just wanted to show you how it looks like on the skin. I haven't applied anything to it. It'S just even it's just air dried, and this is how it looks like so if it's on your forehead, this is how um it's going to look like. So this is just a quick um preview of the plaque um closure. Now i usually customize all my laces, whether it's a closure or it's a frontal. So if you would make a wig with me, you're going to get all of these things now, if you want to make a way, please don't hesitate to dm me on instagram or send me a message now. This is all the hair that you know came out when i was playing so yeah now, as i was saying, don't hesitate to um dm me on facebook or instagram or just other other, the wig making thing on the website. Okay. Now i have a video too. On um, proper um closure placement, so please check that out. These are also on my website and how to stitch it perfectly like this one. Okay, so i went ahead to draw um the outline and then i'm going to have to work on my bundles with a sewing machine. So this is just um. How do you call it a quick run through? You know how i make my wigs using the swing brush. I don't think i have that on my channel yet so yeah i decided to just film this so that you guys can see my work flu. So i'm just doubling um doubling the weft, i'm just doubling the width so yeah. This is my process, and now, when it comes to doubling the webs, it depends on the number of bundles you have at hand and the style you want to achieve now. There'S no specific way to go about doubling tripling, and you know so. This is how it looks like this is how it looks like when you double the width. Now, there's no specific formula: it depends on the bundles you have and the style you want to achieve when i'm making um worse. I watch youtube videos, and this is one of my favorite youtubers she's called sisi opi she's a nigerian youtuber, but she does story time. So i usually watch youtube videos like really long videos to keep me coming, because i'm not really really really like big fan of music. So this is just um one bundle, one bundle in so i'll come and be showing you how, like the bundles look like as i am, you know, making the work. So this is one bundle in any two um three lines, three tracks, and this is three bundles in yep. This is three bundles in and we are almost at the top of the week so yeah we have this much space to go and we have two bundles left. So yeah it's going to be a good week. I can't tell so i'm showing you how the three bundles look like, so this is the finished way. This is the inside of the wig. Everything looks secured and neatly done yep. So if you want to make a machine way too, i have the cause of my website, so i don't want to be saying it because so this is the difference between a tinted lace and a bleach lace. Okay, bleach tinted, the orange one, the orangey one is the tinted and the other one is the bleach. You guys saw the bleached one in the previous. You know clip so now. I'Ve gone ahead to um lay my closure and i'm about to style it. So this is how it looks like i'm going to show you a close-up of that in a bit. Just just wait just to wait just to wait. Um boom yeah, that that is it. This is a close-up of the closure. Now, if you make a wig with me, i'm going to do this thing for you, i'm going to customize your clothes for you, i'm going to tint it to match your skin tone. So this is it. I really do the step before i go ahead. To start the entire week, so here we are going to apply some heat protectant serum to um the wig, because we don't want to minimize the heat damage that the hot tube might cause to the hair. So always don't forget to apply some serum. It could be in a form of spray, or you know the different types of heat protectant anyway. So now you need your control clips, because that is what you're going to use to hold the curl so yeah. This is how i'm going to section the hair. You know into parts and i'm going to curl them, i'm going to do some loose curls in this. You know to this hair now this is not going to be a detailed video on how i kill my wigs just to show you um this whole process. I didn't want to be. I didn't want this video to be so long, so this is just you know, i'm showing you guys my wig making process. Basically, so you know curling the way has a lot of principles, no principle, but then the way you curl, your wig is going to determine how your curls fall and all of that so check out my website. Please please check out my website so yeah i'm done with one side, and this is the other side of the wig and yeah. Always don't forget, you can use a control clip. You can use control clips to control um your curls or you can use bendy rulers depends on whatever you have available. You don't necessarily need to do exactly what i'm doing. If you have bendy rulers or um those big rulers, you can use them now. This is how the wig turned out, and i really really like it. I, like the final um, the final results so yeah i couldn't get enough of this wig and i like how the ombre kind of created an effect you know and it felt like a color effect. It wasn't all like one color, so you can see the like highlight of the color, for you know kind of now. This is how i um shape my my wig, so i normally cut the leaves, and then i recall it so that the clients can have fresh curls when they receive the wig okay. So if you want me to make a wig for you, this is how the curls are like the wig is going to come with an elastic band to support. You know, give you extra security and yeah this. Is it nicely done and ready to ship to um? My client, so i just added this administrator's tag and you know it's ready to ship ready to go to its owner now. I couldn't get enough of this week so before i recalled it, i asked my client if i could um wear it for a tutorial and she was like she was cool with that. So i'm going to show you how it looks like on a piercing like on me so boom. This is it. You can see the hairline right. It looks so good yeah. It looks really good, so don't forget to like and subscribe to my channel. If you enjoyed this video, let me know in the comment section the type of videos you guys would want me to do and yeah that's it i'll see you very soon in my next video bye, guys

Comments
Anne Appiah: I like your work keep it up girl ❤️
Laarie Sarah Faith Yenube: Thank you so much, the hair is beautiful. couldn’t find the website you takes about . Can you kindly reply with it.
Patricia Obour: Please do u teach one on one cos I want to learn.