Part Ii Making A Closure Wig With Used Bundles And Closures On The Sewing Machine
- Posted on 13 July, 2020
- Lace Closure
- By Anonymous
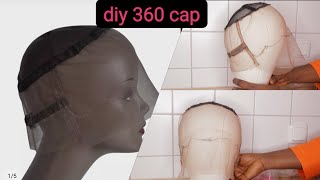
Oh, i got all my little stuff showing well, it really doesn't matter. Okay, i'm trying to get this set up to where it is a good fit to show you all. So the cap is done. Is it if it's too bright? Just let me know so. I'Ve already sewn it on and what i'm gon na do is. It does not look like this when it's on, so it may look like it's over the cap a lot, but it really isn't. It looked more like this when it was on the wig block. So the first thing i do is reinforce my closure and remember when you're reinforcing your closure, you want to sew it all the way down. Oh you're, very welcome. So the only time i stretch this cap is when i'm reinforcing the closure. So i have a brother project runway the limited edition ce 1125 prw. Most machines are the same way i'm putting mine on a force set setting 2.5 at the top and 7.0 at the bottom. The next thing i'm going to do is get ready to sew this. On and i'm not going to go through the entire wig on live um, because i do not try to let this charge up. It'S just not enough battery on it, but i'm gon na reinforce it and then explain to you how i sew it on. So it's a zigzag stitching. You want to backstitch the end, not much and then stop so what i'm doing, i'm actually stretching it to keep it as though it was on the wig block. So it's i'm pulling it towards me for a straight line and i'm stretching it out to capture it like that. Now, i'm at the curve you're gon na curvy and i'm still holding the stretch as you can see - and i know it's not the best view. Oh, i could do this again like in more detail, stop and go before you move, let your needle rest and stop. Let me oh you're very welcome. Sometimes cleaning it off makes a difference. Okay, so i'm holding it and you want your reinforcement and i'm gon na show you why so i'm at the curve. I stop i'm stretching it, but do not stretch when you throw the tracks on stop so now here you see how sometimes you sew and then make crumble or whatever you're going to pull that see how i'm creating it to be straight, as though it was on The wig block and when you let me slow down when you're holding it and sewing you're, sewing it um on the cap in that area and i'm not gliding as fast as i would glide when i'm sewing the actual tracks on, because i need more stitching. And this is a zigzag stitch, so you all, i do straight stitch it sometimes, but if you straight stitch you don't have any room to really mess up, so don't be comfortable with it before you try the straight stitch and then you want to cut your thread Off and then, as you can see, it's reinforced on this uh, can you explain why my needle is making small holes in my bobbin base? Um do? Are you starting with the right size needle 110 over 18, both threads have to be out um. It could be different reasons i have to kind of like speak more to see why so it's up to you if you want to cut now or later, i'm gon na just cut it down, so that you all can see how i cut. I use my finger as a guard to make sure i'm not cutting the lace. You really don't have to do this, but if you knew you might want to because the last thing you would want to do is cut the lace um when you're cutting this off and what i do when i'm cutting it. I'M not. Let me see if i turn this, i don't know is the light. Having the light better, i feel like this is better. Is it can you all see this or it was the light better? So when i'm cutting it, i don't want to cut right at the thread. I want to leave a little bit of the cap. It doesn't matter if you cut off before. After with my frontal wigs i cut off before, i don't always cut off after yeah, when you don't double so let me tell you something: dublin is my friend and it's not because his single y is doing that. It'S because you really have to make sure you are not stretching the cap uh with a single and then also sometimes even adjusting the length of your settings, but you just have to really just be careful and then what i do is i go in and i Just clean it up um, i usually cut it really good, the first time but whatever so. This is the cap. The knots are not bleached as of now um. I don't even know if she wants her knives bleached or not. They it's a used closure and it wasn't bleach, so i'm not going to um bleach it right now now. The next thing i do is i'm going to take my tracks. I don't have time to show this. I show this another day, but when you have tracks that's cut, i match them up already and i would double them and another thing: when you have small pieces of track, i double them. So let's say: if i double this track and i'll link the video to show you how to double, and then i would connect it on the sewing machine to make these longer, and you want to do that um. You want to do that before. You actually start sewing, so what i do really fast is. I have to double the tracks before i actually um sew them away and i do not mind wet damp tracks. However, i do not use dirty tracks. That'S so important to me that i'm not using dirty tracks. So here you are yes, just a tiny bit in front of the cap um and that's because she actually is getting hers glued on she's, getting it installed for she's getting it installed, but she'll still be able to wear glue this one. She take the install out. So now, what i'm gon na do is i'm just going to double these tracks. Don'T keep them at the end. I have a video showing you all how the double eye link that underneath our back stitch points you get a good. They need to be super close pinched together and unlike the machine when you're gliding, you don't want your hands moving too much, i'm just letting it don't feel like you have to rush. This hair is wet, stop get it back, make sure my hair is out the way, sometimes so it's different, so you can sew like this too. This is one technique. If you feel like you, have better control. I'M right handed, i put my right hand through the tracks, are close together, overlap, no space when i start coming and when you stop, let y'all need to rest before you move your hand. So now i'm just getting ready to just double this really fast. So we can move on and i'm going to show different hand techniques to see whatever works for your coordination. There'S no one right way to do this. However, you don't want to gap when you're stumbling, so whatever works for your coordination is what you do. I think i so like this more often, especially when the tracks are new and let me slow down for a second to show you all something. What i'm doing when i sew you want to make sure you get a visual to where you see your needle, hitting both tracks and i'll. Show you how i do the end. When i get to it, i see a little piece of hair right there, i'm not even going to worry about it. I keep sewing pull out when you get to the end you just kind of want to let it feed through stop. I backstitch by and i pull on the hair and that's it so now your track is double and it's time to sew it on i'll show you how i sew a couple of tracks on and then i end this live because you would continue to do the Same thing, all the way up when you're sewing on your tracks, so here we have a double track. I was saying earlier um in part one that you follow the curve, don't make up a curve. Let'S try this okay, that's better! You follow the curve see. So i'm gon na take it i'm gon na place it. You do not stretch the cap at all place it on i'm just placing it sold on a cap for my singles without ripping the double so's on the cap line. It'S the way you're on it's the way you're sewing and i'm gon na go over that. So you see how i'm just it's just a place and i'm gon na show you all someone on the van. You really can't mess up and it's like driving. All of this needs to be comfortable for you, so i'm really stoned and i don't have a good setup for a new video once you get to the end. I cut in at a slant to make and i don't want anything hanging off and now you back stitch off the cap, lift it up. So i'm going to show you with that single stitch cut the track. I mean the 38 and, like i said you really can't mess up on the band, it doesn't show you if you're doing it right when you get on the mesh part it does so you see how i say. Sometimes i decide if i want to sew right under or before above it, i am decided to sew above it with this one, not right under it. I'M gon na sew right above it, so i get it on. I don't like that. You already can't see the placement um, i should have had it leaning above, but i'm gon na move my hand, so i attach it back stitch. Stop you only backstitching on the band area and now so you do not want to stretch the cap. By that i mean, if you see your line, move you're stretching the cap and another thing that helps when you get your thumb underneath you feel it. It should be flat on both sides of the line. Just smooth smooth it out do not over stretch it and place it. You should be able to control that track and count with one hand. Let the needle stop open it up. So you can see where you're going. This is your focus area. It'S the only place. We'Re worried about being wrinkle free smooth. You literally can sew like that. No tension, i mean no pull on the cap, but use both hands and you're just gliding it through. Let your needle stop before you move, stop and go. Is fine still make a wig in less than 20 minutes? Stop it when you get to the end of the track back stitch and then cut, because the purpose of backstitching is to seal the end of this track, prevent it from shedding just so, as you can see, and in the facetime class, like you get a better Um view, because i'm set up prepared for facetime zooming in right here and, as you can see, it's just going to be flat and smooth. If you just follow those steps, do not stretch the cap all of your guideline when you put it back on it's going to go to where it needs to. So i'm going to do one more and you can see it's not rippling is smooth imma. Try to do one more, i don't with the better. Let me see if i can get a better view for you all. It just seems like it's always so much thread so again, i'm aligning it. You want to make sure it's not hanging off the cap right here and when i get it, i'm gon na put it on there's just something about their view. That'S not getting it for me for you all, okay! So now that i have it on, i get it up underneath the footer, if you're having a problem with this jamming, don't start right at the tip, get it up, underneath the footer put it down and then, when you back stitch, it'll catch the end and your Machine don't need to build a little bit more so anytime. You feel like it's jamming, stop and give it a good yank and then now what i'm gon na do is i'm placing it again, i'm not stretching the cap at all. You can see my hand, movement and you have to follow the guideline. So if a single stitch is so important that you do not put any tension on this, because you will find that it will ripple more when you're doing a single stitch and also like for a single stitch right now, i'm using a 2.5 and a 7.0 i'll. Take that 7.0 down, probably to like a six, because i don't need all of that space to catch a track like i do for the double tracks. So that's another thing: that's going to help with that single stitch and you just keep going i'm at the end. So one time back stitch and then you want to nip it again. Scissors in i mean shears and not they just aren't my expensive one and then you're just cutting off and as you can see, it's going to be good. It'S going to be flat, it's not bumpy and you just keep following that technique. All the way up. Yes, i am uh-huh, i am so it's like a smaller zigzag to just enough to catch the single and you want to get as much um thread off as possible, while you're going for some reason. It'S always more than two three is um. There'S only two coming out the machine, but i don't know why, where all this thread comes from, i'm correct to say you are sitting over the track and not the trap yeah. So when i'm sewing, i'm making sure that my needle you, you give yourself a visual. Your needle needs to hit above the track, so you see it's no spaces, no gaps up here. So as long as your needle hit and above the track is gon na always hit in the same spot below i don't care where it hits it here. Your main focus is seeing your needle hit above the track whenever you're doing it. So when you have it on, you need to see that that needle is going down right above the track all the way around, and you just continue that all the way up and then you're done. And if you don't know when you part it with curly hair. A gimmick brush is going to be your best friend like this soaking wet. You want to mold it to where you have a part, and it's super flat put some nairobi foam on it. Um tie it down and you got your flat good, glueless wig. So i hope that helps if you all have any questions drop it below um. I do a better quality video when i get some time over this again, but in the meantime, i'm about to take the next 10 minutes, not this weird guy really fast. Oh you're very welcome um, so you all have a good day and i'll save this video for you all.


Comments
Monsie babe2: I’ve learned soooo much I’m tempted to try doing my wigs on a sewing machine now. Is it easy to unpick and reuse bundles if it’s not Quite right first time? ❤️
Glenda Starling: I Love your teaching. Thank you!
Diana Miller: Should I use a straight stitch when sewing on the tracks after doubling it?
Gaele L: Please can u do a video on how to better and easy install the elastic band on the closure and frontal? I really appreciate you
TERESITZ LEWIS: Good morning! Do you have online classes? If so when will your next class will be?
Datchme Desir: More videos please
Francisca Anosike: Please can you make a tutorial on how to makeglueless frontal wig using elastic bands
MissTiffany Galore: Girl stop the second random video I pick you posted on a very special day to me thank you for sharing