Making A Frontal Wig On Sewing Machine
- Posted on 15 March, 2019
- Lace Closure
- By Anonymous
⇣⇣⇣⇣⇣
Connect With Me ⇣
Instagram ⇢ @theharelife
Twitter ⇢@TheHareLife
W a t c h M o r e ⇣
- Quick 10 Minute Curls
https://www.youtube.com/watch?v=lsetMA...
- How to: Black to Brown Sugar Hair Color
https://www.youtube.com/watch?v=1vlads...
- Blue Hair Water Color Method
https://www.youtube.com/watch?v=CJ0U-7...
-10 Minute Bob Cut
https://www.youtube.com/watch?v=CJ0U-7...
P r o d u c t s U s e d ⇣
-Canvas Block Head https://go.magik.ly/ml/lhqh/
-Block Head Tripod https://go.magik.ly/ml/lhqp/
-Raw Indonesian Hair (14,16,18 w/ 12" frontal) COMING SOON
-QFit Mesh Dome Wig Cap https://go.magik.ly/ml/lhr2/
-Easy Action Scissors https://go.magik.ly/ml/lhr8/
- Gutterman Polyester Thread https://go.magik.ly/ml/lhre/
-Singer 44S Classic Sewing Machine https://go.magik.ly/ml/lhrb/
-Metallic Marker https://go.magik.ly/ml/lhrh/
BUSINESS INQUIRES ONLY ⇣
FTC | Some Links provided are affiliate links. which mean if you make a purchase through the link I will receive a small commission. Thank you for your support : )
**** I DON'T OWN ANY RIGHTS TO THE MUSIC IN THIS VIDEO****
THANKS FOR WATCHING XOXO-SHAYNE
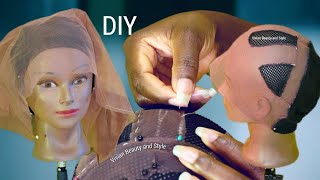
Which, like y'all, welcome back to my channel if you're new to my channel, hey girl, hey, make sure you can subscribe and and turn on the notification bill. And if you are not already made sure you head over to Instagram and Twitter and follow me at the hairline so guys today, I just wanted to walk you guys through the process of doing a frontal wig on a sewing machine. I am NOT a pro at this, yet when I'm definitely perfecting my craft, I'm in a class currently learning how to make sewing machine units and they will be available for purchase really really soon so make sure you are following me on instagram for these updates. So i just want to walk you guys through this process. Look at that hair curl! Do you all see this hair, though guess this make sure like I said you are follow me for the updates, so you want to start off with a wig blockhead. I am using a 21 inch hair that is a circumference of my head and obviously there's other measurements that you need to take, but, like I said, I will walk you guys through that at a later date, I'm just kind of walking you through the process. Not so much the details of everything, so I'm taking the extra space out of my cap now, so I'm going to sew around the area where you see mighty pansy, and this is going to make the cap the exact size as my head all right. So after I take out all that extra space in my cap, I'm gon na go ahead and take a metallic marker. This is the metallic marker by the Walmart brand. So, as you can see, I have my friends'll placed on my cap where it belongs and what I'm going to do is make a guideline. So I'm going to go ahead and outline where my French is at. So I will not be sewing anything in that area. That is, for my frontal time for me to throw that back down. At the end, I'm in my class we are taught to do the lace last I'm gon na try to do lace first, to see if it's a little bit easier. I'M not saying that this was hard, but just to see what techniques work for me better because, like I said I am learning as I go and you know you just want to make everything work for you so so now I'm gon na go ahead and make My guidelines, so you want to start in the back and just go straight across and try not to curve your lines, and you want to go all the way up to the top where your frontal portion is, and my lines are not the greatest guys like. I'M working on getting some crispy lines where they get the job done, so one was done with my guidelines, I'm gon na showing you guys the hair that I'm using today, you guys I'm so excited to be showing you guys this hair. This is raw Indonesian hair, which will also be available for purchase from me really really soon so, like I said girl, you better make sure you gon na, follow me on the ground for these updates, so this hair is so for you guys it is so pretty Aight, i bleached a piece of it bleach to 613 with one bleaching process, which i flashed a picture of you guys. So you can see this hair is bomb like when I say bomb six is bombed, so I am at my sewing machine now and I'm using the singer classic. This is the four 4s. I will leave a link to it down below. So what I'm gon na start to do before anything else is doubling my tracks. I did go ahead and double my 18 and my 16 and I didn't double my 14 at first, just because I didn't know how much womb I was gon na have left. So you just want to line your tracks up and then you're gon na place it up under your presser foot, put your presser foot down and you want to keep your fingers really really close as you. Let your tracks slide through the machine. The benefits of doubling your tracks is gon na make sure that you have a nice full wig and you will definitely be able to fit more hair on there with doubling your tracks. I have also seen people triple and quadruple tracks, I'm not there yet, but I will learn and I will get there. This is what my track looks like after I've doubled it's nice and me I would love doubling my tracks. He'S really therapeutic, like I just look says on my soul machine, so I've already sewn on my first track. So I'm gon na show you guys a few of the tracks and I'm pretty sure I didn't show the whole entire wig, but I'm just gon na show. You guys the process of me doing this so from you first start and end your tracks. You want to make sure that you back stitch a few times, which you guys will see me doing in just a second, so pretty much. What the back session is going to do is reinforce the stitch that you've previously made is going to make your wig extra durable hardest love sewing machine wigs you guys, I will not go back to hand sewing, even though I'm still learning me making the wig on The sewing machine is so much faster than me hand sewing the wig, so I'll, never go back to hand sew on a wig like the sewing machine is the best thing to do when wig, making it so easy and it's much more durable than a hand. Sewn wig hands always can get loose over time a lot quicker than a sewing machine wig. So I'm at the end again, I'm just gon na go ahead and backstitch and reinforce that stitching, make sure everything is nice and secure um and then, when I get to the end of each track, I like to go ahead and just cut off those strings at The beginning of the end of the track just to keep everything neat and clean, I don't want any bunching up or anything, so this is what the tracks are. Looking like so far, it's looking nice and neat so, like I said everything like my stitching and everything isn't perfect, but I'm getting much better. It looks way better than my first way that I do so practice makes perfect and trust me. I will get these perfect. Okay, so I just continue sewing my tracks all the way up once I got smooth top on my 14 inch bundle. I did starts a single, but I actually could have just gone ahead and double the rest of it but, like I said, I'm learning my way around everything, so I could have kept doubling, but this is what the inside of my cap looks like versus, like the Guidelines and everything, so this is the area where I was so handful my front so on a lot of people will go back and reinforce that stitch with the Machine. I did not do that on this one and I did already go ahead and customize in my hairline, so I'm just showing you guys what it looks like now that I've sold my frontal Horn and then you want to cut that space up under and I did Lay my edges down on the baby hair on the front so down with Nairobi foam, I will be doing a updated version of how our customers are friends of the case. These friends who six was bumbling super like y'all, tell me this hair is not poppin. I wish I woulda got no longer frontal, but I can always change it out. This is the finished look of my wig. You guys. I hope this video was helpful. I would definitely be bringing you guys more sewing machine videos and you guys would definitely be seeing more about my hair really really soon so stay tuned, sis stay tuned, make sure you guys subscribe turn on your notification bill and follow me on instagram and twitter at The hair life and i'll see you on my next one: hi


Comments
Nika Carter: i’m glad i found your channel. my first and last time trying the sewing machine method was horrible lol. but now i feel more confident after watching your video. i’m going to try to redo my wig since i never got to wear it
Kat Walk: It's so much cleaner! I feel like the tracks lay flatter with this method. I'll definitely be trying this on my next unit.
Adore Jas: Sis you sound like Beyoncé but this technique is amazing. About to try it rn!!!
Jenniah Thomas: What settings is your sewing machine on
mimi j: Straight lines! Also that frontal on first messed me up imma try it last
Chrissy Onye: Any reason u don’t like to curve the lines?! Great vid
CANDICE WARE: What sewing pattern did you use for this?
Brittini: Oooo you have me about to order some indonesian hair! Can you please share what settings you had your machine on? Thank you!
mimi j: My lines were curved so my unit came out ok but I could only get 2 bundles on there
Tay Rosé: This is so cool
TheHareLife: Hey babes here are the settings of my machine : Tension 4, width 6, needle position 0 with the dot in the middle, length between 2-3 UPDATED FRONTAL TUTORIAL https://youtu.be/-29vDnRCLBg
ArtofNoise: First of all,you sound like Beyoncé
E B.: Ooo back to back like you never left ♀️
Luna Pure Hair: did you adjust your presser foot ( looser or tighter) and which settings do you use including tension. Thanks!
Ms Beauty: What kind of thread are you using.
My life as Djinni: You should change it to heir