How To Make A Wig On A Sewing Machine Fold Over Method (Beginner Friendly Diy.)
- Posted on 13 December, 2016
- Lace Closure
- By Anonymous
In this tutorial I will be talking you through and showing how to make a wig on the sewing machine. I apologise that the video is so long I wanted to make sure that I don't miss out any detail. I also want to make sure that you can actually do this yourself after watching the video. Thank you very much for watching, feel free to share.
what I used:
canvas head from aliexpress
Kinky curly hair from my hair company.
2 - 12 inches, 1- 14inches and 14 inches closure
Non stretch Wig cap from amazon - http://bit.ly/2n3don1wigcap
Please subscribe for more great videos.
follow me on
Instagram - @_blossomandbloom
Snapchat - blossomandbloom
twitter - @blossomnbloom
-~-~~-~~~-~~-~-
Please watch: "grunge therapy make up look"
https://www.youtube.com/watch?v=jHIAjS...
-~-~~-~~~-~~-~-
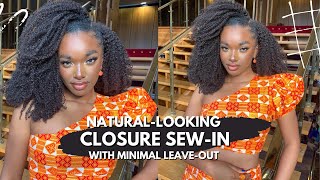
Hello, blossom and bloom here welcome to my channel in this video i'll, be showing you how to make a wig on your sewing machine. So i'm showing you the wig cap that i'm using for this project. This cap doesn't have any stretch to it, except for the elastics on the side, and i prefer this for when i'm sewing on the sewing machine, because when i pull the cap it doesn't stretch, and so i don't end up with um a big wig. Basically, it just controls the size for me now, i'm showing you the closure that i'm going to be using it's a 14 inches kinky closure and i'm going to pin that down all around onto the canvas head onto the wig cap on the canvas head and i'm Going to trace around this closure, so i know where i know the center of the wig. Basically, and also you have to use a really thick mark. You have to make sure you leave a strong mark there, because it can rub off i'm using a chalk, a pencil chalk here and chalk. You can obviously use a pen, and i would recommend a red pen because obviously you'll be able to see that very well. When you're sewing, so you won't miss where your center is basically i'm just going to draw around that okay, so we got there in the end. So that's off and the weak cap is coming off and you can see that mark on there, it's very strong, so it won't be moving or dusting off, whilst i'm sewing now we're moving on to the sewing bits. The part that you've been waiting for this is really straightforward. All you have to do is just lay the air. The weft onto the cap put your needle down and start sewing. Basically yeah it's really straight forward and then you have to make sure you backstitch the beginning of your sewing, so you sew it forward and then you go back on the same sewing. You can do that a few times. I just do it once, but you can do it a few times if you well, you can do it twice if you want, and you just keep sewing that all the way to the end. Now, when you get to the hand, you have to make sure you leave your needle your sewing needle in the hair that will allow you to turn without having to move your hair away. So you can turn that around and then, when you turn the weft, you have to raise the needle back up to allow you to reach that air and press it down, because you need it to be flat. Obviously, if you are planning to cut the hair, you would cut it, but i don't cut it. I just press it down and then keep sewing. I feel that when it's not when it's folded, it lasts longer because there's reduced shedding well, you can cut it. If you feel that that will make it easier for you and you just keep sewing that back to the other side again put your needle down turn your hair turn your wig should i say, and then turn the hair raise the needle up and press the wefts Down put the foot back on it and that should hold it in place. You can turn the knob on the side for the first for the beginning, because sometimes it can be too bulky to just sew straight on, so you can use that knob on the side to help you yeah. You can see me turning that knob to push the needle in so that i can turn the hair the weed around to the other side and now bring that needle back up. So allow me to reach down to the end and press the hair down. Okay and try to keep the cap straight as well when you're sewing, because it's not um a straight cap, it's obviously around, so it does fold when you need it to be straight so that there's no plates in there. If you start getting any plates in there. The wig is going to be small and you don't want that. So keep that straight. Keep your hair, nice and neat try not to drop it. I'M just moving it a bit faster for you, because i don't want this video to be too long, and you can see me using that knob to get the end of that hair like right at the edge. You can see how nice and neat the back of that wig is it's very smooth and it's really quick as well to sew your wig on the machine. I think this whole project took me an hour and a half, so it's really cute, i'm just going to turn the music up for you, so that you can stop here in my voice and i'm going to screw this up me. Okay, now i'm showing you um! Sorry i was spinning the wig cap today for the wig and i don't think that footage is on there. I was just showing you what i did just then i pinned it all the way around onto the line that i drew earlier earlier and then i'm going to just sew it right on that line, i'm going to try to sew it on the hedge, so i Won'T trap too much of the hair in the stitches you to actually make sure that you're, removing your needle. Sorry, your pain that you used to put the closure onto the head onto the cap, because you really don't want to eat your needle with those pains. If you do it's not going to be a great thing that will happen, it's going to be very dangerous. Just make sure you remove the paintings whilst you're sewing don't sew on top and i'm using a very big pin here. Normally, if i was sewing floating this might be, i use a big one so that i won't be tempted to try to sew over it. Please don't sew over the paint, so we got a visitor somebody wanted to play on. The ipad is okay, so that's done. That'S finished now, i'm going to fill in the space in the middle, so the space between the closure and the rest of the hair. I'M just going to finish that by filling it in with the rest of the bundles um, and that's it really for those for this week. I think i'm just going to fill that up and i'm going to try to keep that those lines together to fit to really fill up the middle part uh. So now i'm showing you what the wig looks like it looks really good and i am wearing a different outfit, because this is actually the next day. I couldn't finish it the first day, because i had things to do with the kids and everything. So this is the next day i'm going to try it um, because it's not my week, i'm wearing a cap even if it's my wig i'll, be wearing a car. So i'm going to just put that on my head. If it's not yours, if it's for a customer, try it on a block. This is my sister's week. She doesn't mind so i'm trying it on my head and you can move it to any side. You want i'm really loving this week, i'm tempted to keep it, but i can't because she'll kill me so try on both side check the back and i've decided to add more to the middle, because i feel it's a bit fuller on the sides than it is In the middle - and that is generally what happens really so you do need to go back and fill it in. I will be adding in total about four double so i'll, be doubling it in the middle and i'll be adding four tracks. I'M only going to show you one what i'll be doing for open up the space that you want to fill in and then just fill it in, because i'm doubling the tracks. I will be using a zigzag stitch and that's why i recorded this, because i wanted to show you what i would do if i need to double the track and how to do a zigzag stitch. It'S very easy. It'S very straightforward! I'M just showing you so that you know so you just put your track there as usual. I zoomed it in so you can see with the foot down and this one needs a lot more control because it's zigzag, so you need to really hold the hair down and separate the space very well. What i will say is that, because it's really hard to sew a double weft on the sewing machine, you can actually put this wig onto the mannequin clip the separate the parts that you want to sew and just sew it by hand. I feel that you will probably get it done, a lot quicker doing it by hand. Then you would doing it on the sewing machine for this padding on adding on, because you have. You have to control the air that you've already sewn it's a bit of a pain because it's already full and obviously this one is a curly hair. So yeah it's. It was a bit of a struggle. But if you don't mind, if you really want it to be all done on the sewing machine, then obviously go for it, but most likely i would probably just sew it on the mannequin head. You need to control it too much then, but here you are sewing. It under zigzag and back stitching that that trap is done, so i did not take that all the way. So i started. I just did that in the middle section i didn't take it from side to side and i'm just going to tidy up my wok cut off any thread. That'S hanging off inside the wig cap and take out that excess nets that we don't need anymore. Try to be careful, you don't want to make any mistakes at this point. You want to make sure that you don't ruin your hard work and you just take all that off and you are done. You could obviously sew on um elastic bands. I sometimes don't bother, but my sister's got very small head, so i'm going to sew elastic band, but i'm not showing you the elastic band. Therefore, there's so many videos on youtube. You can see how to say last event and if you wanted to, i will show you on a different video next time. So if you really like this video, because this is it for this video, please thumb thumbs up and subscribe. This is my first ever video and i'm proud. If you have any advice, any comments leave them down below any questions. Let me know, and i will try to get to you as soon as i can. Thank you very much for watching the video and goodbye


Comments
EvrythingNicole: Very informative video !! How do you go about to measure and customize measures for clients when using a sewing machine ??
Titilayo Adefamoye: love love love it thanks for sharing
THEBEAUTIFULADDICXTION: very informative....new subbie
Mrs. Aisha Johnson: What kind of thread did you use? and needle?
Danni Nicole: Do you see onto the band of the cap?
Toyo: Hi, very informative post. I realised after sewing with a sewing machine, the wig became flat and small., can't even fit the head. Pls can you tell where you got that big cap from also how come your wig never shrinked?
IamHair ByCassius: What kind of stitch did you use?
MzExquisite: Can the wig be made with the sewing machine using a spandex dome cap?
Vikki O: lovely, I enjoyed watching it. what hair did you use please?
Tasha Burns: Hello, what stitch and what kind of thread you used, thank you.
ima bemedou: Girl you need to tag this Fold Over Mthd!
Patricia Thomas: +Blossom and bloom do you have to use that type of wig cap?
MsSpencer38: Hi can this be done on a dome cap ?
daimary cristina:
KylieJoyTerundu: My wig caps keep folding
Lorde Jaacki: Music too loud
NTL Collections: Where are u located
Wynter Whitee: The music