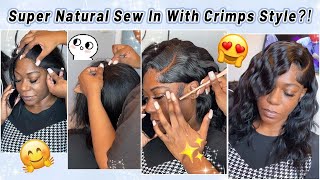
Side Part Closure Quick Weave |Full Tutorial|
- Posted on 23 September, 2022
- Lace Closure
- By Anonymous
In todays video I will be showing you how I do a closure quickweave.
If you would like to see a more in-depth tutorial on any of the topics I touched in this video please comment down below so I know what y’all want next
Hey guys welcome back to my channel, it's your girl salicia. If you are new here, make sure you like comment and subscribe. Today'S video, I'm showing you a tutorial from start to finish, very educational. I hope you guys really enjoy it. If you would like to see this, full-on transformation stay tuned, so let's jump right into this. Of course, the proper way to start off any install is with a shampoo service um. Here I'm going to show you guys how I do my shampoo Services. I always start off with the co-wash, so what I did was I drenched my clients here in water applied the conditioner of choice and I detangled throughout my clients, hair. I do this to each and every one of my clients, a number one key that I did not record is ensuring that you detangle the hair before you even put water on it um and then after you do that step, you can bring your client to the Bowl and saturate the hair water into the co-wash. Instead, This step is not required. It is a step that I have found very useful for myself and my clients. I do have a lot of natural clients, and this step does make it very easy for me to manipulate my clients, hair detangle and makes the shampoo and processing process easier, because once you apply shampoo to the hair, it can dry the hair strip, the hair, and You don't want to create Tangles on top of Tangles if you didn't detangle. First, don't let that go over your head, so I do shampoo two or three times. This is my first shampoo. The first shampoo never sets up as much as a second or third shampoo um with the first shampoo, I'm pretty much making sure that I'm getting to the scalp, focusing with my scalp brush, making sure that I'm getting the shampoo scratching off any scalp debris. This is kind of like a scalp detox um and I'm just gon na repeat this step over my client's entire head. I'M going to rinse that shampoo out and then begin with my second shampoo, which you will begin to see that it sets up a lot more because the first shampoo is really reducing Oil, Scalp residue and also the conditioner that I just applied. On top of my clients, hair and then mind you whatever other products she had in her hair. So this is my second shampoo, which is really my first shampoo and, as you can see, the suds is really there and, like I said, that's pretty much, because all the previous products is pretty much removed and now we're really getting to the cleansing process. So I am going to pretty much wash my clients hair. I'M still going to take my scalp brush and focus on her scalp as well, because we want to make sure that we are stimulating blood to that scalp, which promotes hair growth and also getting rid of all of that. Scalp debris build up all of that. So this way her hair can continue to grow because we need a healthy scalp in order to produce healthy hair growth. So that's what I'm doing here. I just want to give you guys a full on detailed hair washing tutorial, because I feel like a lot of the girls, don't know how to wash their hair, and I feel, like I talk about this. All the time make sure you're cleansing that scalp the hair will run down um the hair. The shampoo will run down the shaft of the hair, of course, make sure you're washing all of your hair, but focus on that scalp. Make sure that you are removing any buildup make sure that you are massaging your scalp um. You know just all the Necessities make sure you're detangling make sure that you are using conditioner, that is moisturizing and make sure you're being gentle with your hair, always starting from the ends to the roots very important. So here I'm just going to rinse that water out and then I am going to follow up with a final and third shampoo and then once I'm done with that, what I'm going to do is I'm going to condition um. I did not record the conditioning process. Um but yes, I'm going to just tell you the steps in which I take I'm going to shampoo for the third and final time, once I'm done shampooing I will apply a conditioner detangle, the conditioner, and then I will rinse it out with cold water. Now, once all of that is done, I'm going to take my client to my chair and I'm going to begin the blow drying process depending on the texture, the fullness, the thickness of my clients, hair. I may put it in four to six sections with this client. Her hair texture is not as thick and the curls is not as um. What'S the word I want to use, the curls are not that tight, so I'm just going to do four sections, really three sections, I section off the whole back and then I did two sections in the front and once I'm done completely blow drying her hair again, Because we are doing a quick weave, the braids, don't really matter. Of course you want to make sure that you do have a flat top. You do want to make sure there is no bulkiness, so you just want to braid according to your client's thickness and the type of part that she wants and yeah and for a flatness. So those are the three tips I give you flatness braid for your clients thickness and braid for the desired part and that'll. Pretty much give you an idea on how many braids to do there's really no right or wrong answer and remember that, just because it's a quick weave does not mean it's going to be done quickly. Okay, so because we're doing a closure deep part meltdown, I'm going to secure the sides of where I'm going to put the lace at and I use Gorilla Snot, I'm going to use it. I'M using two caps - and I do cut one cap around her ear to make sure that it's perfect I'm here, I'm using mold and I'm going to put the mold on top of the cap um. I did spray it with a hairspray and set her under the dryer once that's all done, I'm going to start applying the tracks, there's really no right or wrong way to apply tracks um. The only thing I do tell you is with doing a bonding, quick, weave, Etc. Do not skip that step of using a motor, because that's very important to make sure that the glue does not stick to your client's hair, a bonus tip. If you have 99 alcohol, it will get anything out of your hair, any type of adhesive. So if you did get bondering your hair or any type of glue, lace, glue, tape or whatever, if you use 99 alcohol, it will take it out and not damage your hair. So here I am placing my tracks and I want to do more fullness in her front, so I'm gon na place the tracks in a particular way. So this way their hair could fall in the front of her face and we are doing a bob. So a straight bob! So when I do Straight Bobs I like to blow dry as I go um and then I did mention that we are doing a meltdown so with the cap in the front, I'm gon na match her skin tone with some makeup and I'm going to cut the Excess cap off here, I'm just plucking the closure piece that I'm using and I actually am using an old closure piece um that I found and we're just making use of it, because why not so I normally do three to four coats of glue apply. My lace directly on press it in with my comb and then what I do is I cut off any excess. Sometimes I will go in and re-glue down any pieces. I didn't glue down, but I want to literally mimic her hairline, so whatever I didn't catch is just not meant to be um. So here I am cutting around her ear, making sure it's very comfortable making sure it lays perfectly, and it looks natural and I'm going to glue that little tab down onto my cap, Never onto my client's, hair, um yeah and then I'm starting to part out where I want her part at as well as section off where I want her baby hairs and how I want them to lay now like. I said this is a older lace piece. So from Over the time of previous wear and consecutive wear, the lace starts to shrink. So pay attention to the depth of her part we're going to extend that. Okay, I'm going to show you how, in this video um here, I'm going to secure her baby hair placement and then I'm going to secure and melt down her lace with our lace band. After I place the baby hairs, I spray it with some hairspray and then I tie it down this. I like to tie down tight and get straight to it. I'M also going to darken her apart, because the knots are a little bit over bleached um, but I'm still going to make sure that the knots in the roots are very natural, because that's important now with the quick weave. I know some girls sewed the back of their um closure or lace piece or whatever down. I just don't see how that works. If you put a motor on the back, I mean if they do, that, I'm thinking that they don't mold it. I don't know my business imma, do what works for me and I just glued my back down if you're getting a bonding, uh, quick, weave, you're, not reusing his hair period, so glue the back of that um lace piece down. So this way, when it's time to remove it, you could literally just wash it out and not have to worry about trying to cut uh where the closure or the frontal was sewn down it. Just it sounds like a mess um, so yeah. Once my lace piece is on I'm going to apply the rest of my tracks in a u-shape and I'm going to blow dry to make sure that it is dry at the track and then I'm going to blow dry the ends of the hair. To make it easier for me, when I go in to straighten the hair before I get ready to cut my Bob, so here I'm going to show you how I extended the part to our closures. Remember I told you to pay attention, so I found another little piece of lace and I'm going to extend the part, because I want it to be a deep part. So I glue the part where it was um separated or where I attached it. I glued it down with just regular lace, glue blow dry to make sure make sure it was dry, and then I just used my black spray to close up the part and use my concealer to define the part very simple. If you would like for me to go in depth, comment down below and I'll make a video on it and go more in depth um! If you want to see it again, just rewind this video, so here I'm going to work on melting, the lace even further. After I have taken the band off, I literally just use a little bit more of the makeup that matches my client's skin tone and I use the back of my not the back. I use my um makeup brush and I blend it in once. That'S done, I move on to the next step, which is finalizing the install, which is pretty much cutting styling curling straightening whatever, and I always leave the baby hairs for last, I'm going to give you a heads up now my phone died and I did not record The process of laying the baby hairs but again, if you would like to see a video on how to lay your baby hairs or how I lay my baby hairs, how to lay baby hairs at home, whatever baby here one-on-one. Let me know I will make a video now here I am like I said, cutting my Bob. Normally, I love to use clippers, but here I just wanted to do a very natural edgy look, so I just did it by hand um. It does take more time to do it. This way, if you're going to be very precise, but then this is what we came out with and I think it looks beautiful and I hope you enjoy it make sure you like comment and subscribe, and let me know in the comment section below how you enjoyed This tutorial, thank you.

Comments
Tanzania Simone: Beautiful
Delilah Rose: Hey gorgeous hope all is well ♥️ I’ve been looking for you instagram page to message you about customizing my business account. Do you still do customizations?
Kyla Nesbitt: Beautiful Outcome, if you don't mind I would that Baby hair 101 video and also can you attach the mold products please?