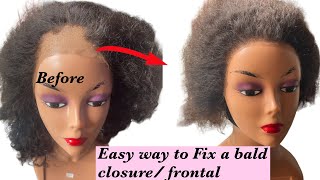
Very Detailed | How To Make Lace Closure Wig| Step By Step
- Posted on 26 November, 2022
- Lace Closure
- By Anonymous
Hey loves ❤️
In today’s video I’ll be sharing with y’all a detailed tutorial on how to make a lace closure wig.I hope you find the video helpful.
Please do subscribe, like, comment and share .
Items mentioned:
1. Pins
2. Wig cap
3. Wig head and stand
4. Hair mousse
5. Bundles and closure: https://a.aliexpress.com/_mt1nbWU
____________________________________
CONNECT WITH ME :
Instagram: https://cutt.ly/WZdtQQ7
Twitter: https://cutt.ly/sZdtxsS
__________________________________
VIDEOS YOU MIGHT LIKE:
——————————————————————
MUSIC USED
Music: Mornings
Musician: Jeff Kaale
Music: Wander
Musician: @iksonmusic
Music: Make A Switch
Musician: jo'el
Music: Blue window
Musician: Jeff Kaale
Music: Mystic
Musician: Jeff Kaale
Music: Pixels
Musician: Jeff Kaale
#bridalhairstyle #closurewigs #lacefrontwig #laceclosurewigs #lacefrontwigs #laceinstalls #lacefrontal #lacewig #wigtutorial #wigreview #wigs
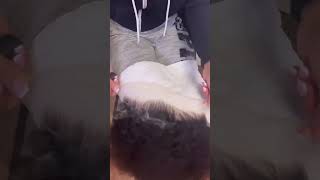
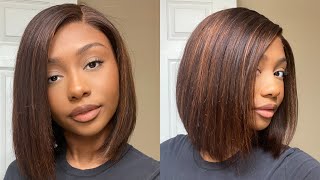
Pardon me: hey, loves, welcome back to my channel, it's your girl sciro in today's video. I'M going to be showing you loves how to create a closure wig. This video is very beginner friendly. So I got this bundles from AliExpress. I'M going to put the name in the description box below and I also got a closure now the bundles were 20 and the closure was 12.. The closure was my bad. I should have gotten a longer closure, so if you want to get a longer closure, get a 16 inch closure. So I also made use of my drawing pins and also a recap this wig cap - it doesn't have to be a recap with closure at all. You can use a plain wig cap. It doesn't matter because you're going to cut it off, so what I did there was that I divided the closure part of the recap into two so that I could get the middle so that when I'm placing my closure, I won't place it somewhere else. The closure will be in the middle of the recap so right now, I'm just trying to place my closure, as you can see, ensure to make the closure flat when you're trying to pin it down. That is actually very, very necessary so that you don't get your hair bumping out when you're done, making the wig so just drag it and ensure that it's looking flat, if it's not looking flat, still drag it till it gives you that um that look! If you get what I'm saying now, it's time to sew, I've put my thread in my needle and I'm just going to start sewing, so I'm going to bring it up close, so you guys can see how I sew the closure. So when I take it in, I try to knot it, so I do not um let all the thread pass through. I leave a small amount and then I go through that small amount and repeat the process. You can see what I'm doing is very, very clear. Hold on foreign, so after you're done, you just want to cut the thread, and then you want to knot the thread, so I just tie the thread and securely really well. So this is how it was looking. I just placed some pins in front to just hold it. While I do the back, it's not really necessary, but it helps it really helps. Thank you. So when you get to the back, you want to make use of your tape, and you want to measure your wig cap inches apart, like that really helps. It makes the hair look really neat. It makes your wig look really neat. So that's what I'm just doing as you can see, and I'm going to repeat the process at the other side before I start sewing in the bundles foreign. You want to make sure you double the bundle that you'll be sewing to your hair. It just gives that really full look without having to sew in so many parts. If you get what I'm saying so for beginners, this is really helpful. That'S why you should get this drawing pins or you should get weak pins that works also, but right now. What I'm just doing is that I'm just I'm following the line and I'm using my pins to just secure it. So it's be easy for me to sew, and then I then cut it. This was not necessary. The cutting it was not necessary. The remaining parts I didn't cut it. I just um linked each one of them together, which I'll show you guys. Also. Thank you. Thank you, foreign foreign foreign foreign, so this is the part where you get to go to the next line without having to cut your bundle. I don't really know how to explain this part really well, but I will try so right now. What I'm just doing is that I'm sewing in the hair and then I started um placing my needle on the next line and sewing the bundle on the next line. So it started going slanty at some point. Then it curved before I then flipped it. I feel like the video, really helps. If you are quite confused, you can zoom it in even more to understand. So after I knew that okay, I could flip it without it affecting the previous line. I just sewed in. I then flipped it, and then I knotted that part really really well, when I use the PIN to just hold the other part. While I secured the curved parts foreign foreign. Thank you. So what you're going to do right now is that you're going to make sure that the last bundle you're going to sew in is really close to the lace closure. Thank you hold on. Thank you. Thank you. Thank you, foreign. So now what you want to do is that you want to cut off these closure parts that we won't be using. Now you want to cut it close to the closure which you sewed in, but not too close, so that you don't cut off the thread. So I'm just showing you guys what I'm doing it's not too close, but it's a little bit closed. As you can see, foreign is very optional. I just wanted more of the coils, so I made use of a detangler to just open up some of the quills, but this is very much optional. I also try to hide the closure length of the hair in between the bundles, because I didn't like the way they were just standing like they looked so different from the um from the bundles that I got, but nonetheless, this hair was actually really fine. I also made use of a hair meals to just help me keep them in place and also help me Define the curls, but this wasn't really necessary because when I used water it came out really really well also water and and leave-in conditioner. When I use those two, it came out really really well also, but I still try to just hide some of them in between the longer um hair lens. That'S just it. I also used a hot comb to just make it look sleek and really really good. So that's just basically it for this video loves, I'm going to show you guys how it looks when it's wet and when it's dry and then you can tell me which one you prefer in the comment section below. I hope you found this video helpful. If you did, please do like comment and also share, please don't also forget to give me a thumbs up. It really does help this Channel and if you haven't, subscribed and you've gotten to the end of this video, please do well to subscribe I'll see. You loves in my next video bye, loves

Comments
Julia Doyle: