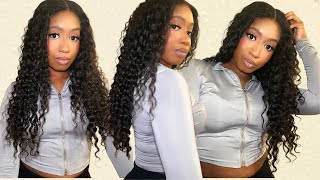
How To: Install A Kinky Straight Frontal Wig || Beginner Friendly || Ft. Hurela Hair
- Posted on 08 March, 2023
- Lace Closure
- By Anonymous
!!
In this videoI will be showing you how I installed and styled this kinky straight wig that I received from Hurela hair company. I hope you enjoy this tutorial, please don't forget to like this video, comment down below and let me know any other styles you'd like to see me achieve.
Don't forget to - Like - Comment - Subscribe and submit your video requests!
►https://st.hurela.com/fqg16 Tax refund season Sale--Up to 55% OFF
★ $30 off YouTube Special Code: YT30
●▬▬▬▬❤ #HurelaHair - Make Every Girl Afford Beautiful Hair ❤ ▬▬▬▬●
Direct Wig Link in the video: https://st.hurela.com/fqg18
Hair info : 13*4 lace front-kinky edge 150% density kinky straight 24 inches
https://www.hurela.com/ Top Selling Series: https://st.hurela.com/fqg1a
WYSIWYG! & NO REASON RETURN ONLY FOR YouTube ORDERS & 3-4days worldwide shipping
Hot color #33B series wig: https://st.hurela.com/fqg1b
Top Selling Curly Lace Frontal Wig: https://st.hurela.com/fqg1d
❤Hot Sale V-part Wigs: https://st.hurela.com/fqg1e
❤Most Invisible HD Lace wigs: https://st.hurela.com/fqg1f
☛2023 New arrival Wigs: https://st.hurela.com/fqg1g
☛Can't Miss Trendy Colored wigs: https://st.hurela.com/fqg1i
☛Affordable bundles with closure& frontal: https://st.hurela.com/fqg1j
✿Be Bold, Get $100!: https://st.hurela.com/fqg1k
#HurelaHair #HurelaWig #installwig
★ Follow #Hurela Hair Social ★
Instagram@hurela_hair: https://bit.ly/2DWtBZa
Youtube@Hurela Hair: https://bit.ly/2DVAmue
Facebook@Hurela Hair: https://bit.ly/3hq1zCX
Twitter@Hurela Hair: https://bit.ly/3kfLgdT
TikTok@Hurela Hair: https://bit.ly/31ZeRB3
✔Wholesale Provided: [email protected]/ +1 (562)415-8634
Looking for a hairstylist? Book with me online!
Amazon Store:
https://www.amazon.com/shop/nae.simone...
For sponsorships and business inquires email us at:
Email: [email protected]
FOLLOW ME:
INSTAGRAM:
Nae.Simone ( https://www.instagram.com/nae.simone/ )
Pariishair (https://www.instagram.com/pariishair/)
SNAPCHAT: Nae.Simone
Don't forget to hit that notification bell so you'll be the first to know when I upload
00:00 Introduction
00:37 Unboxing
02:11 Wig Install
10:25 Styling
Hey Honeys welcome back to my channel. If you are new here, my name is Shanae and in today's video I'm going to be showing you how I installed this kinky straight wig and styled it. So if you're interested continue watching now, so I'd like to send a shout out to herilla Hair Company for sending over this the wig and I'm going to quickly unbox and show you guys what I received so in this package, I got a silk bag that you Can store the wig in then I got a bag with goodies, so I received a melt band, a wig cap, some eyelashes, a headband and, of course, the wig itself. So this was a kinky straight wig. Like I mentioned, it was 24 inches long and it was a 13x4 frontal wig, so I'm just showing you guys the wig and how it looks in its natural state. I did go ahead and bleach the knots and pluck it a bit off camera. So I'm just showing you guys how it looks before I install it, and this is the hairline it does have that kinky hairline texture - and this was also transparent, lace, guys. So I'm going to show you guys the inside. It has two combs at the side. One comb at the back, you also have the adjustable band and there was also an adjustable band inside in case you wanted to wear glueless. So this is how it's looking and I'm going to get straight into this install. So, like always, you want to have your hair braided straight back into some flat braids. I always braid my hair into six braids. So here is the wig: I'm going to go ahead and cut off the extra lace at the back, because we don't need it and then I'm going to apply my concealer into the inside portion of the wig onto the lace and once that's done, I'm going to Spray, my hairline with got to be free spray and just brush back any hairs that might be in my way, foreign I'm going to go ahead and put on the wig. So I did not put on a wig cap for this install as you can see. So once the the wig is on my head, I'm going to make sure that it is fitting properly, because this is a frontal wig. So you want to make sure it's fitting ear to air and I'm going to cut off any extra lace. That is around my ear, just so that I can see it is fitting right before I go ahead and actually install this wig. So once I've cut off the extra lace and it's fitting how I want it, I'm going in with my ebb and adhesive spray and I'm just spraying right in front of my hairline and I'm dabbing it on to my skin, with my fingers. As you can see, and then I'm gon na go ahead and bring the frontal portion back and lay on top of where I sprayed, and you just want to Pat it down to let it dry, because that's basically the glue once I've done that I'm going to Go ahead and put on my melt band and allow it to dry, so I did use my blow dryer a bit and then I left it for a while. So while I wait for the front portion to dry, I'm going to go ahead and flat iron, my wig, so I'm just using this glass spray from argan oil and I'm going to spray all over my wig and start to flat iron. My hair and I'm flattening this wig row by row again girlfriend, isn't you had enough? I'M too busy loving my friends that I don't wan na. Be your girlfriend a girlfriend all you really need to understand that. I'M not your girlfriend. I know yeah yeah yeah and I never wan na be your girl, friends laughs once I finished straightening this here, I'm going to remove my melt band and then I'm going to comb out the edges a bit because they do get stiff once it is on the Adhesive then, I'm gon na go ahead and cut off the extra lace. So I just make a slit with my scissors in the middle and then I use my Razor and I'm just going to razor off the extra lace around my hairline foreign foreign. So once I've removed the lace, I just parted my hair into a middle part, and I'm going in with my pierced hair, wax stick in my hot comb and I'm just going to hot comb, my hair, because I am getting ready to style it foreign. So I decided I wanted these two small ponytails at the front of my hair. So all you see me doing is just making a part at the side and it's kind of close to like if you measure the arch of your eyebrow, the part is basically over there and then I'm using a black elastic band and I'm going to put it Into a ponytail, so the same thing I did on this side is the same thing. I am going to do on the opposite side, foreign with my olive oil mousse, and I'm just going to be playing around with my baby hairs. This is all up to you. I didn't pluck any of my baby hairs out and I found that it was a bit thick. So if you would like, I do suggest that you could pluck out some of the baby hairs to make it easier to maneuver, but I just styled the baby hairs. How I felt I like them, so I basically used my mousse and then I tied it down and blow dried it. So you'll see me playing around with them and I played around with them until I liked how it looked foreign foreign, I'm just gon na comb. The hair down make sure it's laying how I want it to lay these baby hairs were a bit tedious, but I mean you're going for a natural look, so you don't want it to look perfect so now that I've finished I'm going in with my gloss spray And also my olive oil, hair spray, and I spray these products once I finished so guys. This is how it's looking yes, love the natural hair, loving the natural hair, so shout out to harilla Hair Company once again for sending over this unit. All the details will be down in my description box below so don't forget to check them out. They also have other wigs in case you guys are not interested in natural wigs. So I hope you guys enjoyed this video, don't forget to like comment and subscribe and I'll see you guys in my next video thanks for watching. Thank you.


Comments
Elzeather Miller-Wedderburn: You are an exceptional hairstylist. Look fabulous
Dee Luther: Road To 100k Super KutE thumbNail Tho U DiD a Wonderful Job Beyond Pretty You Are Ur Makeup Always On Point Enjoy your night as well Happy Fabulous Weekend Ahead Stay Bless N Be Safe Always