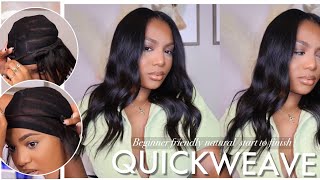
Side Part Closure Quick Weave Wig Ft. Affordable Amazon Bundles
- Posted on 26 July, 2021
- Lace Closure
- By Anonymous
HEY BABES
In this video I will be doing a closure quick weave wig tutorial and lace closure quick weave installation on my natural hair using Affordable Human Hair Bundles From Amazon ! This hair grade reminded me of 7A hair, which is similar to a wig grade "Remy Pack Hair" texture. The name of the hair company is Beaudiva Hair On Amazon and I paid 159.99. There were a few small/short pieces, and I definitely recommend getting 4 bundles if you get any over 20 Inches. However, these bundles gave me a natural full look. It does shed a lot, but didn't tangle too bad at all. I feel this hair could last up to 3 months with proper care, before you will need to buy more bundles.
BUSINESS INQUIRIES ONLY - PLEASE DO NOT INQUIRE ON FREE PROMO.
EMAIL: brittanylashellinfo@gmail(.)com
Link To Hair:
Beauhair 7A Brazilian Straight Hair 3 Bundles with Lace Closure(24 24 24+20 Free Part Closure) Virgin Human Hair Weave 100% Unprocessed Human Natural Black Remy Hair Extensions
Height: 5’5
: IPHONE 11 PRO
Editing Software: IMOVIE
Music by Liles Music - Night Life - https://thmatc.co/?l=20FA12FC
Music by Raphael The Don - Want To - https://thmatc.co/?l=3C6A82C6
Music by frumhere - your ex's ex - https://thmatc.co/?l=EDC77D4E
Thanks For Watching
❤️❤️❤️❤️❤️S U B S C R I B E ❤️❤️❤️❤️❤️
New Videos Every Week !
**LINKS PROVIDED ARE AFFILIATE LINKS TO SHOW YOU WHAT THE PRODUCT IS AND WHAT IT LOOKS LIKE. YOU CAN PURCHASE DIRECTLY THERE IF YOU CHOOSE, I WILL RECEIVE A PORTION OF THE SELL IF YOU CHOOSE MY DIRECT LINK LISTED.
*ALL PRODUCTS WERE PURCHASED WITH MY OWN MONEY AT MY LOCAL STORES
If you wonder, if you want to go what's up and welcome back to the channel, so diving right into this video, i am doing a quick weave closure wig unit, and i'm going to also be installing this on myself as we're using some hair that i got From amazon so stay tuned for details about that, but if you are returning welcome back and as you all know, i like to spray my wig heads down with some hairspray and then let it dry with my blow dryer. The reason i do this is because i'm going to be using glue for this wig construction, hint, the quick weave method and the hairspray allows the hair to stick better to the cap. This is the hair that i received from amazon. I purchased this with my own coin and i will leave all the information to this hair down below y'all. This is a beautiful hair. I still have this wig on my head right now. It'S been about a week. This hair had very minimal shedding. The wefts were well constructed, the closure was beautiful and the bundles were full from weft all the way down to the end of the hair. Very minimum tangling - and i got three bundles of i believe, 24 inch and a 20 inch closure. The closure is not hd. I did go in and bleach the knots off camera and i did a lot of customization and plucking off camera as well again, more information about the hair will be in the description box below so right. Now you just see me going in to apply my closure. I will be sewing my closure down, because i want to keep this closure for a while. It'S pretty nice closure, while laying down your closure. You want to make sure this part is crucial. You want to make sure that you are laying the closure as flat as possible onto your mannequin head onto your dome cap. If it is not flat, when you do it, when you go to sew it down or when you go to glue it down, it will have lumps and bumps under the closure, and you do not want that, because our wigs need to be on flat flat, like We don't want him in here. It'S 20 21. No helmet hair, says okay, okay, so now that we have that closure laid down, i have it. I'M sorry pinned down we're going to go ahead and wrap the hair on the closure around itself and get it out of the way get you some duck clips bobby pins. My hair tie whatever and get it out of the way, because you want the hair out of the way when you go in to lay in your extensions and of course you can see, the closure is definitely laying flat as it needs to be. If you guys want to give me um, i'm sorry if you guys want me to do a detailed video on like laying your closures and frontal down and plucking and and bleaching the knots and things like that. Let me know and i'll get that up for you, but right now you see me going in to sew my closure down and i'm just using a basic hand stitch to secure the closure. When you are sewing your closure, you want to make sure that you don't sew through the elastic band. That'S on the perimeter of your wig cap, because your we're going to have no stretch and you will be mad if your wig is too tight. Now that we have the closure sewed onto our wig cap, we are now ready to go ahead and start laying our extensions down. You see how flat the um closure is, and i haven't even like went in with my hot comb. Yet so definitely make sure you lay your closures flat when you're sewing them down, because that's going to help your wig look as natural as possible closures and frontals back to this hair. Y'All again i got three bundles of i forgot. How many inches, i believe, is like 24 inches from amazon, i'm gon na leave everything in the description box y'all. I leave so much free game in the description box, so make sure you guys read that i know people like to read in 2021. I don't know what it is, but y'all go ahead and read it because i got all the information there for you, but i highly recommend purchasing this hair. If you are interested in getting it, it was affordable. It'S virgin hair. It is not um like raw or unprocessed, it is regular virgin hair, but it's definitely worth it. So we're gon na go ahead and get started with laying down the extensions. We'Re gon na go ahead and measure out the first track that we're going to lay according to our um mannequin head you're, going to measure that out. You want to cut that and then we're going to go ahead and apply some glue. If you are one of my returning babes, hey girl, hey um, you know that you know the process when you're doing a quick weave. If you've watched a couple of my videos cut the track or measure out the track cut, it apply your glue and repeat that process until you get to the top of your wig until your wig is full of all the hair that you want to fit in Your hair um, if you guys want me to do another detail, video on how i lay my extensions and just just about quick weaves and just about laying your tracks down when you're doing one. Let me know and i'll get that up for you, but, as you can see, i am just following the same same process: i'm measuring out the weft from that one side of my nape of the neck to the other and um cutting that and then applying my Glue and laying that extension down, so i'm going to repeat that process until i get to the top of my closure, i am placing my wefts pretty close together because i have a small head and i want to fit all three bundles in my hair. So i can have a full look. If you have a bigger head, i would recommend getting four bundles. If you get any extensions past the length of 20, i highly recommend getting four bundles. If you have a head size that is normal to big, i don't have an average size head. I have a small head, so i would recommend getting four bundles of this hair. If you do get it, if you want a full look, but you can get away with three, because the wefts were very full, so just a little tip. But i'm going to go ahead and let this part play out and if you guys have any questions drop them down below and yeah. I have completed installing the first bundle, as you all can see. I'M almost halfway done and that's just goes to show you how small my head is that one bundle got me almost halfway to finishing my wig. I have two more bundles to put in and i'm just going to go ahead and repeat that same process. This time going from temple to temple, measuring out of the extensions cutting them and then applying my 30 second vine glue. I'M gon na have all the products that i used listed down below as well in the description box and also instructions on how to do it. In the description box so make sure you guys check that out as well, and i'm gon na, like i said, just continue this process until i reach the top of the closure, and here is the completed wig guys. I'Ve got all my bundles in and my closure is laying down. I pulled out some of my baby hairs and this hair looks beautiful. I absolutely love the luster. I didn't even do anything to the hair. I had not flat ironed it or anything at this point and it looks so beautiful, it's full of body full of bounce and it's giving what it's supposed to gave and it's giving what it's supposed to gave the frugal ways. This is what i'm talking about. I can do what it do: okay, anyways now i'm about to go in and pretty much. You know just finesse. This closure, i'm going to be using a mixture of different products, but the main components i'm going to be using is a wax. Stick: um hairspray! I'M going to be using got to be flex, insta-hole hairspray and my hot comb y'all can't my hot comb broke after this video by the way, but anyways i'm going to be using my hot comb to go in and just straighten out. You know each section of hair on the closure. That is your key. That'S a gem! I'M dropping y'alls, one of my gems. You need to take your time and go into your frontal, your closure and hot comb. Every single piece of hair on that on that on that bead, okay, every single piece to get it flat flat. Here i am in all my glory. I just got my hair sleeked to the back with some bobby pins and it's like it literally in a really really small bun um. The way that i make my wigs. You do not have to have your hair and braids underneath um. You can just slick your hair down into a ponytail. It doesn't matter. If you have long hair short hair, you can do it with the way that i make my wigs. So that's what i did super easy and convenient for all my girls out there who really know how to braid or if you don't have time to get your hair braided down. So here is the wig going on. She looks so good. Look at that! Y'All! Look at that baby come on come on kitchen style, kitchen style, where's, this kitchen style where, where not there, you tried it, but no! Yes, i am so happy with the way this wig came out. I'M about to go ahead and put her on. Do my baby hairs and all that stuff? This is how the inside of the wig looks, as you can see very well constructed. No, none of that except the shiny part, the glue, the hairspray. None of that will get on your hair. It'S dry, sis um! So i'm gon na just go in with some makeup and put some makeup with my foundation color onto that lace, especially especially focusing on where the part is because that's the part that's going to be out, so you want that to be able to blend in flawlessly. So i'm going to put this on my hairline of the closure and i'm gon na put this all over all over enclosure. Pretty much all over. The closure um be careful when you're doing this part too, because certain makeup certain foundations, depending on the type if you're using liquid or powder, they can get really cakey and it can ruin your lace melt when you get ready to let your lay wig down. Trust me, i know so be careful with choosing whatever makeup to put on there and definitely don't skip this step, because it just makes your lace look that much more natural um. If you don't have hd lacy now, if you got hd lace, you can kind of skip this step because hd laces hd like can't, see it, but when you don't have hd lights, regular lace. You definitely want to put some makeup on her and i even still put makeup on my hd lace, because we we we don't want scalp and look at that. You see how it just blended right in, and i didn't even i still didn't put enough makeup on there like soon as i put it on my head, it instantly gave scalp like y'all, listen and listen. I got some stuff coming soon in the works. I'M so excited about it, i'm so excited. But yes, i'm working on something really really really really really really special for y'all, so make sure y'all stay tuned. All of my babes here i told y'all i got y'all trust me. I got y'all just stay tuned, but anyways i'm about to just go in and you know make sure the wig is laying how i want it to lay and figure out where i want to set the um wig my hairline down at and, as you can see, Look at that you ain't got to worry about your edges being out. It'S not a frontal, just a closure, but it's very much so giving frontal t's like look at that y'all the size. If the wind blows, you're, not gon na see a track. You'Re not gon. Na know it's a wig at the wind blow. You might think it's an actual, quick weave for a sew-in but i'll. Let y'all be the judge of that. As you can see, i'm turnt up kicking it. I was feeling myself, let's see, that's what my wigs do when you put my wig on your head, any wig that i make on this channel and i want you to put it on your head and feel exactly how i'm feeling y'all. I literally went from 0 to 100 real quick like when i get my hair done. I just i i don't care what mood i am in like when i get my hair done. I just feel like that. Be transformed, like can't tell me nothing. My outfit ain't. Even got to be popping, my hair is laid. That'S all you need to see. Is this crown so yeah i'm going to go ahead and let y'all continue to watch quick dance break y'all music is life. You need music makes me happy anyway, so this is another crucial step that i wanted to jump in and tell y'all make sure you don't skip make sure you cut these tabs that you see here off of the closure when you're doing a closure unit, because leaving That on there is just going to make your closure bulky and again we want our stomachs on flat flat. We want our bank accounts on fat fat and we want our wigs on flat fat all 2021. There'S no reason for people to walk around looking wiggy when you got all of my tutorials up here i mean this pick one and watch now that i have those cut off. We can go ahead to begin to lay this lace, so forehead busting blessing. But you know what i used to be very, very, very insecure about my big forehead back in the day when i was little in middle school and high school, actually, no, not even high school middle school. I was very insecure about my big forehead but baby. I love it now because i can fit all the frontals and closures on this big thing, so it's all good. So right now you just see me: i'm spraying some hairspray around the perimeter stock. I want to make sure all the hairs are out of the way when i go to lay down this lace. Now we're going to go in to clean off our skin, get any excess oils or makeup, because you don't want anything on your hairline when you go to apply your glue and your lace, i'm going to make sure there's a clean surface there, free of any like. I said oils or makeup or anything like that, because they listen y'all trial and error and also i'm going to go in which i'm using 90 90 alcohol to do this, you want to use 91 alcohol. Actually, you want to use a very high percentage alcohol because you want to make sure it's very squeaky clean. Then after i do that i'm going to go in with some witch hazel to kind of also cleanse, but you know kind of calm, my skin back down from that alcohol, because you got to protect your skin, so i recommend doing it using like a toner or Some type of astringent or using some type of skin guard to protect your your skin from the glue because i have broken out before from you know, just the harshness of the glue and the lace and then all that so make sure you guys protect your skin. Okay and yeah guys - and here we are - this - is the late school i'm going to be using. I know y'all have seen it. I know you have heard of it before this is the lace blue by erica j. I absolutely love this glue. This is a black on a brand, so y'all better go check it out in support, and i am telling you here this glue is bomb. It smells amazing, as you can see, it smells like watermelon, like literally like a watermelon, jolly rancher. Actually, no, it reminds me of like the gusher fruit gushers. If you ever had the candy fruit gushers, that's exactly what it smells like and i am gon na apply. I think i did two layers. I only did two layers y'all two layers fourth of july weekend, and my wig is still on my head and today is today is what today it's been a week and my i only did two layers and my lace is still laying down. After being in the heat after being around listen, so i highly recommend this lace glue. It'S very much so beginner friendly um - it's it does not have. This is the holy down. Here we go the homie down adhesive by erica j um. It does not have any. I believe they don't have any latex in it, which is amazing because i believe i'm allergic to latest, because i think the last glue i used to use is ghost vine. I do not recommend using ghostbun anymore. It broke me out, so definitely i recommend this glue. So i apply two layers and then you want to let that glue clear, get clear like that. Let it dry, let it make sure it's clear. Then you want to go in and apply another layer. You can do one. You can do two. You can do three. You can do four, it depends on how long and how secure you want your wig on your head and i'm only doing two like i said because y'all know i don't keep my hair, my hair styles in that long, so i'm gon na be switching it out Soon so i only did two layers and yeah the security i had off. The two layers was amazing and, like i said, the glue works so freaking good, like i highly recommend it, it smells amazing and again this is the black owned company and a little goes a long way check out this glue. I i'm not going to use any other glue, i'm going to try other ones, but right now this is going to be my holy grail. So, yes, all right and after that glue is dry, i'm going to go in and go ahead and lay my lace down. Now, when you're laying your lace y'all, you want to make sure that you get your placement right, make sure you get your placement right. Your baby hair is right, because, if not you can, you can give listen. You haven't seen me, give myself a five head before so make sure you i mean i already got a five here. You wan na see myself give me a six head, but anyways make sure that you find your placement and then i'm just using a comb to press the lace and just really melt it into my skin and just get it in there. You know, and then i'm also going to put a scarf on to hold it down. Yeah there we go, i'm going to put a scarf down and i'm going to let that scarf sit on my head for as long as i can stand, it okay tie it tight. If you ain't got no headache when you get done tying your scarf to lay your lace, you ain't, tired, tight enough sis. You got ta, have a headache at the end. Beauty is pain, trust the process we're gon na finesse it. So i'm gon na tie my tie on and let that sit and then i'm gon na come back and let's see the reveal y'all dun dun dun, dun, dun roll, please, okay! Okay, we ain't got no white residue. It'S down! Yes, look at me! Oh yes, erica j, shout out to you sis! You did your thing with this lace, glue, baby, no residue, it ain't sticky like it's just giving what it's supposed to give so. Yes, i'm super excited about that. Now we're going to go in to cut off the excess lace and when you do this part, you want to be very, very, very, very, very careful, especially if your wig unit already has pre-custom made baby hairs, because you don't want to cut too much off you. Don'T want to cut too much of your baby hairs off, even though you can fix that, but if you're a beginner, you want to be careful, but you also want to make sure you get super super super super close to the hairline, but be careful not to Cut yourself, i've cut myself before beauty's pain, y'all got ta, do what you got ta do, but you wan na make sure you're cutting this lace off as close as possible to the hairline, your hairline and the wig, but make sure you don't cut your baby hairs Off too, it's a trick to a job. If you want a dedicated video, let me know i got you but make sure i recommend using a razor when you're doing so, to give it more natural cut and voila magic. I did my baby hairs off camera right now. You see me going in to apply a little bit more foundation onto my part into my closure, because i want this to look as natural as possible. So this completes the final results i might have to do. My horn on this one baby, but no i'm so happy and pleased with the way it came out and if you guys enjoyed this video, if you learned something, if you had an aha moment or if you think this hair looks decent for the lolo, do you Think i finessed it like the video share. It drop me. Some comments. Do whatever you need to do but show your girl some love. If you didn't like it thumbs down, leave a comment, and let me know why you didn't like it something i could have did different or better but anyways. I love y'all and see you on the next video and, as always, stay beautiful and stay blessed. Bye,


Comments
Boe Peep: The middle parting looks so natural. Like your own scalp! Girl, you know I have no idea. Lol But you're amazing at what you do. So nice to see you pop up on my notifications, with your beautiful self. ❤
Khianti Ray: Did your thing
Deloris Fultz: I see you baby good job Beautiful ❤️
Michelle Peterson:
Lisa Williams: Hey sugar kcmo is in here your number one fan is here beautiful my baby ❤️❤️❤️