How To: Quick Weave W/ Bangs Using A Closure *Step By Step Tutorial * |Tatiaunna
- Posted on 17 June, 2021
- Lace Closure
- By Anonymous
#HowTo #QuickWeave #Tutorial
Hey Babes! Try this super protective Quick Weave with BANGS using a closure! This is beginner friendly, intermediate, and advanced ! Pay close attention as I show you how to mold your hair using liquid protectant , track placement, closure placement, molding , sculpting , cutting your bangs, and styling!
I hope you enjoy this video and you’re able to try this at home or on family & friends!
Be sure to LIKE this video
Comment BELOW ⬇️
JOIN MY JOURNEY & S.U.B.S.R.I.B.E.
Add me on Instagram: https://www.instagram.com/_tatitv
FOR ALL BUSINESS INQUIRES ONLY EMAIL : [email protected]
Hair & products used in this video:
Chocolate Hair 14” 16” 18” from my local beauty supply store
6x6 or 5x5 closure
Liquid Cap Protectant
Hair Glue
Got 2 B Spray
Fantasia Spritz
Nairobi foam
Sheers
Razor comb
Babyliss flat irons
Rusk Speed Freak blow dryer
MY Recent POPULAR UPLOADS:
Half Up Half Down Quick Weave Bob: https://youtu.be/JcwFNk6L2Gk
Flirty Ponytail: https://youtu.be/TtAGJIgYJC8
30 min crochet: https://youtu.be/hWEJ145xIZs
Kinky Straight Sew In : https://youtu.be/hWEJ145xIZs
Music by: SouthStreet24-Media .
__________________________________________________
#howtoquickweave #howtoquickweavewithbangs #quickweavewithbangs #closurequickweave #quickweavenoleaveout #protectivequickweave #howtocutbangs #fringebangs #howtodoaclosurequickweave #howtodoaquickweave #quickweavetutorial #stepbystepquickweavetutorial #Tatiaunna
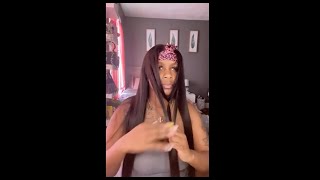
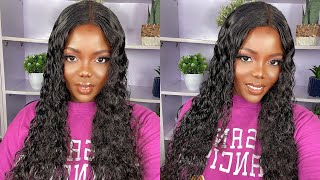
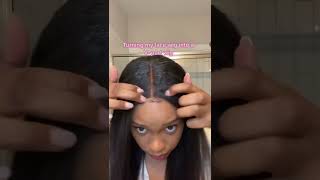
Hey babes welcome back to my channel. I am tatiana in today's video i'm going to be showing you how to do a quick weave with a bang using a closure. I'M first going to put my hair into a low ponytail, we're going to make sure that it is not gripping or tight at the nape, because you do not want any tension bumps going in with a generous amount of our liquid protecting cap. We'Re going to be applying that all over our head and we're going to literally just place that going all the way back as if we're doing like a slick back gel ponytail look. So the liquid protectant cap is used to protect your hair from any glue trying to seep through the cap and getting onto your hair. This product is blow dried and it's going to get nice and hard to create a shell that way nothing damages your hair and it's a really really easy removal process. I will be filming that one for you so just stay tuned, so with my pony. So i'm just going to put it into a braid and then i'm going to crochet it through my hair. One thing i forgot to do after i dried my hair was to actually cut that rubber band of the ponytail. Please, please, please make sure you do that that way you do not have a hump or a lump in your head. I was able to, of course, disguise mine, but if you're doing this at home definitely just cut the rubber band. So now i'm just going in with my rust, be free blow dryer, it's a 2000 watt blow dryer, so it's pretty powerful and this okay y'all. So i got this from my local beauty supply. It was their final sale and i just needed something pretty cute, and this is all they had, so we had to work with it, so you'll need to just apply one cap and then going in with my got to be spray. I like to just add an extra barrier and we're just going to spray that all over our head and we're going to blow dry this until it is nice and hard and you'll know when it is dry completely. Because it's going to turn white now going in with our closure, this closure y'all. I had in my salon suite for quite some time, and i believe this is honestly like a six by six. It look like it's a little bit wider than the five by five. Now going in with my shears, i'm just going to be cutting off that excess lace. This does not have to be nothing dramatic, we're just going to go straight across now. We'Re just going to be tracing this thick part of the closure with hair glue. You can put a nice amount on there, but just don't get too too happy, because you don't want it to smear all over the place and get onto your actual hair of your closure, and now this is what it should look like. Once we got our hair glue and then we are ready to apply so the way i applied mine. I didn't start at the very front of my hairline, i kind of started just a little bit back, maybe like half an inch. I did this because i wanted my bang to fall a certain way and there was a certain type of flatness that i was going for, and it's not really necessary to put it right at the hairline anyway. But this part is definitely optional. If you want to go further, you can go further so before we do anything, you just want to blow dry. Your closure go ahead and press on it make sure that it is nice and firm onto the head. So i'm applying my first track a little bit past my ear and then what we're going to do is place the next track, just a little bit past that last track, so you're going to be doing that each time. So every time you go up, you're going to go a little bit past, where you did your last track, you're going to do this all the way and get to the corners of the front of that closure. As you can see, we're kind of closing that up just a little bit, but i'm still having a little bit of space just because of the colors that i'm using and then like. I showed you in my half of half down videos. All we're going to be doing is placing each track from one side of the closure to the other side of the closure, and it's going to start to get smaller and smaller until we get to the back. Okay, i just wanted to show y'all from this angle exactly what i mean where we're going from one side of the closure to the other side of the closure and i'm making sure that my tracks are nice and close, because i wanted my hair to still be Nice and full and, as you can see as we continue to go up towards the back of the closure, our tracks get smaller and smaller. It'S going to get to a point where you're not going to be curving anymore, but you're just going to be going straight across i'm liking. These little colors that i chose, though i just had to come up with something y'all i couldn't just have just one color, and this is like some old school. You know that chocolate here, i couldn't believe i saw it, but they're just continuing it at their store. You see how we're going straight across and now we're just going to blow dry, make sure it is nice and secure before we do any more styling. So i wanted to give you a nice close-up so that you can see exactly how my tracks were laid and then we're going to go ahead and, of course, cut off that excess cap. And there is no tracks, as you can see on my edges, or anything like that. My edges are actually protected by the liquid protectant going in with my nairobi foam. This is how i mold my bang and mold my hair to actually fall the way i want it to so right now, i'm just parting to see exactly how much hair i want to follow my face and then i'm going to go out with the nairobi, foam And we're just going to apply a generous amount to the very top go ahead and smear that going all the way around, get it nice and flat and i'm using a fine, toothed comb. And we want this to be a nice and flat finish. So we're just going to be combing and molding doing some sculpting and then going up my blow dryer on high heat, i'm going to be pressing and blow drying and guiding the hair as to where i want it to fall. And now we're going to be going on into the bangs y'all. This is not easy, but it's not hard either. I love razor combs. First, okay, razor combs is great for a guide and it does not create a harsh blunt line. So i'm just getting the majority of what my bang will be and we're just going to be starting off slowly, just cutting we're not cutting super short. This is not the finished cutting process, we're just getting some of that weight out and we're just kind of thinning out exactly where we want the hair to possibly fall so going. In with my scissors, i am going to be point cutting point. Cutting helps to create a natural fall of the bangs. Instead of that, harsh bang look so i'm just grabbing another piece of my hair as a guide and then we're going to go up just a little bit higher. So you want to work your way up. Y'All! Don'T start super high because you can't put hair back sort of suck if you did all this work and your bang was too too high. So now we created our guide. So now i'm just going to be going into my sides and then we're going to be using what i already cut and i'm going to start off doing a little face. Framing first, a little face framing a little point, cutting just to see how much bang i want y'all to take your time when you do this and then i just like it go back in periodically now, i'm just going to be using some of my fantasia spritz. I'M going to split my bang and we're just going to do some styling to the bang area. That way, we can see exactly where the hair is falling after we've cut it and then we'll be able to actually continue to finish doing our main cutting. So you don't do the finish, cutting while you're doing your first one, you do it after you style the hair. So now we see exactly what's going on and now i know exactly how much i need to cut as far as the size. If i want to go for this, mushroom bang look or if i want a wider bang, and i definitely wanted a wider bang, so i'm just periodically just slowly cutting off hair looking at it while it stopped again to see how it's falling. So this is what you'll be doing honestly when it comes to the bang part, it's going to be a lot of pressing and slightly cutting, and you know pressing again far as in your bangs area, until you get it the way you want it now. Instead of my scissors, i like to go on with my razor comb because it's going to cut off a little bit of hair, but not too too much and now because i didn't want a heavy bang, i'm going to be taking some of that weight out. I'M just going to be sliding that, on top of my bang, because i wanted to be kind of slightly see-through, so don't become heavy with it because it will cut off a nice amount, we're just taking off just a little bit of weight. So y'all can start to see my eyebrows a little bit. I'M going in with my bio silk. I'M just going to be applying a just a gentle amount onto my hair and we're just going to press my hair out so that we can really get a feel of exactly how this hairstyle is coming out so far and if i'm digging it. If i want my bang to be a little bit shorter on the sides, but you will never know until the hair is completely styled, always remember that do not do your main cutting until your whole head is styled once it is completely stout. That'S when you'll see what needs to be cut on, so i'm just going back in touching out my bang. That way, we can see exactly what the whole look is doing. Yes, ma'am it's coming out so cute, so far, all right! So now i'm just noticing we just want to cut just a little bit just want to cut just a little bit on those sides. You see that extra piece right there just doing a little point, cutting be careful of your eye y'all. This look just needs a little liner with a gloss and just some nice big hoops. This is definitely the look that i was going for. You got ta have some nice big gold hoops for a bang? Look! Okay and there you have it. Ladies, you got a protective, quick weave with bangs using a closure. I hope i was able to help you all with this video. I hope i explained it as best as i could babes don't forget to like this video share subscribe. If you haven't already for more new balm videos and follow me on instagram, my underscore tati tv - and i will see you babes on my next video - that's what i mean. That'S what i need so much better with me.
Comments
TATIAUNNA: NEW VIDEO OUT NOW!! NO BRAIDING REQUIRED!!! : https://youtu.be/2HsE-IHbw5g
CNH NATION;-;: I absolutely love that fact that you show hair styles using affordable hair..like real affordable hair right from the beauty supply. Thank you!
Marcia Dawson: All your styles are very creative. They are all super cute keep up the excellent work what I like about your creativity you just keep it simple
Brenda Morton: OMG that's so beautiful I love it ❤ you do amazing work! The colors were spot on I loved this complete tutorial . You have a safe and blessed day sweetie ❤
Sherie Fleming: It looks so natural. Great job!
lchildress712: This is a great tutorial. Very informational. I went to someone for a quick weave. She used nothing but glue and cap. Lathered it on my head and it took 4 hrs to remove and my hair came out so bad. My daughter was crying when she saw me struggling. I'm still in awe a professional did that to my hair. So heartbroken as my hair was so healthy before that style. Which wasn't even cute. Smh
Kellee Mcfadden: I love what how you explain what to do. Makes me feel like I can do these cruel on myself. I hate doing my hair. But that’ll change. ♀️❤️
Tonya R: Absolutely Beautiful ❤️ it looks soooo cute on you. Thank you for making this video ⚘
Ayonnaz Glam: Very well explained ❤️
Lisa E. Income Generation: I love the look. I was wondering if you could show this with the swooped bang. Also, with a side part. Thank you for sharing ❤️
Angela Chapman: This style is super cute. It.
Carol Mahler: You make everything you do look so easy and attainable. thank you for sharing.
Shayla Nickerson: You explain everything so well..love your videos
Nina Dash: So glad I came across your channel. Love what you did, how you explained it and your voice is beautiful.
lady E J: Just strolling through videos and I was interested in your video, you did an awesome job
kitas215: Great idea and time saving with close
Tasha Boyd: Love how you explain your tutorials
Antonisha Malone: I love your methods on how to style hair girl. Wish you could do mine.
Sherika K: This style is super cute on you!
Cretia Tapps: The only thing I would suggest is to just braid ur hair instead of a ponytail even if it’s just one big braid!!! Love this babe
Adrian Allen: Hey babes I'm loving your hair it's beautiful and it's definitely giving me that vibe. ❤
Monty Ware: You are so amazing, thank you for sharing DIY videos. Sometimes one is not able to go get it done and has to make it Doo...what...it...Doo. That is you #ImGratfulForYouAndYourVideos. Pulled off my first style for new Years...everyone loved it!!! Thank You Ms. Tatiaunna :)
Jenn Jenn: Love it the colors u chose pretty ❤️
keke monroe🏹: it. Super cute.
Jessica Connor Dawson: You’re so beautiful, I loveeeeee this!!! Can you possibly post a mini tutorial of how to take this down??
Fiona Kyndt: Love love love this style. ❤❤❤❤
Jassy Nicole: Love this!!
La'Joia Creary: Omggg the install is so cuteeee love the bangs ❤️
Lucinda Sweatt: That's really cute, great job
Amazon Queen: Love it !!
iitoca Baby: Beautiful love ur work
Peggy B: What an awesome stylist.
Kellee Mcfadden: Love it this is so me✌❤️
Taliyah Hudson: nice!!!! i'm going to try to do a curtain bang with this look just for fun and see if it turns out nice.
Diane Vandiver: This is sooooo pretty what colors did u use love it.
April Kimbrue: Pro tip: Paul Mitchell super skinny serum is way lighter and better for extention hair. Biosilk has a lot of alcohol wich can dry the hair out more. Wonderful job though girl. Definitely impressed. Thank u
1Confidenttrini: You def did that!!!
Ymoz22: YESSSS is all I can say!
mrsdaslyn brown: Lovely
latrice robertson: Luv it Tati
Spicy Cap: You have so much talent. Yessss
felicia curry: Love it
Theresa Bady: So you have to use a closure for this look? Or can you do a quick weave with bangs without a closure?
Tasha App: Hey gorgeous, what colors did you use for your hair?
karon thomas: When you cut the cap off what holds the weave in place.
Renarda Cammon: Girl I love you. You are a lifesaver.
ADORELOVESEXY: Slayed. Gorgeous. Love the colors on you
lovely ladyt: Love this
keke monroe🏹: I the color too. Yaaaas!
Tricia Samuel: Hello, new subbie good video
LeKeisha Fleming: New subbie!!
lovely ladyt: How long will this last
Tasha Moore: Cute I love me a hairstyle with bang....
Magdline Nuom: very nice
What For: Another good&very detailed video lil mama....where did you get that razor comb(I think that's what its called)?
ms_jblessed:
aretha lee: very nice
tammy king:
DivaGlamStudioWeave:
Tiara the Winner: Should have popped the rubber band before gluing in the hair in. It would have look flat in the back.
Mental Notes by KittyLove: " Good Job "
Crystal Rangel: #heybabe