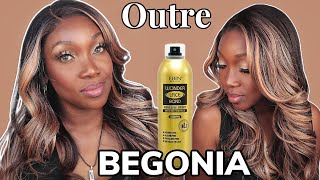
Trendy Salt & Pepper Lace Closure Wig | Ebin Wonder Lace Bond Supreme Hold Spray | Missuniquebeautii
- Posted on 09 February, 2022
- Lace Closure
- By Anonymous
#saltandpepperwig #ebinsupremehold #ywigs
Trendy Salt & Pepper Lace Closure Wig | EBIN Wonder Lace Bond SUPREME Hold Spray | MissUniqueBeautii
Book Your Hair Appointment: https://www.styleseat.com/m/v/missuniq...
Follow Me On Instagram@: https://www.instagram.com/missuniquebe...
HUGE WIG SALE!!!
The sale has begun! Shop https://missuniquebeautii.com
Use Promo Code: Tube10 for 10% off your ENTIRE purchase!
FREE SHIPPING ON ALL ORDERS!
Hair Products I Use:
EBIN NEW YORK Wonder Lace Bond Adhesive Spray Supreme Hold 14.2oz/ 400ml https://www.amazon.com/gp/product/B09H...
Nairobi Foaming Mousse
https://www.amazon.com/gp/product/B003...
Style Factor Edge Booster Wax Stick https://www.amazon.com/gp/product/B07J...
Hot Comb https://www.amazon.com/gp/product/B001...
Blow Dryer https://www.amazon.com/gp/product/B000...
Wig Band
https://www.amazon.com/gp/product/B098...
Wig Making Supplies:
Singer Heavy Duty 4423 Sewing Machine https://www.amazon.com/gp/product/B003...
Singer Heavy Duty Needles https://www.amazon.com/gp/product/B004...
Smithread Prewound Bobbin https://www.amazon.com/gp/product/B083...
Coats & Clark Heavy Duty Thread https://www.amazon.com/gp/product/B01G...
Guterman Heavy Duty Thread https://www.amazon.com/gp/product/B079...
Canvas Block Head https://www.amazon.com/gp/product/B00W...
Equipment Used:
Sony ZV-1
https://www.amazon.com/gp/product/B08G...
Neewer Back Drop Kit https://www.amazon.com/gp/product/B07P...
Ring Light https://www.amazon.com/gp/product/B08D...
Sequin Backdrop https://www.amazon.com/gp/product/B076...
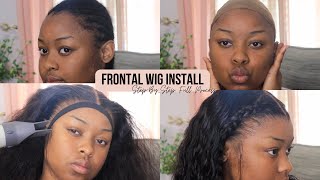
Foreign woof, hey my beauties, it's my scenic beauty in the building and i'm back with another video. If you guys are new to my channel tap the subscribe button so that you won't miss out on any of my new uploads and if you have already subscribed. What'S good, what's poppin welcome back to my channel also, don't forget to follow me on instagram and tick tock at miss unique beauty. The hair in today's video was sent to me by a company called y wigs. They did go ahead and send me the hair in a cute branded bag and also in a box as well. Now inside the box was a wig cap. It also came with an adjustable wig band. It came with their return and exchange policy and, of course, the wig as well. So the wig that was sent to me was a salt and pepper, loose steep wave 13x4 tea part bob wig. This is for my salt and pepper people out there or for anybody that just wants to try a salt and pepper color. Now this wig was beautifully constructed, it does have a bunch of combs in it and it does have an adjustable strap. Now i did go ahead and tint the lace on this wig with my foundation already to match my skin tone. Now i have already applied my wig cap to my head as well. Now i do not plan on keeping this wig on for long. So that's why i did not go ahead and fully melt that cap down onto my head. So right now i'm just adjusting the wig to my head, seeing how i want it to fit and lay on my head and then i'm going to go ahead and cut the ear tabs off of the wig so that this wig can fit nice and snug and Smooth around my hairline now before you guys go ahead and cut anything. You want to make sure that there is no excess hair hanging down and that is pulled away before you cut those air taps off and once you guys remove your air tabs, you will see that the wig will start to lay nice and flat along your hairline. A whole lot better than when you just put the wig on so be sure to cut your ear tabs off. First before you adhere the wig down. Now i'm going to go ahead and add slits along the lace in the front section of the wig just to make it easier for me to lay the wig down. I am going to lay this wig down in sections because with a 13x4, it's just a lot easier to work in sections, so i am going to go ahead and apply some of my nairobi foaming mousse only to the hair on the hairline of the wig. Just to get those flyaways out of the way so that when i am adhering this wig down, i will not have anything in my way. Now i'm going to go in with my even wonder: lace, bond, adhesive spray in the extreme firm hold, and this is their brand new adhesive spray that just recently came out, and you guys know how much i love this hairspray. I have used it in my previous videos and i swear by this lace spray if you want something that is quick and temporary, easy to lay your wig and make your wig last long, but also you know you want that hold on your wig. This is the adhesive spray for you. Now i'm going to go ahead and apply my wig band to the edges of the wig, and this will just help the wig to further melt into your skin, and i am going to go ahead and hit it with that blow dryer one more time until it's Completely dry now i'm gon na go ahead and remove that lace, wig band and, as you guys can see, this wig is melted into my skin. Now, i'm just using the metal end of my rat tail comb to lift that lace up off of my skin and then i'm going to go ahead and trim that excess lace completely off, and i'm going to do this around my entire hairline. Just take your time with this process do not rush. You do not have to cut all of the lace off if you don't want to, because once you lay your baby hairs, everything's just going to melt all into your skin. So now i'm just going to go in with my nairobi, foamy mousse and i'm gon na use this on the hairline just to loosen up those hairs around that hairline and then i'm gon na go ahead and begin to part away the hair that i want to Use for my baby hairs before i go ahead and lay my edges one last time now there is no right or wrong way when it comes to laying your wig. It'S just you doing. Whatever you feel is the most natural look for you and what you would like your wig to look like on your head now. I am not a huge fan of plucking, my hairlines for my wig personally, because i love a fuller hairline on my wigs. So i just like to take a very, very thin section of the wig in the front section of the wig to create my baby hairs, and that is it now, if you like your hairline to be thinned out a lot more than i do, you can go In with your tweezers and thin out that hairline, if you guys would like for me to do a separate video showing how to tweeze your hairline, i will go ahead and do that for you, and i will also show you guys what the difference looks like now. Once i got those baby hairs separated, i am going to go in with my wig band one last time and i'm going to use this to melt my baby hairs and the edges of that wig once again into my skin, and i am going to go ahead And cut down those baby hairs as well. Now, once i'm done trimming down my baby hairs to the length that i want them, i am going to hit my edges with the blow dryer one more time, just to make sure everything is completely dry and then i'm going to get into laying the front section Of the wig and sculpting my baby hairs as well now the length of your baby hairs is completely up to you. I like to keep mine fairly on the longer side, and that way i could blend it into the hair once i sculpt them, and you guys can cut them shorter or leave them longer. It is up to you now. This is what my hairline is looking like and, as you guys can see, this wig is completely melted. Now i'm going to go in with my style factor, edge booster wax stick and i'm going to use this to further lay down the hairs on the wig, and i am going to also go over it with my hot comb. Just to make sure everything is nice and flat and looking extremely seamless in the front now you guys know i like to go in with my rat tail comb to evenly distribute that product. Before i go in with my hot comb, i highly recommend that just to make sure that everything will be laid nice and flat once that hot comb hits that area. Now i'm going to go back in with my nairobi, styling foaming mousse, and i'm going to use this to carve out and sculpt my baby hairs in the front section of my head now. I do not like to use gel products personally because i, like my baby hairs to have a softer feel to it. So that's why i go in with my nairobi foaming mousse, but if you do want your baby hairs to last a few days and you don't want to go back in and re-sculpt them on a daily basis, i do recommend using more of a gel based product Than a mousse based product, so i do not mind re-sculping my baby hairs whenever i am doing my hair, because it's just something that i take pride in when i style my hair, so you guys can go ahead and either use gel or mousse just like. I do now there is no right or wrong way to sculpt your baby hairs. Everybody like their baby hairs to look different, so you do whatever you are comfortable with doing when it comes to sculpting your baby hairs. Now this is what my edges are looking like. After i applied my wig band and let them set and as you guys can see, my baby hairs look flawless. Now i'm going to go ahead and define my middle part in this wig, because i really wanted to do a middle part with this wig and what i really really love about this wig is that, even though it's a 13x4 t-part wig that parting section on this Wig was extremely long for a four inch parting section and i really loved that it gave my wig an even more natural look. I believe so now i'm going to go in with my wax stick once again and i'm going to apply this to the parting section of the wig. Just so that i can get that top section of the wig to look nice and flat, and i am going in with my rat tail comb to evenly distribute that product. Once again. And now i'm hitting that section with my hot comb and as you guys can see that parting area got instantly flat as soon as i applied that heat to it. Now, i'm not applying the heat down the length of the hair. I am only focusing that heat on the roots at the parting section of the wig. This pretty much completes the styling portion of this wig. This wig already comes with beautiful, loose wave curls, so i did not have to go in and re-curl the wig whatsoever. I'M just going to go ahead and run my fingers through this wig and use my y2 comb just to fluff out the curls to make them look exactly how i want them to look, and this way caught me by surprise, because i was really nervous about the Salt and pepper wig, but this salt and pepper wig, really came through this salt and pepper. Wig looks fire, so i am going to go ahead and leave the link to this wig in the description box down below so that you guys can go ahead and check it out. Now i am going to go ahead and get into my slow-mo so that you guys can see the gorgeous texture, color movement, just the everything about this amazing wig. I really hope that you guys enjoyed this video comment down below any suggestions or questions that you guys may have smash that like button and don't forget to subscribe bye. My beauties you
Comments
Candace Crawford: I love love LOVE this look ❤️❤️❤️
Li Laconia: I’m just like you I don’t like how it looks when it’s thinned out the hair line I like it full. Also I used this wig spray also and it’s amazing. Great video .
Mattie Sanders: gotta be honest with you, you are looking good girl!
Gerard Chambers: will we see a another update on your husbands loc extensions he got me thinking hard about getting them lol his look SEAMLESS!!
Darrell Russell: that one is on fire!
Hilda Shaw: looks high quality to me
Barry Wells: excellent work on the video
Ywigs.com: Link to order the same wig: https://www.ywigs.com/products/yonce-middle-part-salt-pepper-loose-deep-wave-13x4-t-closure-bob-wig
Margaret Owens: Beautiful Sis
Joe Murray: best one so far
Patrice Whitiker: You Are So Beautiful My Queen
Virgil Lopez: sharing this.
Tatiana Pacheco-Gonzalez: