2021 Step-By-Step Tutorial | Easiest No Lifting Baby Hair Method + Beginner Friendly
- Posted on 26 May, 2021
- Lace Closure
- By Anonymous
Hope you guys enjoy pt. 2 of the 'How To' lace closure sew in series
_________________________________________________________________________
Links to Hair Products Used ♥︎
Witch hazel toner (didn't show in video, but I cleaned her skin PRE-install with this) https://amzn.to/36ZFNUi
Got2be Gel (yellow bottle) https://amzn.to/3fFE1eA
Beige wig cap https://amzn.to/370RlqC
Pack of Popsicle sticks https://amzn.to/3hTuvXY
Got2be freeze spray https://amzn.to/3aRA5F5
LA girl concealer (lighter color was beautiful bronze/ forgot the darker color, sorry) https://amzn.to/3yeXriT
Bold hold active lace glue
Hair from mayven- 3 bundles+1 4x4 brown closure/ lengths:unknown
Kera care wax stick https://amzn.to/3jCdBvL
double sided edges Brush https://amzn.to/2NiTc2E
NYX powder highlight and contour palette https://amzn.to/3fdcnXo
_________________________________________________________________________
Wanna work with me? ♥︎
Email: [email protected]
_________________________________________________________________________
Stalk me ♥︎
Personal Instagram - @Thechachimarie
Business Instagram - @HouseofVainOfficial
Snapchat - @Thechachimarie
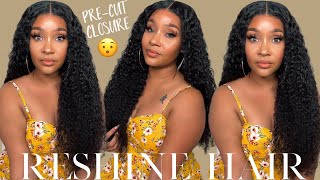
Hi guys so the first thing i'm doing is molding her natural baby hair back with some got to be, and i'm going to blow dry that on the heat setting - and i do this just to keep her hair out of the way before i put on her Cap and i apply her layers of glue when i apply the glue i like to use like this little tracing method, where i apply too much at first, but i like to like basically drag the glue out of the bottle directly onto the cap or her skin. Um because it just controls how much glue comes out - and i like that, and then i blend it out with some clean popsicle sticks and i get a pack of these off amazon. Everything that i'm using in this would be in my description box. So if i don't mention it in the video, i literally would have a direct link most likely now. I'M just sewing down the cap everywhere that i think the lace closure is gon na lie and i'm using a 4x4 lace closure in this video. So this is actually too much to sew down, but it doesn't matter because you can still sew right on top of that to match the cap and the lace closure to her skin tone. I tested two different concealers on her and one i felt was too dark and the next i felt was too light. So what i ended up doing was just mixing these two shades together, um and that's the color that i ended up applying to the cap as well as to the lace when i apply it to the cap. I do like to bring this makeup a little bit in front of that glue. I don't know why i just do and when i'm applying it to the lace, i'd like to bring the makeup a little bit in front of the hairline of the lace as well. Next, i'm just cutting off the excess cap, both in front of her hairline and the rest of the cap everywhere that i didn't sew down here, i'm just adding a little bit more makeup to the hairline of the cap. Before i figure out the placement of this closure, she does have like a lower hairline and i don't want this closure to be touching her eyebrows, because that is not a look or a moment. So i just had to make sure that i wanted it exactly in this place before i had her hold it down, and i started sewing down the first side. I do like to sew down one side before i go to the other, and then i sew down the back last just to keep the balance and placement of the closure, and i don't like for her to let go until i have this sewn down in place. Okay, so before i finalize things - and you know, set things in stone with the glue, i'm just making sure that this side part is going to work right here where this lace closure is at. And then i do like to cut off like these side tabs off of both sides before i actually start um gluing things down, because you really don't need those and it actually makes the install look a little bit more bulky. So for this install, i did use three layers of glue, even though i only showed two and um yeah. I think it's pretty self-explanatory when the glue dried clear. I went ahead and laid the lace closure in the glue and i pressed it down using my rat tail comb. I would definitely advise that you tie it down and let it blow dry for at least 20 minutes, but i didn't want her to be here all day, so i just cut it off immediately and usually, as i told you in like my best tips - video that I'Ll tag up here, if it's not laying in the glue i cut it off, but for this specific install i do need these two side tabs here. So i added extra glue and i waited for the dry clear before i just pressed those in as well y'all. I'M so sorry about my titties being out the whole video, my god, i'm so embarrassed, but i didn't even notice until afterwards. Well, i'm not that embarrassed, but you know what i mean, but anywho, i'm just like making sure i'm cutting off any unnecessary lace, and you know pressing that lace down into the clue. The only closure sew in tutorial. You need to watch in 2020. You guys kept asking me: where did she get her hair? Where did she get her hair? She got this hair. This is the same hair that we used from the last video. So it's from maven, okay. I went ahead and sewed it in sewed in i went ahead and is: is it sold in? I went ahead and i sewed in the back of the head off camera, because this is not a tutorial on how to sew hair. I highly recommend that you watch this up here. If you want a more in depth in more detail tutorial as far as sewing and basic sewing techniques go, but this is not that video, so i'm just going to speed this up. In matter of fact, i'm not even have that much sewing clips in this video at all. I just figured that you guys probably want to see how i meet the like the tracks to the other end of the closure. I don't like sew it into the closure or anything i just get it on the braid as close as possible to the closure, and then i cut it off, and that is all so. I can say that um for sewings, like this or any style, that you really want to like curve the tracks and you want the tracks to kind of fall on the forehead to like kind of you know, make your forehead look smaller or if you want some Type of a bang on your forehead, you kind of have to curve the tracks like that to get that to achieve that. But now that that is done, i'm just styling the top with a wax stick, and this is just basically going to help me tame flyaways. It helps me part more accurately. It helps the hair lay down flatter once i get a hot comb to it, which is what i'm doing now and then to cover the tracks in the back um, i'm just parting out a section in the closure making sure that it's covering the tracks in the Back completely - and i added some wax to that off camera and i'm just hot combing that to make sure that that stays in place lately to get like stubborn edges or stubborn corners of the lace to lay down and to blend in very well with the skin. I apply like i missed some got to be spray onto the hairline and not blow dry it well here i am parting out baby hair and to make sure that i, like the baby hair in this exact spot. I just start to swoop it to make sure it's going to work and i actually added a little bit more before i started a hot comb, the rest of the hair, which is going to be tucked behind her ear and y'all know. This was one of my favorite tips. This whole baby hair technique was one of my favorite tips in this video up here. So if you want like some really cool tips on how to like, lay your lace and stuff like that check that video out and if you have any new ones for me, then let me know because y'all know i love that anything to speed up the process Or make it look better if you guys, like this video so far like this video and let me know in the comments what's up what's good but i'm cutting off the baby here, not cutting it off, but i'm trimming the baby, hair and y'all know i like To add the hairspray to my baby, hair brush and swoop the baby here, so you get some fast baby hairs on the go. Some express baby hairs, some drive through baby hairs, boop give money. If you don't know what boot get money for i say we get money in so much videos, but i didn't get me like doing the other baby hair on the side, the sideburns i was blocking it, but this is what it looks like at the end. You already know now just to mold the top and make sure that i get the hair lying in the direction i want it to lie, just use some hairspray and comb that that is basically how you do a side part sewing. You guys show so much love on that. First closure sewing video that i had to give you guys a side part, because a lot of you guys were asking. So if that was you and you in here watching this video now what's up sis, i got you, but i'm just cleaning up the front of the lace. Nothing really, i'm not really doing nothing, major, i'm just being a perfectionist and i did add some makeup to the part off camera. But i added that color and then i cleaned it up with some mascara, and i also added some of that original concealer mixture. Just to like calm that color down a little bit and guys that was it, i do have separate videos on how i bleach knots and pluck the hairline before an install. But i wanted to make this video shorter, but she said period do not play with her. You


Comments
Lovely Lenish: Super detailed and explained very well
Shauna: New sub here....I admire your work, you take pride in it
Andrea Jones: So pretty I love her hair❤️
Elle & Jae TV: Amazing work
tatyanna vantilburg: So what do you do when the closure starts lift? I wanna do this on myself but I’m scared cause I excessively sweat.
Trisha J: Quick question do the glue be on the stocking cap only or do some be on the skin? What is used to remove the glue??
Aaliyah Shadai: Do you braid your clients hair as well or do they braid their own?
Queen T.: How does this last if you work out daily?
TeTee Jallah: Where is the closure bought from?
Sharlita Mondine: I love ur personality I would sit in your chair any day!
Winter Springs: What size is the frontal ?
Alonia Henry: Hey can we get a frontal qw video
Jess Kay: Does the ghost bond last longer?
Nisa Original: Heyyy , can i set up appt whr r u located