How To Install A Lace Frontal Wig + Baby Hairs | Ft Ywigs
- Posted on 02 January, 2019
- Lace Closure
- By Anonymous
OPEN ME ♡
SUBSCRIBE HERE ♡ https://www.youtube.com/channel/UCqPQc...
Please don’t forget to LIKE, comment, and subscribe
Wig Details:
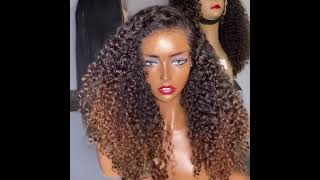
Brazilian Straight 13x6
AFB60
20 inches
Natural Color
150% Density
Medium Cap
Lace color: Medium Brown
USE MY COUPON CODE: “Adeshia” TO GET $$ OFF @ Ywigs.com
Direct link: https://www.ywigs.com/upgrade-brazilia...
HOW I STYLED THIS WIG: https://youtu.be/uYiO01vgnUs (LIKE this video for another upload of many different ways to style this wig)
Products I used:
Razor comb (the product that I couldn’t think of the name of lol)
https://www.barbersalon.com/dorco-tink...
Got 2 b freeze spray
Ghost Bond Glue: https://www.amazon.com/Ghost-Bond-Hair...
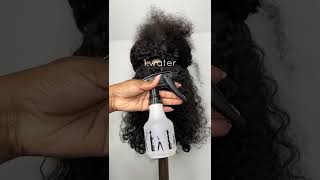
I didn't bleach the knots and the wig came pre-plucked. The unit was extremely soft and I had minimal to no shedding! I've been wearing it for about a week now and I haven't had to touch up on the glue at all. I've been spraying the hairline with Got 2 b freeze spray.
---------------------------------------------------------------------
For business inquiries or sponsorship:
Email: [email protected]
----------------------------------------------------------------------
STAY CONNECTED WITH ME
Twitter: https://twitter.com/adeshiasims_
Instagram: https://www.instagram.com/adeshiasims_...
Snapchat: adesims
Hey guys so this unit came from Y wigs dot-com I'll, have all of the details about this unit down in the description bar below. So don't forget to check that out. It came in this box with a wig cap with elastic bands and extra clip for the wig. My wig cap is already placed on and I'm making sure that it's covering both of my ears, then I'm going to use the got to be glued freeze spray. Just to apply the wig cap to my hair line, so I am spraying this along my hairline and I am using a generous amount just to ensure that the wig cap does stay on. It protects my edges. I am pulling this over my ear, make sure it is over your ear, so you can protect all of your hair lines, your sideburns, all of that just one. You just want to make sure that it is secure in the wig cap and I'm also rubbing this freeze spray in just to insure that it does stick well. Okay, now that that is all done. I'M gon na grab my blow dryer and I'm gon na place. This on a cool setting, and I'm just going to run this along the hairline, where I spray the free spray just so it can dry and mold. So it can actually stick so now that that first layer is all dry. I'M going to apply a second layer of the free spray and this time I'm actually making sure that I'm smoothing it down a lot more okay, so you'll know when the free spray is completely dry because it will become hard. So now I'm going to start cutting the wig cap and I'm going to cut straight down the middle and then I'm going to start cutting along where the freeze spray stops. So this is why we applied the freeze spray directly to my hairline, because once I cut it, I'm going to cut with that free spray stops, and that is exactly where my hairline stops. So now I'm actually going to cut a flap for my ear. So we can protect the sideburns and I'm just cutting straight down the middle of my ear. Once I create that flap, I'm just going to tuck the excess pieces behind my ear and I'm going to cut off what I don't need and right here, you'll just see me lifting up pieces just to get as close to my hairline as possible. And if I need to I'll spray, some extra free spray just to ensure that the wig cap is secured to my head, so I'm just lifting up excess pieces and cutting them right off. So I'm going to use the same technique for this other side of my hair for creating the flap for the wig cap and I'm still lifting up pieces just to ensure that it does look nice and there's not any excess pieces hanging out. So the goal here for the wig cap is to just make sure that it blends in and nicely with your skin. So you want it to look like it's actually growing out of your scalp. Basically, like it's just attached to your head, you don't want any flyaway pieces to make it bumpy or anything. So that's what I'm doing here just to ensure that it blends in nicely. So I'm cutting straight down the middle of my ear to create that flap and then I'm going to just tuck the excess pieces in cut off what I don't need and voila. I really recommend taking your time with this step and just make sure that everything looks nice. You don't have any excess pieces and just make sure that it looks bleed it in with your skin. So if you need to smooth down the wig cap, just a little bit more, it's okay to spray, some more freeze spray on there and then let that dry. Okay, now I'm just gon na grab some rubbing alcohol and some cotton round, and I'm just going to clean up around my hairline just to ensure that there is no free spray or anything sticky. On my hairline once I apply this glue and I apply the unit as well so now I'm just going to show you guys how this unit came packaged from why wix.com. So it came in that box and then it was in a ziploc bag, long, a ziploc bag and fat. So this hair was extremely soft and it did have a hairnet on it. So I took the hairnet off and it was so soft. This unit is 20 inches and again I'll. Have the details down in the description bar I'll have the link to the wig as well. So now, I'm just showing you guys the actual hair line. I am going to cut those baby hairs off, but this came already pre plucked, so I made sure that I tried the wig on first just to ensure that it fit my head and just to ensure where I wanted the actual hair line to be so. It is always important to actually try the wig on first before you actually decide to glue it down, just to ensure that it is where you want it to be. So after I have perfected the wig cap, I'm going to apply foundation to the hairline just so it can look more like skin and I'm using the fini Beauty foundation. This is in the color 390 and I am using a wet sponge to apply it and then I'm just going to go over it with a blow-dryer, I'm only using the blow dryer, because this was a liquid foundation. I'M using popsicle sticks in the ghosts bond glue to apply the wig, and I'm also going to try the wig on one more time, just to ensure that I am placing it exactly where I want it to be on my head. And can we just take a moment and look at how this looks like my scalp dusty dead? So I'm going to start off by applying the ghost bond glue to the middle of my hairline and I'm applying this in separate steps. So first I start off by applying it in the middle and then out blow-dry that with cold air until it dries clear and then I'm going to apply a as second layer and then I'm going to also blow-dry that and wait until it dries clear. And then I'm going to move along down my hairline towards the bottom of my ear and for the second layer, I'm also making sure that I'm applying the glue a little bit above where I already placed it kind of like on the wig cap. So now I'm going to secure the wig down in the middle of my head and I'm being very careful, I'm also adjusting the combs in the back as well to make sure that it is fitted nicely to my head. So I'm pulling this all the way down and I am NOT placing this where the baby hair stop, I'm placing this exactly where the actual hairline of the unit stops. So that is where I placed it, and then I'm just using the comb to just press it down and just melt it more into my scalp, so just make sure that you're actually aligning the unit hairline with the actual hairline of the wig cap underneath and I'm Just blow-drying this on a cold setting and I'm also melting this and pressing it into my head just so it is secure. So I'm just going to follow those same exact steps for when I apply the glue to the middle of my head. So now I'm just applying it to the sides and down further towards the bottom of my ear, I'm applying one layer of the ghost bone glue and then I'm also going to apply a second layer of the ghost blonde glue. So once again, I am going to press this down where the wig cap hairline stops and I'm making sure that I'm aligning this with the actual hairline of the unit, I'm not placing I'm not stopping where the baby hairs are. I'M placing this where the actual hairline of the unit is so the actual baby hairs should not be glued down. They should be hanging off just as you see here so now we are going to create my sideburn on the side, so I'm just gon na follow the same steps that I did with the wig cap. I'M going to attempt to a cut down the middle of my ear and then I'm going to cut straight across and you'll see this in just one second, so I pulled some hair to the front of my ear for the sideburn and then I'm just gon na Cut down the middle and then straight across, so I hope you guys could see what I meant so I'm just pulling some more hair to the front and then tucking whatever is left over behind my ear. So now we're just going to glue down that sideburn. I'M just going to pull all of my hair behind my ear and then apply two layers of the Ghost bond glue and then blow-dry that on a coal setting. So now I'm just showing you guys my hairline with everything actually glued down all right. So now it's time to cut that excess lace off, and I waited to do this until the last step, because I wanted to make sure that I didn't cut off too much of the lace. And I wanted to make sure that if I do reapply this that I will have enough lace to actually glue it down exactly where I want it to be, so I am cutting as close to the hairline as possible and yes, I am cutting the baby hairs That were originally with the actual unit I'm going to create my own, a baby hairs. I just want to perfect the actual hairline, so this is just an extra piece of lace that I did not glue down and I'm just cutting it right off. So now I'm just showing you guys what the hairline looks like when all of the lace is cut off, looks very natural to me. So I'm just tying my head scarf around my edges for a good 20 minutes, and that is going to blend everything nicely and this is after I took my headscarf off and I am going to pluck the hair line at just a little bit. So I'm just grabbing some tweezers and just plucking very gently. So if you have any questions about plucking or whether you didn't pluck enough or you didn't or you just over plucked, I would just recommend just to go for your liking and whatever looks natural to you. So now I'm just gon na get started with the baby hairs, so I'm just going to comb down a piece of hair. Then I'm just going to cut that. I forgot what this tool is actually called. I think it's like tweezers or scissors or I don't know what it's called, but I'm using that and then I'm going to use the edge booster edge control. So I'm gon na stop talking and let you guys just sit back and watch me. Do my baby hears because I feel like it's kind of self-explanatory, it's very easy to do so. I'M just gon na be quiet and let you guys just sit and watch me. Do my baby hairs you so I'm spraying the free spray on my baby hairs. Just to hold them and then I'm going to tie that right up. So I'm just using a plug-in straightening hot comb just to get all the lumps and bumps out of my hair at the top of the hairline and I'm just straightening that out so for the stubborn of flyaway hairs at the top. I'M just using this free spray and I'm just smoothing that down you and you guys. That concludes this video on how I applied this lace: frontal wig from wild wigs calm, I'm not gon na straighten my hair anymore, but if you guys do want to see how I style this hair, then please give this video a thumbs up and also subscribe.

Comments
Adeshia Sims: THUMBS UP THIS VIDEO LOVES! & SUBSCRIBE! There’s a lot more videos coming like this very very soon and I don’t want you guys to miss them!
ISLANDBEAUTY: You slayed this wig ❤️ great video
sunnie milannn: Did you contact the company for this wig ? The wig looks beautiful on you and I definitely want to order this now that I seen this just want to make sure I receive mines just as good as yours
Mrs.RED'VON 77: Just beautiful Hi sis love the video you are awesome 1 tip I would like to share that I have been doing for over 7months now that has been great for the bald cap method is when you're pulling the stocking cap down over the your ears go ahead put a hole where you clean your ear at pull your ear through the hole on the stocking cap this will allow the stocking cap to lay flat and then proceed with their products of got to be glue or spray if you would like to see a visual of what I am talking about feel free to stop by my channel I have a video on it it's called No More rolling up stocking cap method I hope this helps thank you #keepsupportingsmall like mind God bless
Asiah Unique: A1
Lovely Kira: How long did it take for you to get your hair?
Redna M: Is there a lot of shedding?