Make Your Own Lace Closure Fast | Badie On A Budget
- Posted on 07 May, 2018
- Lace Closure
- By Anonymous
Hey Guys! This is a quick and budget friendly solution to not having a closure for your weave. Sometimes hair texture do not blend well but the coins are tight and you got to do what you got to do boo boo. I learned this technique from many other youtubers and I am glad I came across this. Say bye bye to bad blending.
Items used
Frontal cap
Dome cap
Knit picker
Deep curly bundles
Song
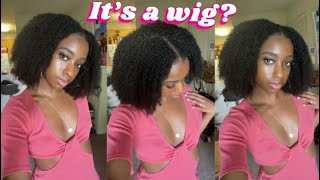
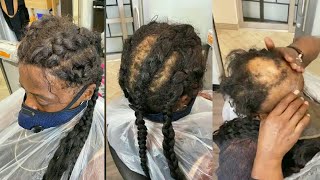
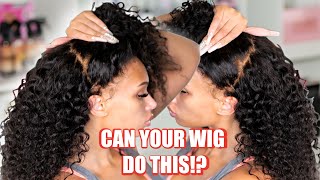
Hey guys welcome back to our Channel and what you're gon na need for today's DIY is a lace cap week, thingamabob II - I don't know it was only $ 5.99 at the local beauty, supply store and a dome cap that was $ 1.99. So, as you can see, I really don't know what is going on with this this cap. Well, I don't know what this trash bag thing was me in the middle, I'm not really sure, but I'm gon na cut the lace out of this cap and sew it on my dome cap, because I don't even know how it was so through that trash bag. Well, a plastic bag, not trash bag. Sorry yeah! So I'm just cutting this out, cutting the lace out of the cap. So, as you can see there, then I'm gon na put the dome cap on inside out make sure you do this inside out and then I'm just gon na lay well I'm gon na measure where I want my part to go on the dome cap and I'm Just using, I think this is a eyes, shadow pencil. I don't really know what it is, I'm for real seriously, but I'm just gon na use that to go around the area that I need to put my part now, I'm measuring all the way around the dome cap, because originally I was going to do a lathe Around the edges, so I could pull this up in a ponytail but, as you will be able to tell the rest of y'all got tired, so I didn't even crochet or whatever you want to call the hair I'm using some stick pins to place down the lace To just help me keep the lace still as I'm sewing, and you want to sew around the perimeter of the mark that you put for your part once right after you get your laces on down, I will recommend putting the lace a little bit farther up, but This is my first time doing this, so I learned my little best center right here. I'M just cutting excess lace off the perimeter, but make sure you leave a little bit cuz. You don't want to miss and clip your own. Are you sewing it, and then you want to follow me. My goal verses. So here I'm just using some hair from the bundle and I'm gon na divide the width and I'm using. I think this is the eyebrow Archer to divide it and then you're gon na use the invisible part method to place the hair down. First - and I put some looking Sigler right there just to help me guide myself to know where my part is and make sure you flip your wig, your wig cap back out back on the right side when you do this, so I'm just gon na use some Hair glue and make sure you let it get tacky first before you put it down and then just blow dry, it so make sure it stays in place and you're just going to repeat these steps, and so you get all the way to the top of the Closure and then you're gon na you know, keep lining them down to close it off you. So this is what it should look like when you're almost done just lined up, and I closed it off on the top. Now how you gon na do this part is you're gon na wrap some of the hair around your finger and then you're gon na place, the whatever knit hooker I don't know a caramel, what it's all through it and just place one piece of hair through that Loop and knot it so it's basically like how you crochet, so if you know how to crochet weave this will be so easy to you, but it's just very time-consuming. So this is a repeat: I'm letting you see it again, just pull it through and pull the one strand of hair through the hoop and keep continuing to do this until you finish covering up the area where you can see the track hair. This is a kind of time-consuming process. If you don't do your invisible part correctly, if you don't bring close enough cousin, you have to you, have to go in and make sure that part is not wide as a parking space, because you don't want that sisters, not gon na look right. So you need to make sure that you kind of gauging it to see what your actual part look like in your head and what you want. Your weak parts look like so that you won't have to take so much time on this particular part of crocheting. The little strands of hair I want to forgot this thing. You only want to use like a couple of strands of hair to pull through to make it look more natural, because the more hair you pull through the hole, the bigger the knot is going to be so it's gon na look more noticeable. If you pull too much hair through the lace closure so at first my part look like this, but I went back in a little later and add it more hair so that the part can be more even on both sides. You see what I'm saying whatever of my handmade yeah um. I didn't do really like a lot of the month or size, because I was so tired and sunny. I'M like I was so sleepy and I know how to get up extra in the morning. So I didn't do this anyway, so I think I'm gon na keep it like that and then I can move it to the side and make it like a side part or whatever whatnot. But I ain't really too much feeling that. But you know when I'm Queens its teeth and you got some heart in your closet. Just like I got some, but you know it's summertime in the roof. Don'T thicken up baby, get you the length to make your own lace possible. I mean it. Hospital II would just I recorded what like half of my head, cut off the top of it, but I just want you guys to see influence' instead of like, let me just bending down whether or not how it actually looks. I'M very pleased with them. Like I stated earlier like I, I like it and I think it looks more natural, especially if you take your time but, like I say I have a 7 month old. I do these hair.we these videos, what she goes to sleep and I think it looks very realistic whatever and hair from no. I really I got from here, so I don't remember how what it is? It'S not something that you order online, like some bundles like this is legit the bundles that come from the hair store one in a pack, but this is real hair. I had this hair over a year, only wart like one time, and I didn't like the way. My hair was blending the top because, like I said, are you know who dumb room swim? So that's the post, the rules went into pulsing and it didn't work. So I had to do something else. I wasn't like the wasters hair and you know sometimes coming up or whatever and once Anna beats up. You know yeah. I just want a little Island by for the beach and what's more Island, binding, curls, dick curls and waves, like you know what I mean serving on this melon in one of water, skiing. Listen anyway guys. So I hope you like this tutorial or how to I want to say it of how you can make your own exposure and make it look like you've just departed from some somebody. You know what I wasn't not even kill it right. Thank you guys for watching make sure you like comment and subscribe.

Comments
Deshaun: I have to try this method !!
idesign8: Oooo this sooo beautiful!!! Okay summer hair!! I hate you at the end lmao
Random World of Gwendonna Rozier: I what one made