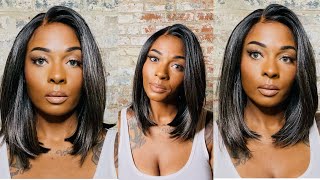
How To: Make A 613 Lace Frontal Wig On A Sewing Machine, Measure Ventilated Wig Cap, Remove Plastic
- Posted on 09 March, 2020
- Lace Frontal
- By Anonymous
Part 2: https://youtu.be/hl6IbBtrmG4
This video will be a step by step, very detailed, beginner friendly tutorial on how to slay a platinum blonde 613 lace frontal wig on a sewing machine from start to finish. In the next video I will be coloring this wig red. Stay Tuned!
______________________________
IMPORTANT LINKS!
Website - https://qbwigcollections.com/ (Wigs, Raw Hair Extensions, I-Tips, Wig Caps, & More)
Social Media Links - https://beacons.ai/qbwigcollections/ (Follow Me On IG Here!)
MyStore - https://www.amazon.com/shop/qbwigcolle... (Shop Everything I Used In This Video!)
Email - [email protected] (Business Inquiries, Custom Hair/ Wig Orders)
______________________________
Hey guys welcome back to my channel, so today I am going to be making this lace frontal wig, with this 6:13 hair, and I am also going to be coloring. It dark roots with red ends. So please stay tuned and watch this entire slay. Alright. So I'm going to be using three bundles two 22s and a 20 inch and an 18 inch front so as well. All of my bundles are 613 and I'm gon na be using a medium sized black wig cap. The wig cap can be black because, of course, I'm coloring, the Rouge dark. So it's not gon na matter. What color the wig cap is anyway. So first, let's get started by putting my frontal onto my cap. I make sure the frontal is only a little bit in front of the cap. It does not have to be like an inch or two or anything like that, and I'm going to make sure that it's flat all the way down the sides completely. We don't want any buckles in this wig at all, so let's start with, of course, outlining my frontal, with, of course, that heavy duty extra sturdy crayon that I use it's in the color gray. So I can see it really well. So I'm just gon na measure. This and this line acts as a barrier, do not go past this line when sewing on your tracks with the sewing machine. Okay, you guys so after I'm done with that, I am completely done with the frontal. I don't need it any more until the end, and this is how it looks so now I can go ahead and start with marking the lines for my tracks, so I know how many lines I need already based on the amount of bundles I have. Of course, I end up, you know doubling my bundles. Sometimes I can even triple my bundles. If I have you know four bundles, I think I've only done one wig, where I needed to add five bundles in it. But doubling the tracks makes this so much easier, but making your lines gives you a guide of where you need to sew and it makes things so much easier and faster. When sewing on your tracks - and of course the plaque is the plastic underneath, the wig cap is gon na come off anyway, and then, once you wash the wig, of course the crayon is washable. So it's going to come off as well. No need to worry make your March, where you need to and you'll be fine, so I'm just gon na finish, making all these marks on here then I can move one two doubling my tracks and, of course, adding them onto my wig cap now guys. This is definitely a guide to what you should be following when adding your tracks. If you get about halfway through and you notice, I have a lot of hair left. I'M gon na have too much hair left when it comes down to it, don't be afraid. Just start tripling your tracks, even if you get you know halfway through or so on and so forth. As long as you fit all of the tracks on there for your client or for yourself, you should be fine and everything is gon na be good. So, of course, I'm just using black thread. The roots are gon na be dark, and I am doubling my tracks all the way through. All I did was put both of my twenty-two inches on top of each other, and then I just sewed them down together to make one really long double track. So you can see. Stitching is a 1, so we bought the MoveOn finish this up and then, of course, take my wig cap. Put it on that sewing machine and get started literally. It takes leat like about depending on how often I stopped it takes me about two hours. To finish. A wig sometimes an hour and a half if I'm really focused and I'm moving through and my sewing machine acts right. Cuz, everybody knows sewing machines got their own mind, sometimes, especially when I'm making a lot of wigs at one time. It starts to get tired, but I'm gon na go ahead and start with the backtrack and I'm gon na sew that on completely and then I'll move on. Of course, I cut the tracks when I'm sewing on the sewing machine. I do not flip over my tracks. There is a way to do it, but I just do not. I don't find that that's the flattest way for me to deliver great quality to my clients, so flipping the tracks ain't for me. So I am going to add these on and then of course later on in the video stay tuned, I'm gon na be custom coloring this wig as well, and you guys will see all that action. What color I use and all of that later on in the video so stay tuned for that so fYI you guys when showing my tracks together, I use a zig zag zig zag stitch. Excuse me to sew my tracks together, but when sewing my tracks onto my wig cap, I only use a straight stitch. It makes it so much easier to take the plastic off. If you use a straight stitch, I have before used both so through the mesh. Sometimes I would use a zig zag stitch and then, of course, through the plastic, I would keep flipping back and forth and using the straight stitch as well. So if you want to create something, that's your own. You can definitely customize these wigs to exactly what you need to be so, as I go through, I make sure I am NOT going past my frontal line that I made in the very beginning, it's crucial because, of course your frontal is gon na be up there And that part of the cap is going to be cut off, so you do not want to go in front that line at all. Make sure you stop the tracks there all right, so I am done sewing all the tracks in and I pretty much put everything in there. I think I only had like one inch of track left, which is perfect, so I am going to put this wig on my mannequin head and, of course, I'm gon na add my frontal one to the front of this week happen. Alright, so pull all that hair back. Add your frontal one make sure your frontal is just as flat is when you first just started, and then you guys can finish sewing it up, cut off the bottom of that cap and then you're pretty much ready to go. So when sewing make sure you guys go through the lace, go through the net and go over the tracks as well sewing everything together. I don't want to see in meat cap in between the wig, the frontal and the tracks. I want those to be super. Super close together, so I make close stitches and I make sure I go through them both and then 2h for extra security. Of course you can go through after this part. You can go through with the sewing machine and just really anchor that front hold down to the wig cap being very careful not to get the hair bunched up in the sewing machine, because there's a lot of hair right here at the crease. So as long as you guys really sew it down, go through the go over the tracks through the frontal and go through the wig cap, you should, I should be perfectly fine, alright, so this step, of course, you guys know, got to cut this cap off from Underneath this frontal and then I will take off that plastic as well from underneath the frontal to make it ventilated. We want all that air to get in there to all your clients, scalps keep their scalp healthy, and you know real good and flowing so cut this way. Cap off be sure not to cut any strings or anything like that. You do not want that frontal to be slipping, and then, of course, it's easy to take this plastic off. All you do is pull it apart and then it just comes off. All you got ta do is pull it off with your fingers, any small parts. Of course you can use your tweezers for if you need to really get in there and get every piece of plastic off alright, so we are completely done stay tuned God. The color is next and we bout to get this red popping. Alright, don't forget to subscribe guys


Comments
Queen Brittney (QB Wig Collections): Watch part 2 of this video here: https://youtu.be/hl6IbBtrmG4 Thank you so much for watching! I really appreciate each and every one of you! ♥️♥️♥️
Keima Smith: I’m here for it!!!
BIG CHRIS SKITS: Good Job!