Best Flawless Wig Install For Beginners | 5X5 Invisible Lace | Body Wave Hair | Luvme Hair Review
- Posted on 13 October, 2022
- Lace Frontal
- By Anonymous
Hey my Harmonys! **VERY DETAILED + STEP-BY-STEP** BEST FLAWLESS WIG INSTALL FOR BEGINNERS | 5X5 INVISIBLE LACE CLOSURE W/ NO GLUE | BODY WAVE HAIR TUTORIAL | LUVME HAIR REVIEW
Like, comment, share, subscribe and click the bell to be notified for whenever I post! ♡ YouTube.com/c/SymphonyTaylor
I love you guys and God Bless y'all in Jesus' name! xoxo
HOW TO FIT THICK LONG NATURAL HAIR UNDER WIGS *VERY FLAT, NO CORNROWS, SUPER EASY*- https://youtu.be/rlLOzovUbG8
Check out my WIG INSTALLS Playlist for more videos like this!- https://www.youtube.com/playlist?list=...
----------------------------------------------------------
:
Direct link of unit in the video: https://bit.ly/3rLgf7x
Length of hair: 22 inches
BW 2 Powder- https://amzn.to/3ThFBFz
Developer- https://amzn.to/3Mv5UGi
Shimmer Lights Shampoo- https://amzn.to/3RZFPAb
Shampoo + Conditioner- https://amzn.to/3yE1reI
Wig Caps- https://amzn.to/3vDKnVz
Hair Clips- https://amzn.to/3enZ3C4
Hair Dryer- https://amzn.to/3yfNfZO
Edge Band (similar)- https://amzn.to/3RZGXnp
Ebin Edge Control- https://amzn.to/3TkvVuc
Hot Comb- https://amzn.to/3HpcCL8
Heat Protector Serum- https://amzn.to/3JcosZV
Wax Stick- https://amzn.to/3g2ODbh
Hair Spray- https://amzn.to/3T3sRD4
Oil Hair Spray- https://amzn.to/3RXDPIW
Curling Iron- https://amzn.to/3CuInk8
Leave In Conditioner- https://amzn.to/3TidHcB
Rat Tail Comb- https://amzn.to/3sEm4EZ
Ebin Lace Spray- https://amzn.to/3sLG2Oj
----------------------------------------------------------
:
HUGE DOLLAR TREE HAUL | $1.25 GEMS YOU NEED TO BUY NOW! | AFFORDABLE MAKEUP, HYGIENE, HOME & MORE!
| https://youtu.be/5eWwO3KhTew
I FOUND THE BEST CORDLESS FLAT IRON ON AMAZON FOR THICK HAIR | Aesty Dual Heater Titanium Flat Iron
| https://youtu.be/hJgztmpznog
HOW TO: Half Up Half Down On Short Natural Hair | Type 3C 4A Hair
| https://youtu.be/E3HxnbZE478
----------------------------------------------------------
:
Shop my favorite items on Amazon! - https://www.amazon.com/shop/symphonyta...
Join Amazon Prime + 30-Day Free- https://amzn.to/3NWRdLf
Prime Student 6-Month Trial- https://amzn.to/3LKLWGu
Prime Try Before You Buy- https://amzn.to/3s4SUhF
Try Audible Plus- https://amzn.to/3Ir4KcM
----------------------------------------------------------
' !!
Instagram - https://instagram.com/SymphonyTaylor
Twitter - https://twitter.com/SymphonyTaylor
TikTok - https://www.tiktok.com/@symphonytaylor...
Snapchat - https://www.snapchat.com/add/symphonyc...
Facebook - https://facebook.com/Taylor.Symphony
----------------------------------------------------------
:
• My Favorite Stylish EyeGlasses To Wear: https://bit.ly/3juDkqS
Coupon Code: "ST15" for 15% off!
• The Best Detox Products: https://www.teamiblends.com/
Use Code "SYM15" for 15% off or "SYM20" for 20% off orders over $29!
• Get a Free Uber Ride! Code: symphonyt27ue
https://www.uber.com/invite/symphonyta...
• Turn receipts into gift cards, try it and get 2,000 pts! Use code N63JX or link: https://fetchrewards.onelink.me/vvv3/r...
• Get $10 and free delivery from Instacart! Use my code: CUSERB57D9313F or link: https://inst.cr/t/18587f51f
----------------------------------------------------------
Cash App - $ymphonyTaylor
PayPal - [email protected]
----------------------------------------------------------
: Contact me directly at [email protected]
----------------------------------------------------------
: This video is sponsored by Luvme Hair (but still my honest opinion!) Some links above are affiliate links which I get a small commission and it doesn’t affect you as a customer. Thank you for all your support!
#WigInstall #BodyWave #BeginnerFriendly #HDLace #LaceClosure #SymphonyTaylor #LuvMeHairReview #LuvmeHair #LuvMeHairInvisibleLace
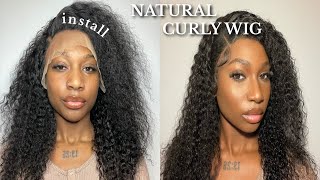
Foreign ERS welcome back to my channel if you're new here my name is symphony iPhone Beauty, fashion and lifestyle content and if you guys enjoy those types of videos, please make sure to like this video and, of course, subscribe to my channel to join the harmony. This hair reminds me of my mom's hair. The way I styled it - and everything literally reminds me of my mom, but you guys this hair is from love me here and I did work with them in the past and I absolutely love their hair quality. Like look at this, though, like look at the curl, this hair is 22 inches with a 5x5 undetectable glueless lace closure. This time in this video, I'm going to show you guys step by step of how I achieved everything, including me, dyeing the knots and washing the hair, and just everything like that, and usually I do not show you guys how I do that. But this time I will in this video. So if you guys want to know how I achieved this, look then just keep on watching when you order from them. You will receive this box. That says love me, hair, affordable luxury hair and I really love their packaging. It'S very luxurious, looking and clean, but of course you'll get the hair and you'll get a little baggie to put the hair in a wig cap and an instructions manual on how to take care of the hair and the return policy and everything like that. But this is how the hair looks once it's out of the hair neck. This hair is the 5x5 undetectable invisible lace, glueless closure wig with real HD lace, and the lace on this is a Swiss lace. So this is a really good quality lace. I am going to be bleaching the knots to give it that more realistic look, even though it already has that, but I just want it to look even more realistic, so I am going to be using a wax stick just to move the hair out the way And, of course, using the hot comb, so everything will be out the way there's been a few times to where I forgot to do this step and the hair would actually be bleached well, actually, some of the front pieces of the hair would be bleached, because I Did not do this step, so it's a must have to do that and I'm going to be using the bw2 powder. And if are you, please use two scoops, at least for this five by five closure in this clip, I'm just using a little bit at a time, but I definitely recommend you guys using two scoops. Then I'm adding a 40 developer because I noticed, if I use 20 or 30, it would like take too long. So 40 is the quickest way and it just makes everything easier. But as you can see, I'm just using a little bit at a time because you want to make sure that you have like an even amount and it's not too watery or too thick. You really want to make sure that it's enough, because if it's too watery, it's gon na seep through the wig and then you're gon na actually dye the hair and it's just going to look a hot mess. So make sure you follow these steps that I'm telling you guys, so you definitely want the bleach to be this type of consistency. Now you're going to want to put the hair inside out then put a paper towel underneath just to make sure you're not getting none of the bleach on the actual hair. But I am starting towards the back or the front like just this section of the hair. First, instead of like near the baby hairs or on top of the baby hairs first, since the baby hairs are more thinner in the front and it's pre-plucked in the front, it's going to die fast. So I always recommend you guys, starting from the section that I started on, but yeah you really want to have like a thin thick type of texture over the knots, because if you use only a little bit on top, it's not going to really do much. So I recommend, using this exact amount, that I'm showing you guys once I'm done, putting the bleach all over the closure. Then I set the timer for 26 minutes. The timer is up. I immediately wash the hair with Shimmer Lights shampoo. Well, actually, I mainly focus on the knot, so it doesn't look brassy because you don't want to have a brassy looking scalp and then I actually go in with regular, shampoo and conditioner afterwards. Then I use this vanilla, leave-in conditioner, so this hair can look very you know alive and then I'm going in with a wax stick to use the hot comb again and just make sure to pull the hair back again. So the hair does not be in the way, while I'm trying to melt the lace, because that's very annoying foreign just taking an alcohol swab. So I can wipe off the area where I'm going to be using the spray on and then I'm going to be using edge control. So I can move my baby hairs out the way. If you want to see how I put my hair under wigs I'll link that video down below for you guys, because you guys know my hair is very curly and thick and we want the wig to lay flat as possible on our head. So I'll link that video down below look how flowy and realistic the hair looks like I only added one product in it and it's looking amazing already. I love how I love me. Hair had gave me two wig caps, but I am going to be taking the wig cap and putting it on so I can prepare myself to put on the actual wig and I'm using the end of this comb just to move my hair out the way, but As you can see, the lace on this wig looks so freaking good with the black straps that I just cut off the wig and a couple of Clips ago. That makes the wig a size small. You also want to cut off the thick pieces on the side of the lace, because it's not going to make the hair look as realistic, so definitely cut those off. Then I'm going to be taking my favorite glueless spray, which is the Wonder, lace bun, I'm going to be adding about four to five layers. So this could last me a few days, keep in mind with each layer. You want to blow dry until it gets tacky. Then once it gets tacky you want to add another layer, and just do that about four to five times foreign once you're done with that, you really want to make sure that both sides of the wig is. Even so, your hair doesn't look lopsided and then you want to slowly add the lace onto the spray that you just sprayed on your forehead and just make sure it's laid flat. No bumps nothing like that using a comb that I'm showing you guys in this video would help lay the lace even flatter and I'll link everything that I'm using in this video in the description box down below. For you guys, because everything that I'm mentioning will definitely help make your hair look very realistic and make your lace look popping, then I'm going to be taking this elastic band, so it could help me melt the lace and I'm going to be leaving it on for About 10 minutes, or so maybe 15, but look at this hair like it's so pretty and I'm not disappointed one bit like. I could literally leave the house looking like this and I'll be fine. Besides, like you know, I have to cut the lace, but the hair itself looks so good once I'm done with that, I am cutting the excess lace off with some eyebrow scissors. I usually use a razor like a facial razor type thing, but the lace is so thin. I don't want to mess up so using eyebrow scissors will definitely help. Then I'm going back in with the even wonder spray and just lay the excess lace more flat. I did use another alcohol swab to wipe off the spray that was on my forehead and then I'm going back in with the elastic band or the bedazzled elastic band, just to make sure everything is looking melted even more, but look at the lace like I wish. I would have moved it up a tad bit more just a tad bit, but overall, it's looking real good on me and I am not disappointed like I promise you guys, but now I'm just going to be doing a side, part type of style. I haven't done this in a really long time, so I'm super excited to show you guys how I do this, but I am going to be using a a wax stick, so everything can lay more flat and then I'm using a hot comb, of course, using a Hot comb will definitely make your hair look more realistic. This wig can be glueless, it requires zero skills and it's definitely beginner friendly trust me. It'S definitely beginner friendly. It has a real HD lace. It looks super realistic. It is pre-bleached, but I personally want to bleach it a little bit more with the knots and it's definitely pre-plugged it's a 5x5 lace and it's affordable. It has a density of a 180 percent, it's full and Airy and shiny soft smooth, manageable and is definitely low. Maintenance foreign side part to be looking exactly like this. I could have cleaned it up a little bit more, but I'll just use that with concealer later on. But now I'm going to be putting my hair into two different sections. Then I'm going to be taking a clip, so the access hair won't be in the way, while I'm curling it. The curling iron I'm going to be using is a Conair one, inch curling wand with heat protecting oil and, with my Annie clips first, I comb their hair with a rat tail comb. Then I added heat protecting oil, starting on the bottoms of the hair. Since that's the oldest part of the hair and then I'm going to be curling the hair - and I am not an expert with curling hair. But I really do love how the curls came out, letting the curls sit for about 30 to 40 seconds, maybe 50 seconds, and then I'm going to be using a clip. So that could cool off. And I can start on the next section of my hair and by the way I do have 10 Clips, so I'm going to be doing 10 different parts depending on what type of curling iron or wand you use. You do want to keep touching the hair to make sure that the hair is not getting too hot, or else you will burn your hair, then that's that for the wig so make sure you guys read your instructions manual or just like keep touching the hair until You feel like it's hot enough to where you can let go of the curl one, quick tip and imported tip. That I forgot to mention is that you do want to curl away from your face, so you want to make sure that the curl is not looking like a forward curl. But the curl is looking like a back curl, because if it's looking like a forward curl, it may look a little bit off well in my opinion, but I always like curling the hair like away from my face. If that makes any sense away, I didn't want to be too perfect with the curls, because I really wanted the hair to look very natural and effortless in a way. Please, then, once I'm done doing that, I am going to be adding some hairspray. I definitely recommend using some type of oil hair spray, because this one was like a little bit too hard and I wanted it to look. You know effortless and fresh looking, but I'll leave a good one that I always hear about in the description box down below, but pretty much I'm just going to be doing the same exact thing on the other side, then, once I'm done I'll be adding the Hairspray. Thank you. While I'm waiting for all that to settle in, I dare receive some more goodies from Love Me hair, so I received a edge scarf, which is really cute. I received the edge brush and I received a mirror so about an hour and a half later. I did do my makeup, so the curls will like settle in better and now I'm just taking off the clips. That'S on the curls foreign once I'm done doing that I am going to be taking a wide tooth type of comb or you want to use your fingers because you don't want to use a comb. That'S too many bristles or anything on it or else like the curls would even be looking curly. So I definitely recommend you guys using that and I added some hairspray, so I can add some more volume to the hair foreign. Then I'm just taking a hot comb. So I can do this type of look to the hair. I didn't want the hair in the front to look flat, but I love how I did this, though, like look how cute this looks and look at the curls look at the ends of the hair, like I'm so glad I put the heat protected, mainly focusing on The ends so the ends don't look dry and now I'm going to be adding concealer just to make sure I can clean up my swoop line. Then I added some mascara and I definitely recommend using a waterproof mascara. So the swoop line could look even more fresher and cleaner, and I did over bleach a little bit if you want to know my final thoughts on the hair, then just stay tuned towards the end of this video, please. This is the final result of the hair. Oh, my gosh like it's so pretty. This is 22 inches with a body wave texture, it's definitely holding the curl. I love this quality of the hair and especially the lace closure like it's very much invisible. I did not have to pre-pluck at all and I'd even have to add any baby hairs, and you guys know I always add baby hairs. This one for sure looks very much more natural, something that you can easily throw on. I don't have to add no glue either or spray. You can literally just throw this on and go about your day with this hair. I definitely rate this hair a 10 out of 10. Like seriously. What is this? I really have nothing bad to say about this hair and the ends of the hair. Too. Look very fresh - and I could just tell this. Hairstyle is going to last me all day or even tomorrow, or maybe a few days who knows because the curls are still holding but make sure you guys go check out. Love me here I'll leave all their information in the description box down below, for you guys and all the products that I mentioned and used in this video. If you guys have any questions or concerns comment down below, let me know what other videos I should do on my Channel or just let me know what other videos you guys would like to see from me. Do not forget to like comment and subscribe to join the Harmony and, of course, click that Bell button to receive a notifications. For me every time I upload okay, so I love you guys so much and God bless you all in Jesus name and I'll, see you guys in my next video foreign
Comments
Symphony Taylor: *Hey my Harmonys, I really hope you guys enjoyed todays video! Like, comment, subscribe, & share with a friend!*
Alex_goofy: Absolutely gorgeous and perfect and amazing babygirl
Pink Rose': Okay HunnyBunny u did that! . Gorgeous! ❤️
giftedtouch633: ✨Girl.❣️This is the BEST beginner friendly wig install and review.❣️This hair is bomb.❣️... Your amazing, gorgeous and super smart.❣️ Excellent video Beautiful, Blessed Symphony.❣️❤️❤️❤️
Just Jeenie: Do you sell your old units
giftedtouch633: ✨Enjoyed girl. ❣️ Did this unit shed at all.?
mahyree: Can you please do another diabetes video .how do you keep your blood sugar down what you eat etc thanks