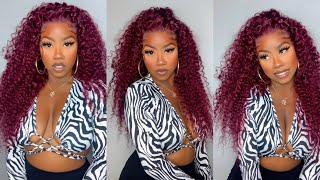
* The Perfect Pre-Highlighted Wig!!! Flawless 13X4 Lace Front Install | Ft Ashimary Hair
- Posted on 11 October, 2022
- Lace Frontal
- By Anonymous
Hey my lovely subscribers and non subscribers thank you all for all so much for your continuous support!! I LOVE YOU ALL
Let’s connect ♀️
~~~~~~~~~~~~
INSTAGRAM: https://instagram.com/itznamara?igshid...
WIG SALES: https://instagram.com/marawigsz?igshid...=
Tiktok : www.tiktok.com/@itznamaraa
For any business/ collaboration enquiries
-EMAIL| [email protected]
~~~~~~~~~~~~~~~
●▬▬▬▬▬▬▬▬▬❤Ashimary Hair❤▬▬▬▬▬▬▬▬●
Biggest Discount & Shopping By Influencer, Get $39 off Now, Code:IN39
Hair Details:13x4 HD Lace Highlight Straight Wig 22 inches 180% density
Direct Link ➤https://bit.ly/3VcsYxj
HD Lace Wigs:➤ https://bit.ly/3fUWPdP
Halloween color Hair : ➤https://bit.ly/3fTMY80
★ Find Ashimary on Social:
Facebook: http://bit.ly/2Em6mo2
Instagram: http://bit.ly/2RUTBst
Youtube: http://bit.ly/38ArYea
E-mail: [email protected]
WhatsApp: +8613273746020 (Provide Wholesale)
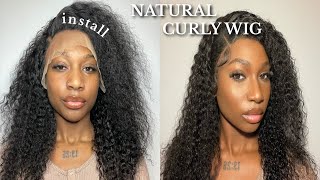
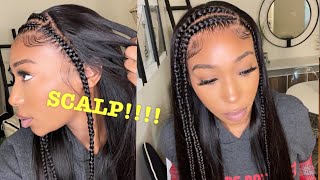
Thank you, hey guys, welcome back to my channel so today I'll be working with Ashley Mary here and I've never actually worked with them before this is my first time working with them, so I'm just showing you guys the bits and Bob that comes in the packaging. I did get quite a few things that I'm quite happy about like the eyebrow razor and these um detangler. I'Ve actually been wanting one of these for um a while now so I'm quite happy, I got my hands on them and this is the unit I'll be working with today. This is their 13x4 HD lace unit. As you can see, that's the construction of the wig um and you've got two Combs on the sides and one at the bottom. You'Ve got your regular elastic straps as well and um. This unit is absolutely gorgeous it's also straight, and it is the highlighted wig. I believe this is a 180 density. However, it felt like 150 and yeah as um. I know The Parting does look a bit crooked, but that's because um I actually did The Parting on my mannequin head so yeah. So now I'm just going ahead to cut off my ear tabs and I just realized that there isn't enough lace on the sides, so I'm not able to actually tuck the hair behind my ear if it makes sense so um. That was a bit annoying. I had to basically just let it sit on on my ear if it makes sense, but um I'll show you guys a closer look later on in the video. As you can see here, I'm literally like struggling trying to um just make sure it's not um resting on my ear, rather than it's literally behind my ear, because it can be a bit um irritating. Sometimes when you um, the wig is literally rubbing against your ear. If it makes sense but yeah, I'm fast forward, um, I'm just gon na start installing I just said you know what it is, what it is. Let me just try and finish it, and hopefully it turns out great and yeah. So right now, I'm just using my skin protector. I love to use the one from Kiki hair care and now, as you can see, I am showing you the three products from Eben. I have been loving um. Even kindly gifted me. These products, I've used those two before the orange and black one, and I love them. However, I've never tried the sensitive one, which is the one I'm using right now, the one in the gold can - and I absolutely love it literally since I tried it out that day, I've not put it down, I absolutely love it and because I've got sensitive skin As well, I've not broken out at all, not that I did with the other two um, but for some reason I just really like the Holden this one and yeah. So but I absolutely love all three to be honest: um I actually own all three in the bigger cans as well. So I'm just basically doing my regular, install and just just applying a good amount onto my skin and then going ahead to press that down using pressing the lace down using my rattle comb and yeah just to ensure that it is um, melted and yeah. I absolutely loved how this turned out and the lace on this unit is absolutely amazing. I really really enjoyed um working with this unit. All right, thank you and a crucial part is um. Definitely using an elastic band. I always use elastic bands in my video. I just really love um, the Melt it gives and um, because I can't really sit and wait for it to dry and melt. So I just use my blow dryer. This is basically the quicker way of ensuring that your lace is melted and dried as well as you can see, I'm going in with the eyebrow razor that was actually in the packaging, and it is very sharp, I'm not actually enjoying it really um. So I'm gon na just go ahead and cut off the excess lace using the eyebrow razor and then um. I recently picked up pet. I recently picked back up the bed headspray and I have actually been loving how um it looks with wine stools. So I always um use this to kind of I use it as a melting spray, basically, and it so far so good. It'S um turned out really good um yeah, so I'm just using the edge of my rattle comb and um just pressing that down so I'll spray, some of the product onto the edge and then press it down. As you can see like, I was shocked at how well this melted. Can you see that it looks like it's growing out of my scalp guys, um yeah, so try that trick out and see how that goes. I really enjoyed using both even spray and the bed. Headspray for this install like the Melt, is literally amazing, so I'm just gon na go ahead and do that for all over the perimeter of my head and yeah foreign. So I'm going to use like a smaller brush and apply a little bit of my Foundation onto the lace just for a better melt, and then I will be going in with the elastic band to just further melt that in and whilst that's melting, I'm just gon Na go in to style this unit um, so I'm gon na do a middle parting, and I noticed that basically, the unit um was a bit too dense towards the back, and I noticed actually when plucking it as well. So what I did was just apply. Some of my um caracare wax stick and then use my hot comb to just flatten up the top and then once I felt like it was flattened. I go in to tweeze The Parting a little bit just to give it a bit of space. So, as you can see, um yeah just right there, it's a bit too dense, so I'll just go in to pluck it a little bit um. Just so it looks um seamless it looks better or it's a bit more open if it makes sense. Basically, in other words, just open the parting up a little bit, hopefully that makes sense um so yeah once I feel like I've plucked um. Well enough, I go in with my root spray and just to give it a more sleek and sharp look, and you just want the edge of a rattle comb and just spray that onto The Parting, as you can see, it looks so much sharper and just a Sleek he looks so much better, so I'm just gon na go ahead and continue styling it and it just basically pressing out the hair. I really love my units to be like super flat and laid that's just how I prefer it. That'S if I'm going for a really sleek and flat - and you know, grown out of my scalp sort of look and um yeah. So now I will just be using my heat protector and I'm just spraying that onto my hair, um generously and then going in with my BaByliss wide plate straighteners, I absolutely love these straighteners and yes, I'm just basically going to straighten away and make sure everything straightened And sleek I really enjoyed like straightening. The second you'll see that lost star that Sheen. It looks so good. I absolutely enjoyed working with this hair, like I feel, like I've said this all throughout this video, but yeah so um. I felt like I needed to um. Add some layers - and I wanted to do the The Feathered layers and I decided to use my um razor comb um to achieve that, and I literally just went oh and cut away really um, as you can see that I find that technique that I'm doing right Now, to be a lot easier, just pull the hair forward and literally try and cut in um sections and um basically start off a bit shorter at the front to frame your face, and then the next sponge is literally slightly longer than the first Bunch. If you make sense um sand, I also went into give this a blunt cut at the end because I felt like it was a bit too stringy for my liking, so I just went ahead and, as you can see there, I went ahead to give it a Blunt cut and it looked a lot, Fuller and healthier, and then I'm just gon na bump the ends of the hair as well, just to kind of give it that 90s look which I love so yeah, that's pretty much what I did and I'm gon na. Let you guys just watch me um go in and just keep cutting Away really foreign foreign foreign. Thank you, foreign guys can y'all see this unit, though, can you guys see how? Oh, I don't even know what to say, like this unit, looks so good, like really really good uh, it's just this Sheen. For me, it's the the Lost star, the featheriness of the of the um of the layers, like God, I'm literally obsessed. Like look, I look cute, I'm so sorry, I'm actually so cute. I did my thing with this with this install, so let's just take off that. Can you can you guys see this? What what lace, what a lace it looks like it's literally, it's growing out of my scalp this unit is fire guys, apart from the issue around the ear like this is absolutely stunning. I definitely did my thing look at how well the leaves turned out. I am super super happy, I'm so glad this looks amazing foreign. So this is the final look. This is how the unit is looking and I must say, I'm pretty impressed with this unit and I'm also very very happy with how the install came out. The unit is so stunning, very a soft and literally like look at the movement. Look at the sheen at the luster of this new look at them. Look at this Sheen and the loss of this unit absolutely gorgeous. I am definitely in awe I'm very much impressed with this unit and I'm so happy that the install came out great. Let'S just do you guys in or let's just show you guys the lace work. This is absolutely stunning. I decided to not do any baby hairs whatsoever, so you guys can see the lace in full effect. This is super gorgeous. Also, as I mentioned, this is a 13x4 these frontal unit, and this is their highlighted unit and also this is, I believe, 20 inches, but I'm not too sure I'll make sure to leave all the specs and details Down Below in the description box so make sure So make sure to check that out, including the link as well to this unit um. This is 180 density um. When I initially installed the unit, I decided to just snip off the ends, as I felt like it was too um. It was too thin for my liking, so I decided to do like a layered cut and this is how it's looking and I'm so happy. I did that because now the unit looks a bit Fuller and um. Usually, I would like a higher density, so this is 180 density, but I do feel like it is 150 as um. I feel like it's a bit thin for 180 density. However, for this style particular style, it works so well as basically it's very flowy and yeah. I like it and yeah, so that's the specs of the unit, let's just dive into my thoughts about the unit. I absolutely love the lace guys. The lace is so seamless and it is so good. I really like how well it Blended in with my skin and how thin the lace was, and also I absolutely love these highlights on the wig like you can see, it was basically done properly and it's really really Lush. I really like it. This is gorgeous um. Another thing I absolutely loved is how silky straight this unit straightens absolutely gorgeous, and I love the Lost star and the movement of the wig. It is so gorgeous. The only things that I didn't really care for is the amount of the lace you get on the frontal itself. This is literally um how much you get and then on the sides. You only get about like an inch or two um, which is really really small. So it's not a full 13x4 um, but yeah and also the construction. So I couldn't really cut the um lace around my e as how it is constructed, as you have that two inches on the side. So it doesn't give you enough room to actually cut around your ears. So, as you can see right now, I can't really tuck it a card. It'S literally like on top of my ear, so I can't tuck it behind my ear. Um! That'S another thing! Yes, so that's another thing other than that the unit is absolutely gorgeous. I really really love the way this install came out and I love how soft and silky bone straight this unit straightens, but that's pretty much it I'll, make sure to leave all the specs and details Down Below in the description box so make sure to check it. If you did find this video helpful, please do not forget to get a thumbs up this video and also don't forget to subscribe, to see more of my installs a few of my makeup videos as well and um yeah, and also do not forget to hit that Notification Bell just so you get notified whenever I make an upload and yeah. So that's all from me today and I'll catch you in my next one bye, take a trip on it. Yeah keep it going.

Comments
Édith Olga Adamou: ❤❤❤