How To: Lace Frontal Wig For Beginners (Step By Step In Detail)
- Posted on 22 October, 2018
- Lace Frontal
- By Anonymous
HAIR IN VIDEO: Klaiyi Brazilian Straight Hair 13x4 Lace Frontal 14 inches + 3 bundles 16, 18 & 20 inches http://bit.ly/2QEMu4g
Want to win free hair?Click here: http://bit.ly/2zpjQhu
Ready For Your Halloween Hair?All orders 5% OFF!!!(10.17-10.21)
Klaiyi Hair Official Website: http://bit.ly/2NTQzmG
Same Brazilian Straight Hair in the video: http://bit.ly/2QEMu4g
Klaiyi Hair Hot Selling Indian Deep Wave Hair: http://bit.ly/2pohsS9
Want to be a Klaiyi Promoter?Join our K-Girl Club now: http://bit.ly/2NT2e5f
Use Code BEAUTY2018 to get $$$ OFF
Klaiyi Hair on AliExpress: http://bit.ly/2MHFhNR
Hot selling on AliExpress: http://bit.ly/2D4Q1GE
Klaiyi Hair on Amazon: https://amzn.to/2N5xw4O
Klaiyi Hair Social Medias:
Facebook: https://www.facebook.com/NO1KLAIYIHAIR...
IG: klaiyihair_no1 or https://www.instagram.com/klaiyihair_n...
THE BEST LACE FRONT WIG INSTALL TUTORIALS
LACE FRONT WIG - Installation, Creation, Customization STEP BY STEP Tutorial https://www.youtube.com/watch?v=YHa-OP...
360 Lace Frontal Wig INSTALL For Beginners! (FRONT & BACK IN DETAIL) https://www.youtube.com/watch?v=5dTZfc...
How I Lay My Wigs | AALIYAHJAY https://www.youtube.com/watch?v=Hzhw5I...
This Lace Is So Natural | AnthonyCuts Natural Wave Lace Front Wig https://www.youtube.com/watch?v=gPth4d...
HOW TO LACE FRONT WIGS FOR BEGINNERS | PASTEL PINK WIG https://www.youtube.com/watch?v=AwkJcx...
Affordable $59 Pre-Plucked Lace Frontal Wig!! https://www.youtube.com/watch?v=qcKtwh...
SALON SECRETS REVEALED: Lace Frontal Wig for beginners https://www.youtube.com/watch?v=1NN1v9...
LETS MAKE A RED LACE FRONTAL WIG FROM START TO FINISHED | Shalom Blac https://www.youtube.com/watch?v=az_T1Z...
VERY DETAILED Lace Frontal Wig Install | Stocking Cap Method | Cutting The Lace https://www.youtube.com/watch?v=dcCcXS...
GREY Lace Frontal Sew in Start to Finish https://www.youtube.com/watch?v=GXDT-m...
VERY DETAILED | How To Make A Lace Frontal Wig | Charlion Patrice https://www.youtube.com/watch?v=SDOR-a...
Lace Series | Installing your Frontal wig https://www.youtube.com/watch?v=_1yt5G...
CONTACT FOR BUSINESS [email protected]
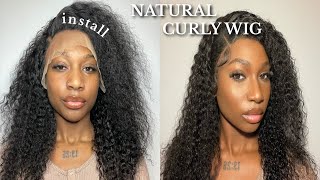
Hey everybody: this is breanna rutter and in this hair tutorial i am going to teach you how to create your own customized lace, frontal, wig, and how to do the installation step-by-step for beginners, the hair I'm wearing is from clay II, and I made a lace: frontal Wig installing their Brazilian straight hair, 13 by 4 inch lace, pencil in the length 14 inches with 3 bubbles of hair in the link, 16, 18 and 20 inches. If you want to get this here, all you have to do is click the link down below in a description to shop clay e hair, as you can tell this - is the box that they sent my hair in and, of course, they make this for your beauty. So what I'm going to do is open it up to show you how the hair looks once I received it. As you see, they gave me a free package of eyelashes that you can use when you're actually doing your makeups, as well as the hair, which is the bundles and the frontal. So it comes in a very clear package to keep the hair very neat and Static. Free after I removed all the packages, this is how quality their web slip and their hair their hair feels so soft to touch. It'S literally unrealistic how soft their hair feels and, as you can see, the ends are slightly blunt, but they have a very, very light. Taper at the tips, so that way you have a very natural appearance to your hair and, as you can tell, there's no shedding so now, I'm going to show you how to front to look and, as you can see, the hair destiny looks extremely natural, especially at The beginning, and then it gets a little thicker near as it's going towards the back. So that way you can have a very full look without it looking vici. So I absolutely love the fact that those about a half inch of thinness at the front so that your actual Center will look very natural and, as you can tell, I got a lot going on right here and I'm gon na get ready to remove this ponytail. Cuz we are not rocking with this look before I began, making the wick, of course, I'm using my measuring tape to measure how long it is and, as you will tell us, actually thirteen and a half inches long. So we had an extra half-inch and my measurement across the front of my head is 13 inches. So what I need to do to make sure that this pencil is a perfect fit is that I need to remove a half-inch on both sides of my pencil. Now you don't have to do this if you don't want to it's perfectly okay, if you have a little bit of your frontal that kind of goes behind your ears, but for our perfectionist out there you want to go ahead and measure from ear to ear, to Make sure that it's a fit before making your way. So now what I'm going to do is show you. Some of the supplies are going to be using t pins scissors, a wig cap, and I'm also going to be using needle and thread to actually sew down. My hair onto my wig cap make sure that you're using curved needles so that it's very easy for the needle to go in and out of the weight cap when you're, stitching and wig pants helps your weight to stay down and nylon sewing thread is the best. So now to begin stitching our wig. The very first thing you want to make sure you do before you begin sewing is that you pin down the front of your front sole, also make sure that the dome head, you're stitching your extensions on is the same size as your head, because you're either gon Na have a week that's too small or week - that's too big if it is not so circumference of your head, their circumference of the distance around your entire head. For me, it's a little bit close to 23 inches. So in my exact measurement is about 22 and a half, so I'm using a 23 inch, circumference, wig cap or wig head actually so make sure that the wig is the exact size of my head with just a little bit of room. So that way, it's not super tight to my head. As you can see, that's how you want your frontal to look and now we're getting to the part. We'Re going to start sewing the extensions and because this may or may not be your first time. So this video is for beginners. I highly suggest that you watch this multiple times, especially when you're making your wig it's super important. So what I'm doing is I'm going to be sewing this entire wig doing the two-track method, so what I did is I actually secured at the beginning of the extensions with my needle and thread and I'm gon na go ahead and begin stitching it down now, as I'M stitching I'm gon na be giving you tips, so I can help out all the beginners who are actually going to be making this way. For the first time. I highly suggest that you learn the skill and get it down pack, because this is gon na save you a lot of money when it comes to purchasing hair, extensions or weeks for that matter, because then you'll know exactly what type of wiggle unit you need or What type of bundles, or how many bubbles you need to create your different looks. So this is definitely a skill. That'S gon na pay back a big time, whether it's for your own personal use or you actually make money making wigs for other people. As you can see, my knots are extremely close and it's very important when you're laying down that first cracked extension and then, as you continue to stitch along, you can skip about a space of about half an inch to a bow in between stitches or knots. So that way, you don't have to add a bunch of knives as you're making it away, but the closer your knots the longer your way last so now we're getting to the point where we're having to go back to the opposite direction, and I absolutely love doing The flip over method, and that's what I'm demonstrating here as I'm, pointing to you how you want the extensions to go back. The flip over method is important when making your wigs, because it gives you the best longevity out of your bundles, especially when you're using these clay, bundles they're, extremely high quality. So you don't want to cover your weft, causing your extensions to shed, because if you cause excessive, it causes the bundle sash to lose more hair over time. You don't need to cut through your hair extensions. All you have to do is fold it back going in the opposite direction and continue stitching. So that way you don't have to cut through your way. Now that we're at the top we're not going to be doubletrack stitching any longer we're going to be single track. Stitches, so I'm creating very small knots that are extremely close together. Sometimes I'm going through the front tool, and sometimes I'm not - it just depends on how much space I have with the wig cap. That'S left so you're going to continue stitching until you reach all the way at the end and secure the very last stitch. What about three to four knots so that it does not unravel and once you're finished with your wig. This is exactly how it should look. Your last weft should be very tight up against your frontal so that there is no space and you want one track at the very end of sewing your stitches, so that it's very flat at the top. You don't want two tracks at the top. As your very last row, I suggest that you cut about a little bit more space so anywhere from about a quarter. Inch to a little longer is the space you want left on your cap when you're cutting it. So that way, you don't accidentally cut your nuts. So, as you can see, if I were to cut a little bit longer, it would have been perfect, but it's still fine. I did not cut any knots whatsoever so now at this point, I'm using the t, pins or wig pins to hold down the lace in the very front. You want to do this when you're plucking the front of your frontal. So that way, the wig doesn't slide off the mannequin head. You can also do this in your lap or on your head. Sometimes it just depends on the mood I'm in sometimes I actually put this wig on my head and pour on little random hairs. As you see here or put it on a mannequin head now, as you can see, the frontal actually looks extremely natural, but I'm only plucking some of hairs so that I can add a little bit of randomness to the hairline, because it's literally like stitched perfectly meaning That the hair is just too perfect all the way around and our natural hairline has some areas that are just a little bit thinner and a little bit thicker. So I'm just plucking hairs as I see fit, based on how I envisioned it for it to look against to my hairline, so you can choose to wear it as is, but it may look a little bit Wiggy on you. It definitely depends on how your hairline already looks, so I highly suggest that you do a little bit of customization so that you can get your most natural appearance and, as you can see, this is for beginners. I am NOT bleaching the lace. I am NOT tinting it or doing anything like that. I'M showing you a very easy way to just manipulate your hair just a little bit so that you can make your wake. Look extremely natural and realistic. Now, at this point, I'm just going to be pinning on the back of my head with a few bobby pins, but when you're gon na be wearing your weight for a long time, meaning a week or longer, I highly suggest that you braid down your hair because It helps to keep your hair better, protect it when you're wearing your wig instead of having your hair just loose and slicked back so now we're going to use these two products to actually mold a cap down to our hairline. So, as you see, I'm only applying a little bit of gel the gel is called got. Some glue in the hairspray I will be using is also called back to the glue, but these products are not glue products, and I don't suggest that you use glue on your hair because it can cause breakage and damage and you have to use different types of Products to safely remove it, since you are a beginner. I highly suggest you follow these tips so that you can have a very flawless look to your wig and, like I said, come back and watch this again, especially when you're actually sitting down and making your way. So that it can turn out perfect, so I'm just spraying a very thin line of some hairspray onto my hairline, and then I put my cap on not in the past. I used to put the cap on first and then I used to put the pasta on top of the cap, but I noticed I had to use a lot more product and I necessarily need it too. Now, I'm just using the pick of the comb and I'm doing two things right now: I'm smoothing my hair back under the cap and I'm also smoothing the product into the cap. So that way I have a very firm, actual appearance along the hairline. When I dry it down with my blow-dryer after I finish drying it, I'm simply just going to use some regular scissors and I'm just going to trim off the cap in a very right now. It'S important that as you're trimming, you don't get too close to the glue. You want to save just a little bit of space because you don't want to accidentally cut your skin or cut the hair. I mean it gets pretty like molded down extremely flat, so just only cut the cap, that's already easy to cut, and then you can go in further and you can cut off the little bits that I suppose sticking up or you can just put a little bit Of gently smoothing down this is how the underside of the frontal looks and I'm getting ready to put it on my head. So I can show you how you want to mold it down to your head now that we have our cap molded now it's time to mold down our frontal, so really quick. I barely did any editing at this point because I just want you to see nothing. Magical happens here. All I do is flip the wig on my head. I start at the back and then once I get the position in the back, I just grab the front and I just pull it forward. So many of you comment every time I edit that part out of me putting on my head you're saying what tips did you leave? I felt like you left out something I didn't. I just lit it on my head. That'S it now at this point, I'm going to actually use clips to clip my hair back so that I can cut the lace to customize it to my hairline. Now you can do this before if you want to, if you know the exact shape, you want your lace to be, but I highly suggest that you put the wig on your head and then remove the lace, because in some areas, as you're going to notice on My sides, especially I have extra lace that I'm putting there and I'll explain to you a little bit why some people like to cut that extra lace off as you can see, but it serves a purpose for me. So the reason why I like to have the extra lace is because I noticed that when I don't I have to over, pluck my frontal so that way it can contour to go down a little bit. The sideburns of my hair kind of go down a little more than normal, meaning that I don't have a perfectly contoured hairline that goes straight from ear to ear. It kind of tends to go down further near my ear. Not at this point using the end of the comb and I'm putting glue underneath the lace so that actually dry down the front of my frontal without having any list in this brush is collect in preventing you from burning your ears off okay. So now I'm gon na go ahead and start where, on the other side, as well put it in just a little bit of glue underneath not times, you will notice that I'm also going to use hair spray to spray in some areas and that's the fun notice That it's just a little bit dry or I could tell if it's lifting in any extra hold, so I've put the spray directly up to the lace. I spray through the lace so that it can seep through and then I continue drying my blow-dryer. So, as you can see, this is not a good look. It looks like I have no hair in area so in order to fix that, which is what I always do now with my frontals, is I actually cut off a little bit of hair and I use water and hair spray to slick down those baby hairs on The sides now I tend to not like baby hairs and in a very front of my hair, I don't like to cut any off, because I already have some more for it space, but I noticed that near my sideburns. I have to cut baby hair so that it can look very natural. So if you think about it, if you have a small forehead like mine, and you actually put your wig on without fixing the sides, how I did you will tend to have to make your weight go even further down or your forehead, so that it can completely Cover up the side burns, but in preventing that I like to keep my legs away. Clearly it further back near my forehead, and then I like to cut baby hair. It'S only on my sideburns. It allows me to have my very natural fit for my way, so this was definitely great advice for those who have really small foreheads, but you want to wear pencils so now, as you can see, it has that 4 inch parting space throughout, so that you can Choose to wear your hair, however, you want, and you can also thin it out if it's a little too thick for your taste or just put makeup on it. So now this is like the laziest way. Then you can style your hair, I'm literally using it Flatiron and I'm showing you very quick that I literally only curled my hair in about two to three minutes: I'm just gliding big chunks of hair through and I'm flipping. My wrist underneath so I have a very slight curl in the end now, because I curled my hair cord, it added extra volume at the top of my head. You can see it's pretty lifted at the top, so you want to curl your hair going forward in order to create that effect, and then I'm just running my fingers doing and finding random pieces that just needs a little bit of curl at the end. So now to finish off this: look I'm using a hot comb and I'm kind of bumping up the front near the hairline so that I can make the hair near my hairline extremely flat. In also so I can add a little extra lift. So then, I add a little bit of hairspray so that I can tighten all together and, as you can see, this hairstyle is finished and also, if you watch this far, let me know in the comments: what's your favorite go-to hairstyle to wear, I want to start Doing tutorials on how to do certain styles and less time and at a more affordable price. So let me know in the comments what hairstyles you want me to do next, thank y'all. So much for watching my custom and lace fronts, a wig and installation tutorial. Give me a big thumbs up and comment down below any hairstyles. You want to see next click the bell for notifications, so that you don't miss my new videos see y'all later bye,


Comments
Coleen Vee: I am thinking of making my own wig for the first time and this tutorial is really detailed and so helpful, thank you.
Luvii Duvii: Super cute! You made this process look so easy.
msshalle: I would love to see you do a braided wig and a wig made from locs or the crochet microlocs.
Ms. H.L. Hurst: Just need to share this with you and your viewers you are definitely have inspired me to make my own wig. Thanks so much!!!!
Taeja Unlimited: I’m going to try this style soon. I recently tried crocheting my own weave
knowledge Hungry: Thats so beautiful. Now can you do a lace front braided wig tutorial?
Dimplies Kerr: Hi Breanna love your technical in doing hair your doing it step by step i am learning thank for sharing ❤❤
Britt My: I'd love to see a tutorial like this but with kinky curly hair. That includes styling.
Klaiyi Hair: Professional!It's helpful❤️
Miss Manu: I love it... I may have to try this
Angel Kay: Nice! You Make it look easy. Ok going to try this
she who lives: Thanks for this tutorial,u the best Brie!!
Josie Ananda: When I make wigs they come out very good but I always end up with more hair on one side!
Aesthetic core: I love your videos their the best and im new subscriber love you
xsoxlovely_seekingYah: Cant wait to try
Clover Jones: Looooove it
Ssavage: U always slay
cindy lou: Im glad I found you again I saw you years ago on here back when Jared was doing the videos. I couldnt remember your name! I hope all is well!
mzdetroit71:
Nyesha: So if a lace frontal is worn everyday is this done everyday?
YALIXSA ESCOBAR: The love wooo❤
wanna benatural: What is the name of that hot comb?
LoveTee: Next Clip-ins hair style.
Sarsarian: Why not make a video titled “how to be proud of your real hair”?
Layla7ronaldo Cristiano: Hi