Butterfly Locs Wig Using A 13*6 Lace Front Wig
- Posted on 26 March, 2021
- Lace Frontal
- By Anonymous
WATCH IN HD. #Roadto2k
Welcome to my channel loves
Thanks for stopping by
#4chair #DIY #locswig #butterflylocs
#braidedwig
I used :
13x6 Lace wig
Murrays Bees wax
Marley Braids
Spring Twist Hair
Inspired by Dia Dierra Channel: @Dia Dierra
https://www.youtube.com/channel/UCA8_l...
Video :https://www.youtube.com/watch?v=t79bIw...
Connect with me
Instagram + Snapchat @Tijuanaskky
Business [email protected]
Remember to BE- YOU-Tiful
Hit the comment Section skuurrrrrr
Related Videos
Passion Twist 4c : https://www.youtube.com/watch?v=a8sAzh...
Distress locs: https://www.youtube.com/watch?v=xMiLMO...
Passion Braids : https://www.youtube.com/watch?v=VYRbQj...
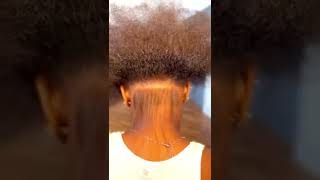
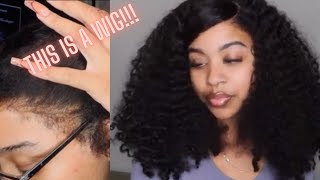
Hey guys welcome back to my channel it's a girl to on the sky and in this video i'll, be showing you guys how i achieved this butterfly locks wig using a 13x6 lace front wig. So, if you're interested just keep on watching now, i mentioned that. I am using a 13x6 lace front wig, like guys i was sampling, this hair company, some a while back, and they sent me this trash here like this here was so horrible, like the only thing about this that i really like is that the front was really Pre-Plugged and the laces were bleached, but otherwise i'm not. It was trash. Trash trash dress trash. So even though the hair was trash, i was so inspired by a jamaican youtuber dia pick up yourself. I'M gon na link her in the description box below she showed me how you can make a butterfly locks using a 13x4 lace front, all right all right, so i want you guys to go over there and subscribe to our channel check out our videos. Our videos are very, very, very nice, okay anyway, so i start this tutorial by parting out my baby here right. Like i mentioned, this wig is pretty plug, so that was so easy for me. I didn't really have to do much plucking, so guys, you're gon na need, like separators um, like some separator clips for when you start your parting, because trust me that was the most tedious part of this experience. I started my parts at the front of the lace and i work my way back. Remember i mentioned that this here is this: wig is a 13x6 lace front, so there is no lace in the back. So when i got done parting, this was what the wig was looking like. So to the back of the wig, i made sure that the parts were closed so that you cannot see the back part of the lace or the week. I should see now for the details of this these partings. What i use to part the hair at the front is maurice beeswax, the yellow one like you guys, can see there. So i used hair wax because the hair was so soft right and when i used the the wax department here, it gave it a little bit of sheen and it was easier for me to slick the hair right. So the wax really really helped that, and i used rubber bands to secure my parts because guys, the lace being that this hair was occurred here it was pretty soft, so my plaits were not stained, so i used elastic bands to secure the plaits at the front, But at the back they were fine. So when i use the rubber band guys, like trust me, the to the front of the lace, the hair was going. Nowhere like at the back, it was really fine because, like i said it's, the hair was so trashy to the back it. The plots were not pulling out right, so this is marley braids um. I got this here from amazon and i use this to extend the locks. No, i wanted the length to be like mid back, so i use that to extend the braid. Now i use one of the marley braided to do this and i plat it onto the elastic band and plait the hair down. So i should mention that i didn't put the the money here all the way down to the bottom. I actually put it to the length of the wig, so you guys will see, but i didn't plant it all the way down now for the wrapping price of this procedure. I use spring twist here now this printer is here. I will link it in the description bar below i purchased it from amazon and it's in the color 1b and in the length 12 inches now. 12 inches is a spring, but it actually stretched very very long. I forgot to measure it to tell you guys, but i promise you guys it's longer than 12 inch way pass, so i fluffed it out right before i start wrapping it. I fluffed it out to this, and then i crocheted it underneath or crocheted it onto the braided hair. So after i crocheted the the spring twist here onto the braids, i wrapped the base about three or four times like i wrapped it really tight, because i want to cover up the rubber bands and i want the base to be firm, and this is to the Front of here, so you know you want to you, want you want it to have that firm sleek. You know, even though it's locks, but you just want the foundation to be very sturdy so after wrapping it from the base three to four times. I start using my thumb to create the butterfly effect. No, i do have a butterfly locks, video that i did on myself um some time ago. I will link it also in the description bar below, but i just keep on looping my finger. The lock the hair around my finger and pulling it down looping in and pulling it down, looping it and pulling it down. Um. It'S not hard. It'S really simple! It'S something really easy to do. Um, i would say um you can give it a try on your own hair, but i decided that i really wanted a lux wig, because trust me guys whenever i do locks on myself to pull it out is a disaster. My always i chop out my ear. So i'm gon na say i have to put this on a week: okay, okay! No, when i mentioned earlier that i used two of the spring twos here to complete each of the locks so to add the next one. You will use the same, leave out a little bit and then just start wrapping it onto the hair again real simple guys. So just follow me, look, follow me and see what i'm doing and if you attempt it it would be really great it'd, be great for you great for me, but just commenting leave comments down in the comment section below and let me know so. I'M rambling and i'm just gon na continue and let you guys watch till the end of this video, okay, okay! So for the end of here, you're going to loop, the hair back upwards when it reach your desired length, you're going to loop, the remaining of the hair upwards and just twine twine twine back twine back twine back twine back and give it a roll. That'S it some persons use glue. I don't really like glue, so i didn't use any glue. Some persons burn it. I don't like fire, so i'm not going doing that um anyway, so i used some setting mousse on the hair and off screen. I went ahead and used a hot toil and rub it over the hair to tame any flurries, and this was it. This was the hair like. I was really impressed. Um i showed dia. I know she's going to watch the video. You know pick up yourself again. Girl yeah but um and she loved it um. This was really really a great project. I was really i really owed it myself and let me know how i did in the comment section below. Let me know: what's up guys, hit the comment section if you really like this video, i like what i did if you found it interesting, give it a thumbs up. Please i'm asking you. You know how it is um and until next time guys remember to be beautiful, and i want to also say thank you guys so much for the support you've been giving me. It means a lot to me, i'm almost at 2000k and i wouldn't have reached there unless it was for you guys, so one big, open myself and stay tuned for when i install this wig in the next video. Alright, bye,


Comments
CakeDreams008: I love it! You motivated me into making one! Thank you
Dia Dierra: Can’t wait for you to install!! love it !
Dia Dierra: You did such a great job hun
Melissa Harris: Great job !! You make it looks easy
Kurlie KeKe: I'll love to see you install this wig. This wig really came out perfect
Kurlie KeKe: This came out great and you gave me some inspiration to try it out . I am wondering if I can turn my 4 x 4 wig into a braided wig.
Tameka Bryan: Girrrrllllll!!!!!! yup this bad!!! I love it!! You did amazing!!! Love it! On my list for summer!! (Between midterm and spring clean I'm a day late but had to come support)
Funny Sheit!: Well done and neat!
Que3n_Kim Tv: I love everything about this. Wow. 10/10
Sharine Wynter: Beautiful locs love them
M Pampalon: This is 1000% amazing hun. Do you think it would look better on 14in 13 x 4 lace front wig or an 8in full lace?
Sandre campbell: Love love this!!!!
Kemaya K: I’m about to do some butter fly locs on my hair now lol.
Que3n_Kim Tv: From trash to treasure
Kemaya K: I gotta try this
Sai: I wanna try. Except I don't have a wig to use.. So now I need to find a trashy lace to make this
michelle watson: i love it.....
Kemaya K: Omgsh this look amazing
Dia Dierra: Ouuuuu thanks boo
Dane Visuals: Mom life never looked better
Tameka Bryan: Mi affi save it! I'm lazy with my natural hair but I will kill a wig!
Tasheria & Jov: ♥️ it’s 100 for me
Mel Boss: Creative
Tawana's Lifestyle: This nice bad!!!
Roosevelt: Girl u Mek mi feel like mi can do hair now to rass...lol
Dia Dierra: Heerrrreeee sorry I’m late I was working