How To Make A Lace Frontal Wig Customize Cut Curl And Style Wiggins Hair
- Posted on 01 April, 2018
- Lace Frontal
- By Anonymous
hey loves new video easy way to Make a Lace Frontal Wig Customize Cut Curl and Style like the salon ft Wiggins Hair
HAIR DETAILS:
Wiggins Hair Official Store on Aliexpress:
Body 3 bundles with lace closure:
Straight 3 bundles with lace closure:
Wiggins Hair Official Website: https://goo.gl/CSDAX6
Body Wave 4 bundles with Lace Frontal:
Body Wave 4 bundles with Lace Closure:
Body Wave 3 bundles with Lace Closure:
Body Wave 3 bundles with Lace Frontal:
3/4 bundles with frontal/closure: (7 Styles for you to choose!)
Ombre Hair and Blonde Hair:
★up to off 30%, extra $5 off $139, extra $10 off $269 and extra $15 off $359
★extra $3 coupon for all new customers, Coupon code: "WIGGINS", only one chance!
Wiggins Hair Store on Amazon:
Follow @wigginshair on instagram: https://goo.gl/AhdsXo
Facebook @wigginshair : https://goo.gl/GqrSQt
Subscribe Wiggins Hair on YouTube: https://goo.gl/w1Kxie
E-mail: [email protected] (provide wholesale)
WhatsApp: 0086 17703997280
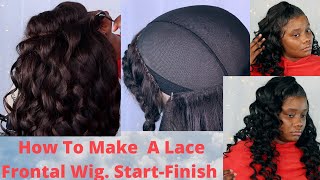
Hey guys, it's Caroline, I just wanted to show you guys a super easy way to slay your wake start to finish like you got it done at the salon. So let's just get started so the hair I'm using today is from Wiggins hair. I will have all of Wiggins information and links in the description box make sure you check it out. I have four bundles of hair. I have two 26 inches and two 24 inches and then I have a lace front, toe which is 20 inches long. Alright, you guys so the first step to actually slaying your lace front. Wig is you're gon na have to customize your lace front. So the first thing we want to be doing is bleaching or nuts on our front. So now I don't usually do this on my channel in most of my video, but I really wanted to show you guys how I do this if a client wants to request this a Messala. So the first thing I do is bleach my nuts now using the bw2 bleach powder with 40 %. I'M developer I'm going to be adding like three scoops to the bowl and then I'm just going to avoid it. I don't usually measure I just add, but I really want a thick consistency with the bleach. I don't want the bleach to be soupy. I want it to be really thick, because that's the only way it's gon na stick on the list without a trance also the hair on the lace, so I just wanted to stay on top of the lace. Oh, I want flesh to be extremely thick. Like you see now all right so now that I have my flesh all mixed up, I'm going so I'm starting to apply it to the lace and I'm going to gently tap it on the lace. I'M now going to tap it to hard just gently, I'm putting on the list making sure that it's all over the lace but is not transferring on so the hair itself. Okay, you don't want the bleach to transfer on to the strength of the hair, because then it's going to change the color from black to like bran, so you just want the leash to be on top of the lace. So you apply it gently until you completely fill the whole lace up with the bleach all right, so once the lace is totally covered up with the bleach. I usually take another foil paper and I gently press it down so that the bleach can process on the least my leaved is only about 10 to 15 minutes and I check on it. I see the last turn after that I pretty much take it in shampoo and condition it now. If I was doing this for a client depending on my clients, skin complexion, if there are lighter the main, I will usually go in and take the brow Cygnus out from on the list. I'M try to make it a little bit lighter or if they are darker, they mean. If their complexion is darker than me, I usually go ahead and tend the least a little more, so it matches their skin complexion, but because this is for me, I'm gon na leave it just the way. It is all right. Actually, she are not on our list front why the hair is so wet. I'M going to put it on my mannequin head using my T, pins to see, kill the lace front down this lace front. It came free plug already, so that's a great thing and most lace front so come pre plug nowadays, but you will get some that you have to work a lot fun to make the hairline look realistic, but this one is okay. So, starting off with my tweezing, I'm going to be taking out the first line of the baby here now, if you twist out the first line of the baby hair too much is going to make your lace front ball in front of it. You'Re gon na have a little bald spot, so you don't want to twist it out. You want to just leave that because you're gon na cut that to make baby here, but behind the first line, I'm going to start tweezing it out and that's a part of iU so tweezer out, I usually try to skip a section. I would twist a little bit after section and I would skip and move up to the next section. I do that and then I be partying the space in the back to tweeze it out. They just help make the lace front to look really really natural in the front and it looks seamless all right so right now. I love it. The way this, I don't like it to tweeze out that just my personal preference, if I was doing this for a client depending on their choice and how tender like the front line to hairline to be, I will twist it out a little more, but after that, The next step is making baby hair. Now I just take my razor comb, the first line on the hair line that I part out off that I did not tweet. I would just take my razor and cut it and just make a shorter to make my baby here alright. So once I have my baby hair a little bit shorter, I take my mousse and I drop it on my baby here, laying it down in a more natural form that it lays naturally, on my hairline, I do not like the slicking down off the baby hair. Now, if I was doing this for a client and it requested their hairline, so be silk slick down and they like to see their baby hair in the front, I would definitely give them that. But personally I do not like slicking down and a leaned out the baby here I just like it to leave naturally in the front. So this is how I love mine, and this is how I will customize mines that it looks natural for me. You all right now that we customized the lace front is time to move on to making the wig using my all-time favorite wig, making cap I'm gon na. Take this mesh dome cap and put it on my mannequin head. I'M gon na take that lace front! Look! How good that leads from look in the front? Look at the hairline! Yes, I love it. I'M gon na put it on my mannequin head now to position this. You don't want the front to be laying flat, because if the front lays flat the back is not gon na lay flat and you're gon na sew it on wrong. So you want to make sure you have that gap that is not laying flat. You can see the hole in between in the front when you position this this away. Now, where you see that little line stops. That'S where it measures to the cap and using my T pins, I'm going to secure the lace front row on the wig cap. All right now that I have a lace-front secured on the wig cap with 30 pins in place, I'm just gon na remove the hair out of my way, I'm taking my clip and removing the hair out of the wind. This is how it's supposed to look he's supposed to have that cap in the front and the back is supposed to be laying as flat as possible now using a needle and thread. I'M gon na start from the middle of the lace front and I'm going to work my way down to the left side and then I'm going to come back up to the middle and work. My way down to the right side of the lace front sewing it down neatly and secure leave flat on the wig cap. All right, you guys. Once I have the box out of the lace, frontals suntan, you can see how nicely flat and secure that looks. I am ready to move on to placing my bundles in the back. Are you guys moving on to our bundle? I'M gon na show you guys a really super easy way that you can show on your webs cut layers in your hair and curl your hair, all at the same time. So the first thing we're gon na. Do we're going to take this regularly part off your wet when of your bundle whenever you get your bundles, this regularly part apart, that's not even at the end always cut it of your bundle. Once you cut off that part of your bundle and you throw that part away, you guys, your wig will make a whole lot of difference. You will see body and volume in your way. You will see this hair. Look at this bundle. Right now is so easy and the hair looks nice and full already so starting off wolf double tracks, I'm doubling my West because I have four bundles and I want to pull all four burners in start it off at the end of the cap, I'm trying not To go through the fan does around the cap, I'm gon na start to sew on my webs now how, as he killed my webs, I'm on my way capsule my web doesn't move around. I, when I put my needle through the cap, I go ahead and put it through the double webs. I make a loop and then I pull the thread just to kill it. This is how I do my sewing my stitching all around my wig and I usually start for my left side and work my way to the right side to secure my wife's on the wake up. Alright. Now now we cut our first panel. We are layer, we apply our first wife. Now you can move on to the next step or curly. You can either put on the whole bundle before you start to curl. If you choose to - or you can do it one line at a time if you want to now using some type of oil, any type of oil that you have I'm using the Paul Mitchell serum, I'm gon na rub a little bit on the hair. Just to give it a little bit of shine and then you can take any type of curling too, that you have at home whether it's your curling on your your curling wine or, if you're looking for that, I'm sleek look, you can take your flat iron, whatever Color and whatever size you have at home, you can use so I'm taking my regular curling iron and I'm going to curl away from my face. I'M doing this method making sure that all the curls falls back going towards the back. So I'm curling towards my face and I'm gon na wrap the whole hair on the curling iron and then I'm going to release the curl. I'M gon na hold it for a little bit. Holding is still making sure that every tip of it get the curl and then I'm going to release it into my palm now. You can hold it so it cool off. If you choose to, I don't usually do that. I usually just take a clip. I have copper at this clip. I don't have a whole bunch to do a whole head, but I have about five or six and I would just see, kill the curl in place. Just it cooled off and once it cooled off, I'm gon na take the clip off and move on to the next, but this is how I curl I cut, and I saw on my wife's all at the same time. Okay. So now that I have my um first bundle and I'm going to be taking my second bundle and I'm going to be doing the exact same thing, but with my second bundle, I'm just going to cut let's a bit higher, just to add a little more layer. So that is shorter, then the first bundle that I cut, so I just make it a little higher and then I flip off the regulations again and you guys can see how nice and even that looks now once I apply the second bundle. This automatically gave me layers took my wig okay, I'm just gon na do the same ethic, with the needle and thread again working my way from the left side and moving my way to the right side, and then, after that, I'm going to go ahead and start To curl away from my face with the second bundle, all right now I went ahead and I put a third bundle in and you guys can see how nice and full and bouncy the hair already looks. I'M gon na move on to my last and final bundle. I'M going to make this bundle the part that I'm cutting off I'm going to make it a little bit longer, as you guys can see. I went up a bit. This way just gave me that extra layer on the top that I'm looking for okay, I'm taking my scissors and I'm cutting all of that part off and then I'm going to start to apply it right in the middle off my wig, as you guys can see, And I'm just going to apply it straight across going all the way to the top. Until I get to the lace front, are you guys so now we add the very tough or the wig? This is my last track: I'm making it a single track, a single West, I'm just going to put it and attach it to the lace, frontal and marry them together, sew them together, and this will be the end of sewing our West to make awake. Are you guys, so I'm finally done with making on my way you can see how nicely the closure in the last track is soon down together? I did put in four bundles of here and now I'm just gon na take my curling iron and curl. The rest of the bundle - this is how it looks after I finally finished curling. You can see how bouncy and it looks okay now moving on to the closure. This is our last part. Our wig is half way done almost done. Okay. Now this is how I do my photo to give it a nice layer in the front that is bouncy, it's movable, okay. I go ahead and cut a lot of layers on my front. Oh okay, I, like my frontal to be bouncy, so I do put a lot of layers in the front all right. Once I have my front row completely laid out. I have enough layer as I please I'm going to take my curling iron and go ahead and put some curls on the front row and I'm going to be curling away from my face, like I did the other girls in the back. This will just help. Give me a nice volume to the wig, all right, you guys so after killing entire wig. This is how the wig looks. All my curls are going back. My wig was easy to make i stylish at the same time, and I gave it volume I gave it layers. I did all at the same time. I'M loving this right now, I'm just cutting off the extra lace in the front of the wig and then after that I went ahead and I cut off the extra cap that was underneath the lace, so I will be able to expose the lace once that is Done I went ahead and added my elastic band using my needle and thread, I add the elastic band to my ear taps and once I was done, that was pretty much it. It was time to put the wig on alright, you guys. This is the end of this video. I just want to put the wig on after that I'll secure it. I cut off the edge cut lace around my ear, just making sure that it wakes it behind my ear and then I use my car to be glue spray to spray, my hairline, so that the lace is securely flat on my hairline of this week. After that, I just took my wide tooth comb and comb through the whole wig. I flipped the wig over call me all the curls to the front, and then I just went in here and flip the hair back. That is pretty much it to this wig. I absolutely love the results of this way. I have volume, I have layers, I have curls, I have a bombshell, wig. Okay, it looks like I did it in a salon and I did it all at home. Okay, as always, check out Wiggins hair in the description box. Thank you guys so much for watching this video. As always, I love you and I'll catch you all in my next video bye,


Comments
Guerlyne Bel: You did a beautiful Job slaying that wig!! Love the styles ❤❤
Sharon Mays: That's beautiful. ..very very nice job your a great teacher and very detailed. .thanks
Mildred Dawson: So beautiful! You do a wonderful job!
Sabrina Ross: yes it is definitely a bombshell Beautiful I love the way your Technique is done with such simplicity you slayed that!
Wiggins Hair: Thank you sooo much,dear,really perfect.
Sweet Peach: I LOVE IT!
Smish: Very detailed thank you
Deidre Rilry: It's real beautiful I love it
Contents content: great detail!!!!! thank you
MsMeshaboo: Beautiful as always
Marcelle Dupont: Bravo FabbulousC international ❤️ Très beaux ! Magnifique ! Les explications sont claire, précises et concises. Très belle coiffure. Rien à dire. Tout est réussi. Magnifique ! Love you FabbulousC ❤️❤️❤️
Lori Green: You did that beautiful
Glenda Rogers: Luv this video ty
Beautiful Dreamer: Amazing
ShaniceJanay Mcduffie: Bomb af just learned a lot.
dolly sibdhannie: Should I beg for this ☝ lol it's really pretty keep doing you
Evabless Crystal: ❤️
Kersha Beaver: Nice
Rukietu Chapin: Just by curiosity are you Liberian? I think you have a Liberian accent.
elizabeth meeks: Gorg❤