How To Bleach Knots & Pluck Lace Frontal | Detailed Talk Through Video | Amazon Beauty Forever Hair
- Posted on 29 June, 2020
- Lace Frontal
- By Anonymous
This was a detailed video on how I bleach and pluck my lace frontal wigs! I hope you guys can learn something and this helps you with the customization of your wigs.
Let me know if you guys like this video !! Feel free to share any ideas for videos for me!! Or, any videos you guys want to see specifically!! Let me know what hair products you use!! Let me know if you do try it how you like it !! LOVE YOU ALL!! THANK YOU FOR TUNING IN!!!
- - - - - - - - - - - - - - - - - - - - - - - - - - - - - - - - - - - - - - - - - - - - - - - - - - - - - -
T H U M B S UP if you liked this video!!
S U B S C R I B E → https://bit.ly/2WTV5a7
Business/PR/Collabs: [email protected]
- - - - - - - - - - - - - - - - - - - - - - - - - - - - - - - - - - - - - - - - - - - - - - - - - - - - - -
6% Discount Code: Beauty006
HAIR DETAILS:
Our Website : https://amzn.to/2KJs3jT
+ link to the same hair on the video :https://amzn.to/30RcaOZ
+ link to the wig grip:https://amzn.to/2YqfOS2
+ link to Beauty Forever Hair Amazon Store: https://amzn.to/2KJs3jT
Hot sale for Beauty Forever hair:
Bob wig: https://amzn.to/2NwFWqU
Body wave wig: https://amzn.to/2J7ECGR
Malaysian deep wave:https://amzn.to/2KWch8F
Malaysian curly hair:https://amzn.to/2JkzxKe
Malaysian loose deep wave:https://amzn.to/2xzIsSp
Brazilian body wave:https://amzn.to/2KAmlAM
How to contact Amazon Beauty Forever Hair ?
Email: [email protected]
Phone number :(256)8266745
Whatsapp:+8615893771660
INSTAGRAM: https://www.instagram.com/beautyforeve...
IG: @beauty_forever_hair https://goo.gl/jiNuEN
FB@Beauty forever hair https://goo.gl/2W9juN
- - - - - - - - - - - - - - - - - - - - - - - - - - - - - - - - - - - - - - - - - - - - - - - - - - - - - -
PRODUCTS IN VIDEO :
LINK TO WIG :
BW2 Powder :
40 v Developer
Shimmer Lights Shampoo
Creme of Nature Shampoo
- - - - - - - - - - - - - - - - - - - - - - - - - - - - - - - - -
WATCH OTHER VIDEOS :
Transforming Sweat Pants into Two piece set | Beginner Friendly DIY Transformation |
Long fake Nails At Home (NO ACRYLIC) | Super Affordable Nails From Amazon
Oversized $5 Sweatshirt to Two Piece Set
DIY Sugar Wax!
- - - - - - - - - - - - - - - - - - - - - - - - - - - - - - - - - - - - - - - - - - - - - - - - - - - - - -
S O C I A L M E D I A
► Instagram: https://www.instagram.com/nataliaalese...
► Snapchat: https://www.snapchat.com/add/nataliaal...
- - - - - - - - - - - - - - - - - - - - - - - - - - - - - - - - - - - - - - - - - - - - - - - - - - - - - -
Song Info (intro):
[ R&b Love Piano ] NO COPYRIGHT MUSIC || INSTRUMENTAL BEATS || MUSIK GRATIS ( Prod.JualbeliBeatz )
https://www.youtube.com/watch?v=51NV8p...
Song In video :
"Thinking Of You" | The Weeknd [Copyright Free Music] R&B Trapsoul Beat Instrumental
https://www.youtube.com/watch?v=UTxtfU...
––––––––––––––––––––––––––––––
#lacefrontal #bleachknots #bleachfrontal #plucklackfrontal
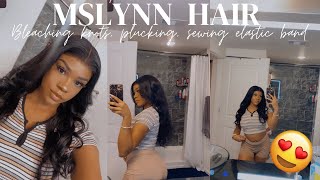
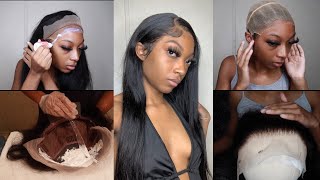
Hey guys welcome back to my channel, it's your girl at least today, I'm going to be showing you guys how I bleached and plucked the frontal of this wig. This is how the wig looked prior to me doing any customization, and this is how the wig looked after. I think it's definitely a huge difference. If you guys want to see how I cheat, this look definitely stay tuned. This is a detailed video on how I bleached to pluck the knots my channel is all about doing it yourselves and how to so. This is why I created this video, so you guys can create a bomb lace frontal all by yourself at home. If you guys want to see more of these types of videos, definitely subscribe to my channel and give this video a big thumbs up. Hey guys so this week was sent me by Beauty forever on Amazon and on the back, provides you information on how to maintain your wig and how to measure the wig so inside. It provides you with lashes, which is really cute gift for them. To give you and then the wig, this wig is the beauty forever Malaysian curly wig it's a 13 by 6 frontal human hair wig - that is pre, plucked curly lace, Perman twiglets baby here, and it is a 14 inch wig and 150 % a density. Well, since this video is focused on how to customize your front, so I want to show you guys, the frontal prior to me adding any customization. This is how the inside of the wait. Look it's a 13 by 6 frontal. So it's goes six inches deep in the middle, and then it comes with two combs on the top and a comb on the back and then clasp in the back. To make the wig tighter so now onto bleaching is when I get yourself some type of little Bowl that you'll be able to throw out, or your reusable mixing bowls, your bw2 powder and your 40v. It developer and first you're gon na go in with your BW tube powder and put in to full scoops there's a scooper that is provided in size, the powder and put in full to measure down scoops into your bowl. You don't want to go on with the same measuring cup. That'S provided and go in with one full cup of the 40-feet developer and go in with half of the cup of the developer. Only pull it up halfway and put it into your mixture. Then you want to mix everything together and you should get a very thick consistency. I think this is very important when bleaching your nuts code, you don't want it to be too runny, because then it will run through your hair and over bleach your knots. So you want to be a very nice to consistency, as you can see here, and also depending on how much at least you have to bleach, you can either like cut this, these measurements in half or double it triple it, whatever you need for your friends'll, so Here you can see, I have the frontal. What I like to do is I pin back all the hair straight back first, so that we don't have hair flying around everywhere. So you just want to go ahead and pin everything back or clip it back. Don'T you have everything clipped back, you can go ahead and turn that frontal around and now you are prepared to start bleaching, your nuts. So what you want to go ahead and do is get a knife using a plastic one, so I could just throw it out right after and you want to go ahead and spread that on your lace. So for this part, you want to take your time and spread it on now. You don't want to be pressing down too hard, but at the same time you want to just make sure that you get a nice, even layer, all over the lace and make sure everything is fully covered with the mixture that you need. The reason why I chose to use a knife to apply the mixture is it's like it's so easy to spread it almost like you're putting butter on bread and you're spreading this mixture on your lace, and it's just very easy to apply it and make sure you Know where you're applying it and get a nice even layer, all overly, so if you guys are gon na do it. I definitely advise you guys to use a knife, because it's very helpful and easy to spread it all of your lace. Just to remind maybe you want to make sure you get every single inch of that lace that has hair on it. So you want to make sure those knots are nice and bleached. I picked up my camera just so you guys can see that literally everything is covered with the mixture with the bleach. So this is how your relationship be looking. I'Ve been going with my foil and the supplier to the bottom of the wig. I just fold it over on top of the lace. I don't push it down or anything I just fold in the sides of the foil, and you want to leave this for about 20 to 25 minutes. So this is how the knots were looking. I was very pleased with the outcome: she's gon na go ahead and rinse off all that bleach off the week before you shampoo or anything just get all that bleach out here. I'M showing you guys the knots at the top very pretty I love the way. It came out. I then going with my shimmer light shampoo and I apply it all over my frontal and I shampoo that into my frontal, specifically where I believe the knots, because you want to get that brassiness out of your hair, and this is very important to use this after You bleach your hair, I went ahead and did this twice I shampooed and rinsed it out twice, but once you finish doing that you can go in with your regular shampoo and with my cream of nature, moisturizing shampoo, you just want to go ahead and shampoo. The whole entire wig give it a nice thorough, scrubby, double dog, you guys know, take care of your wigs as if it's your natural hair, especially if you want it to last. So it's very important to shampoo and condition your wigs, especially when you first get them to get any smells out of it, and also just prepare your wig for whatever period of time that you want to wear it for so after you shampoo, you want to apply Conditioner, the camera cut off by apply conditioner for about an hour and a half to two hours. So this is how the wig was looking after completely dry and, as you can see, there already is a big difference with the not being bleached. And if you want to install like this, you can, but if you want to make even more customized and more natural definitely stay to see how I plug these knots. So first thing you want to do is get the end of your ratchet comb or the end of any comb and part a small layer of the hair out from the rest of the hair. So I usually do about like a half a centimetre of hair. A very small portion because you want to work in small sections to get the best results and it's just easier. It does take some time, but the results are beautiful, trust and believe. When you part the hair, you want to make sure you clip the rest of the hair back, you don't want to grab your tweezers or tweezers are gon na, be your best friend for this part of the customization, and you want to go ahead and just start. Plucking the knots, so what I like to do is hold the hair in one direction and pluck the opposite direction, because I feel, like I get the most hair out when I do this and you're going to go ahead and pluck different areas of the frontal. You don't want to stand in one area, because if you stay in one area, you will create ball spots in your cap and that will not look cute honey. So he's going to go ahead and pluck around the frontal of where the hair that you parted and you want to make sure that if you see any areas that look too thick or anything kind of just use your eyes, you go ahead and plug that. A little bit more but once again do not stay in one area. Cuz. If you do that honey, you're gon na create a ball spot and you're not gon na, like it. I usually like to pluck in sections and as you guys can see here, I usually do a side top and then the other side. And then, when you finish plucking that section, you want to go ahead and pull out the hair that you plucked so that it doesn't get all knotted at the ends. And it's just easier for you to see what else you need to pluck next and while you're going through, feel free to pull the hair back to see any progress that you have made, and I can see a little bit progress thus far. So we're going to go ahead and part another section of the hair once again, don't party too big and also don't part too small. I say about a half a centimetre of hair and pin back the rest of the hair. So once again you want to go ahead and hold that hair and pluck the opposite direction. It'S just easier. Sometimes I do pluck down. But you know it's not the scars in the do, so you want to go ahead and pluck the opposite direction and continue to pluck all over that frontal just go and spots that you feel like may be too thick or just continue just to go back and Forth until you feel like the hair is less dense and a stand out and as natural as possible. Here, I'm just showing you guys. Once again, once I pull that hair for me plucking, I pulled the hair back to see the progress I have on the frontal. Like to do this after every layer to see how much I may need to pluck or may not need to pluck she's gon na go ahead and part the hair again and, as you guys can see, this is gon na become like a routine. You just want to go ahead and part plug part plug as far back as you would like until you feel like it fits what you would prefer when it comes to your natural hair line. Once again, I'm just plucking the knot starting off with the size and making sure I don't stay in one set area and as you get farther up on the head, instead of just pulling out the part, the hair that you plug, you can go ahead and take A brush and brush out they heard a two plugs cuz. This is easier because the hair was getting thicker and you wanna miss you get every strand, so you can see how much more you need to pluck or may not need to plug you. So this is how the hair looked after three layers, so I did the rest off-camera. I went about a couple more layers deep and this is how it looked when I was finished. So what I like to do, when I finish plucking, I like to brush all the hair back to see how everything is looking and, if I feel like one part place or part, is too thick I'll just go in with my comb and part that area as I'M doing here and just pluck that areas a little bit more here. I just want to show you guys how the middle part was looking. I personally don't pluck that area cuz. My hair is very thick when it comes to parting, but you can, if you'd like - and this is how much hair came out from plucking like it's like a whole ball. Around looks good, though, after, since this is a curly wig, I just went ahead and sprayed the whole way and got it what to see how the frontal was really looking and to see did any other spots I need to pluck so I just went ahead and Plucked the size 11 or but this is the finished - look yard. This is how it came out. I absolutely love this wig and how the knots came out. I am really excited to wear this wig and you know show it out. You know I'm funny, so I'm going to be installing this wig in the next upcoming video, so definitely stay tuned, for that it will either be posted Monday or Tuesday. When I install this wig, let me know what you guys think was this detailed video helpful for you guys, and will you guys be using these methods on your own wigs and if you guys would like to see more of these, do it yourselves? How to add videos all about definitely subscribe to my channel and give this video a big thumbs up, helps me out a lot and never forget honey. Love life love you and do you boo, love? You guys thank you for watching.


Comments
Cydney Stephen: Glad I am old school and a plain Jane. Can’t be bothered with all this. You are good. More power to you young lady. Lol.
Celina Roberts: Hairline looks natural when done