How To Cut Outre Melted Hairline Hd Transparent Lace Front Wig Frontal Seraphine Review|Kharah Jay
- Posted on 03 December, 2022
- Lace Frontal
- By Anonymous
Looking for a synthetic wig that will give you the perfect look? Look no further than the Outre melted Hairline HD Transparent Lace Front Wig Frontal (SERAPHINE). This wig is perfect if you're looking for a high-quality wig that will last long.
This wig is made with premium synthetic hair and is designed to give you a look you want. The Outre melted Hairline HD Transparent Lace Front Wig Frontal (SERAPHINE) is a great choice if you're looking for a synthetic wig that will give you a perfect look.
Hey, Welcome Back!
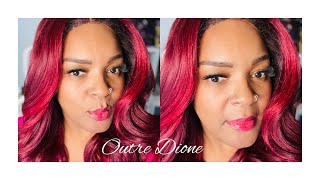
Outre melted Hairline HD Transparent Lace Front Wig Frontal (SERAPHINE)
#vlogmas #outrewigs #howtocutyourownhair
Link to the wig
PLEASE WATCH IN FULL HD FOR THE BEST EXPERIENCE.
*************************************************************************
FTC Legal Disclaimer - Some links in my videos' description box may be affiliate links, meaning I will make a commission on sales you make through my link. This is at no extra cost to you to use my links/codes; it's just one more way to support me and my channel! :)
MUSIC:
Music by Mr. Chase - Love of my Life - https://thmatc.co/?l=AB1C4EE1
Music by Ryan Little - Heaven's Muse - https://thmatc.co/?l=AF4C0511
S O C I A L N E T W O R K
Kharah_jay
*******************************************************************
Business inquiries/ collaboration
Email: [email protected]
V I D E O S Y O U M A Y L I K E
BUN TUTOIAL
https://www.youtube.com/watch?v=nq-Q2E...
CANON UNBOXING
https://www.youtube.com/watch?v=Ynt-M0...
VLOGS
https://www.youtube.com/watch?v=ADhNvs...
EATING OYSTERS IN JAMAICA
https://www.youtube.com/watch?v=tgdc_O...
COME SHOPPING WITH ME
https://www.youtube.com/watch?v=XzPVCg...
*********************************************************************
F Q A
CAMERA: Canon SL2
LIGHTS: 2 soft boxes and a ring light
EDITOR: Final cut Pro
Im Jamaican
Hey guys welcome back to my channel I'm doing a hair review on the old tree. Melted line called serafi. This is a soft HD, transparent lace. It'S five inches deep part in it's pre-pluck Airline. It has an elastic band, it has natural hairline, which we all love and yeah. This is how it looks. It looks really nice, but the lace is not looking good, so I'll be using the Eben lace tint in medium brown. So this is how the hair look and how tall it is, but we're gon na take care of that, because I don't want it that long all right so first, I'm going to do is catch up to here. Kinda get it out the way, then I'm going to apply some glue on the lace, while ever I would recommend cutting it off if you're a beginner. I struggle with this method. Probably I need to do it more, not sure, but um here, I'm just basically kind of seeing if it's flush around the ears and then cut light excess. I must say that using the elastic band with this is very secure. Very very tight, like I felt like I didn't, have enough um lace or I didn't have enough space, or it just felt really tight on my head um, but over time it kind of just gets loose. So since I like how it looks, I'm gon na go ahead and use my got to be spray and spray it down. I can't really see so I tend to go back and forth with my glasses. As I said, this method is not for beginner. I don't think so. I would recommend spraying it in sections like um cutting it like one, two, three four sections and then spray it down that way and then cut um. For me at least, I think it wasn't really a beginner friendly method to use, but yeah. That'S what I'm going to do, I'm just going to spray it down and then I'll come back foreign guys. So I know you weren't able to really see much because I can't see, but here I am cutting in the middle because I feel like. Okay, probably this would have been a better way of doing it, but you know I was really trying in this video to be honest. If I had just cut it and then just put it on my hair, like that, I would have been it would have been better. It would have been a better method. So if you're doing this by yourself, I would definitely recommend cutting the lace and then go in and just spray it down or just spray. Your hairline then put it on there. You know so yeah. Please learn from me. If you're a beginner do not try this method, to be honest, the elastic band, as I mentioned, it's just a way better method like you, don't need to really glue this wig down. To be honest, but I just like to glue my wigs down so here I go. I'M cutting off the lace um, so here I go. I'M cutting off the lace trying my best just to get off most of the leaves, because I feel like these synthetic wigs that has so much lace on it. It really needs to cut as close so they um the weak hairline. You know. So it could look a little natural foreign looks. I cut off majority of the lace and now um, as I say, that method really didn't work for me. I feel like, as I said before, I should have just cut it off alright. So now I'm trying to glue the ear tabs and that one was really difficult. So if you have like the liquid gel for this brand, it got to be glue or whichever brand. I would definitely recommend using that. But this is how it's looking. It'S not tied down as yet, so it looks like it's lifting and stuff and I think the wig needed to come a little bit more forward, but it's fine for the most part. Thank you foreign. So this is what I'm going to use to spray the edges, not edges yeah. Of course, I did do that, but my ear tabs and I'm using this scrunch because it works like magic guys to melt the lace in so I'm just putting it around my neck from now, because after I spray it down, I'm just going to pull it up And put it on the edges, like literally where the lace is cut, I'm just going to put it right there and let it stay for like 30 minutes, and I tell you it melts the lace right in you know. So I love that um. So yeah, that's what you're going to see me do I'm going to put on my Bonnet because I was using the hair tie. That was catching up my hair, but I I did find another one. I did foreign foreign scrunchie right on the edges, where it's cut and make it stick right under literally some here was caught in it, so I'm going to like comb it all the way, so it doesn't glue that in and yeah that's what I'm going to do. I'M going to sit with this for 30 minutes and then I'm gon na come back and show you how it looks so far. I put this wig on and it's still on my head. It'S been a week now, I'm going to show, I think, there's a video coming up where I'm gon na show you guys how I protect the wig or I make it last for two weeks. So please stay tuned for that. Please stay tuned! It'S I think. It'S a really nice video. This is how it look, I'm bringing it all the way forward, and I did kind of I know it - looks kind of messy I'm going to use the micro smooth powder from Sephora that matches my skin tone on the lace and then I'm going to use my Flat iron, the back of it to kind of press that bump down you could use like a curling one that would be really good or if you have a hot comb. You can definitely do that because here do take a slight amount of heat, not like 450, but like probably like a 350 or so heat just to get the bump out and yeah. So you're gon na watch me do that foreign, hello guys. This is how it looks: that's the big repeal it looks really nice, as I tell you all you need, is a scrunchie and you just put it where the edges meet your skin and it just melts it in really really good, and I didn't even spend 30 Minutes because I was in a rush, but it came out really really good. This is how the side of it looks nice if I had a smaller curling one or a smaller flat iron. I should say I would definitely curl my edges and so, but I think it's good um, but yeah. It'S looking really nice. However, I'm gon na show you guys how I cut this here um. It was kind of a bit too long for me to be wearing every day. Um I've been wearing it every day since I glued it on and I've been loving it. I love the land, people love the land and I'll show you in the next clip how I cut the hair stay tuned all right, so the first thing you want to do is bring the hair forward that you want to split in to bring the hair forward. Then you're gon na use the scrunchie. If I didn't mention this crunchy is a large scrunchie. I want to bring It Forward, then take your scrunchie and tie to the length that you want your hair to be cut. So if you want it a little longer than this you're gon na pull it down, if you want a little shorter Pull It Forward and it works so well with this type of style, um like a body type style Body, weave type style. So I'm just gon na use my eyebrow scissors and then I'm just gon na cut it. You can use any scissors that you like as long as you're cutting it and then I'm going to cut any like pieces that are like hanging down and then that's it. That'S how I cut it. Everything looks good, it looks even looks great and I'm just so excited. I really love here that has lent like this. It'S just so easy effortless and you could wear it every day. You know I leave this link of the hair down below, so you could check it out. As I said, I love the hair. I don't regret purchasing it. Please stay tuned to my other video, where I show you how I maintain it for two weeks, and I see you in my next video bye, guys, foreign


Comments
Kharah Jay: Thanks for your continuous support Remember to LIKE, SHARE & SUBSCRIBE
Roxanne Maddan: Okay I’m gonna fail at this but you look awesome as usual ❤
Randomly CC: It turned out really good
Big Sly: