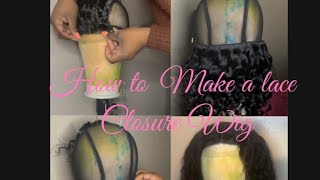
How To Make A Lace Closure Wig For Beginners || Very Detailed
- Posted on 09 December, 2022
- Lace Frontal
- By Anonymous
Hi lovelies ! Welcome back to another video . Today we’re doing something different . Im going to take you through how I make my wigcaps. Lets learn to make a closure wig.
WATCH LIKE SUBSCRIBE and leave a love COMMENT
xoxo
SEND ME A MAIL
MARCIA ASAMOAH
P.O Box 259
Sakumono Estates Tema
KINDLY STALK ME
Marcia’s Instagram: https://www.instagram.com/ewura_byna/
Marcia’s Twitter: https://twitter.com/ewura_byna
My TikTok: https://vm.tiktok.com/44pgKp/
Or Search
Instagram:@ewura_byna
Snapchat:@ewura_bynaa
TikTok:@mar_cia24
SUBSCRIBE HERE
https://www.youtube.com/channel/UCZXWz...
Shot with -Iphone 12
Edited by- Marcia Asamoah
KEYWORDS
#wigtutorial #wiginstall #wigmakingforbeginners
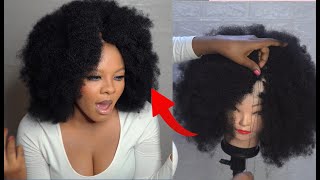
Hi guys welcome and welcome back to my channel, it's your girl, Marcia and I'm back again with another video. Today we are doing something extra different. I haven't done this thing here on my channel before, or sometimes I make my own cups myself and I decided to share this super detailed way of doing my own wake up with you. Let'S get into it. I got this DIY wig cap from the market, so I got this on the market. I think I got it from best hairdos and I was super affordable. I think I got it at eight cities also so they've already, given you that you pass where your closure will fall, but I don't know if I'm going to end up cutting it. I can't tell I'm going to be showing you my needles that I've already threaded. I mean this is not a difficult thing to do and I don't like running out of tread and coming back to do another one. So I have four already done and that's what I'm going to be using. I have my tape measure, so I'm going to be using to measure the back of the a dummy hit and I have in place of tea pins. I have my office pins yeah. You know your girl likes to improvise so yeah, and this does the work as well, and I have this milk pencil that was supposed to be for makeup, but I can draw yeah. I have my pair of scissors for cutting and my hair clips for holding the hair down. This is the hair I got. I got this hair from pretty hair store at small color market and I don't even know how to pronounce it here. Let me try and see lemon. I don't know if I'm right but correct me in the comment section down below this is a full pack of four bundles and one closure, and I got this in 22 inches that was, It was kind of affordable. So I decided why not let me just buy it, so this is how the hair looks out of the pack and it's super soft hope it doesn't. The hair looked really really nice and I was glad I got it. I hope it comes out well anyways. So, let's get into it. This is how the closure looks out of the pack, and it was so neat nicely and I had three parts um. How do I even say it yeah? I had to whip at one in the middle one on the left side and the other on the right side. So, whichever way you want to style, it was ready for you. So, first off I'm going to pin the closure on the: U part of the cup, that's what I went ahead to do! First, to secure it only before I go in to even see it so yeah, I'm securing it down with my office. Pins hold it down! Make sure there's no space in between them or there's no air in between them, where you can really have a nice outcome? So that's what I'm doing right now foreign is done. I'M going to hold the closure up, put it in a pony to prevent the hair strands from getting in the way when I start sewing everything go ahead and sew everything down, and I'm going to start from my right side to make it easier for me. So I'm giving you an up close on how I'm doing it. It'S very simple: it's just like sewing a tone, dress or something so I'm going to take from you from the closure, hold it to the cup and secure it by passing the thread through the loop. Yes, passing the thread through the loop, I'm going to demonstrate it for you to see so so that's what I'm doing right there is. It helps secure the hair to the cup very well. If you're able to weave it very well, you should arrive at this Resort. Thank you so once this is done, I'm going to secure the tip of the closure to the cup very well and cut off my excess straight. Then I'm done with the closure. Now. What I'm going to do is that I'm going to Mark out the closure on the cup just in case I'm done, and then I want to cut it out. I can just see where exactly to cut, then I go ahead and use my measuring tape. I'M going to mark it an inch interval, I'm going to follow these tracks for the sewing, so that I don't miss out and everything becomes as neat as possible. Let'S go ahead and draw them to the sides, both sides of the wig cup. Here'S my first bundle that I'm going to install on the cup is 22 inches, like I said from the beginning, so let's go ahead and start with, so I had to pin it down to see how it's going to look and I actually doubled my weave. I doubled it so that I'll have a heavier look. I also decided not to cut my weft, so I tried as much as possible not to yeah. I know I said I wasn't going to cut, but I ended up cutting because I couldn't turn around it to the next track, so I had to cut it foreign. I wanted to know how the enclosure would look on the hair, so I decided to bring the enclosure down and to combat on the head to see how what the outcome will be like so yeah this is it and I had two more tracks to go. Foreign thing was done: I needed that elastic band, usually in in a wake up, and I had to improvise, so I cut it out of my hair net, and this is how my results look like. This is how my sewings look like very neat, which I was even surprised at how neat everything was and, like I said the way I showed you if you follow it, that's how you end up, so I attached the elastic band to it to hold the hair. I usually put it on my head before I wear the cup and yeah. I had to cut it out. You remember, I said from the beginning that I make out of the: U part, so, yes, I'm cutting it, who likes black, showing underneath the enclosure. Nobody. So yes, this is the outcome. After cutting it, and I followed the track that I used then I went ahead and straightened my hair in sessions. It wasn't easy at this point. I was very, very tired, but I just had to get done with it. When I start, I don't like to stop. I like to finish before everything, so I went ahead, put my wax on it and then straightened it at a degree of I think. 2. 30. Yes, the straightener was at 2 30.. I wasn't really feeling the middle part. So I decided to do my own Parts in it and turn everything so after doing it, I sprayed it with the whole days, pray to hold the style that I've done, I've actually done and yeah. This is how the side path came and was very, very beautiful. Trust me, I don't know if they forgive me for my interview. I know my dummy hasn't taken her bath, but she's looking very pretty anyways because she has a hair done, and this is the side part that I went in for but later I decided to go in for the middle part. So I did the middle part. I scaffed it for I think about a day and then I removed it, and this was the outcome, so I just wanted to go ahead and show you how the hair looked on my head actually and here the lightening is bad. You know why, because my ring light, all of a sudden went off and it wasn't even turning on. I didn't know what to do again. I had to take it to the repairs, so this is why I end my video. Thank you all for watching I'll, see you in another video bye,


Comments
Anastasia Fobie: This hair is giving I actually enjoyed the video it was really helpful
Khadijah Khalid: This is a very good video. Very simple and easy to understand.
Nardra: The hair really looks beautiful
Khadijah Khalid: Nice one!!❤❤
Queenof90s: I've always wanted to learn one
MUGRE'S COUTURE: Well done maaarciiaaaa
Queenof90s: I need to learn this really
Amiratu Abubakari: The way I want to learn this work errh
Amiratu Abubakari: It’s human hair wow
Amiratu Abubakari: Are you experienced or it’s your first time doing it
Amiratu Abubakari: Makola stuff are very affordable