How To: Wispy Fringe On A 5X5 Hd Lace Wig | The Perfect Autumn/Winter Hairstyle | Asteria Hair
- Posted on 09 December, 2022
- Lace Frontal
- By Anonymous
If you want to learn how to cut your own bangs on a wig at home, keep watching!
Thanks for watching this video on how I cut my wispy fringe on a 5*5 HD lace closure wig from Asteria Hair.
This is a very quick, easy tutorial. For any more info, drop me a comment x
Don't forget to like, comment and subscribe!
Products used (includes affiliate links):
ORS Heat Protection Hair Serum
Remington Hair Straightener - https://amzn.to/3hbMJpI
Scissors
Wahl Hot Comb - https://amzn.to/3uFaJVe
Angled tweezer
Hair Info: 22inch straight HD 5*5 lace closure wig 180% density
Shop Now➤https://bit.ly/3OYulx9
*Straight bang wig➤https://bit.ly/3h4hQmX
❤#AsteriaHair Official Website➤https://bit.ly/3XXr2Kz
▬▬▬ ASTERIA HAIR GIVEAWAY ▬▬▬
Top1 #asteriacurlywave Lace Wig➤https://bit.ly/3B9rwTY
Join our FB group: Big Sale For Holiday Season(BF-CyberMon)
Group Link➤https://bit.ly/3AKYVoN
#asteriahdlacewig #asteriaclosurewig
Wholesale or promotion? Contact Asteria Hair:
WhatsApp: +86 15238065852 Email: [email protected]
Instagram @Asteria__hair https://bit.ly/3Lobbxq
YouTube @Asteria Hair https://bit.ly/3m5EBoA
Intro: 00:00
Unboxing and Initial Review: 00:29
Install and Styling: 02:31
Cutting the Fringe: 04:48
Finished Look and Outro: 11:04
Music by Commoninterest - Sushi & Avocado (Ft. Johny Sex) - https://thmatc.co/?l=335AC7FD
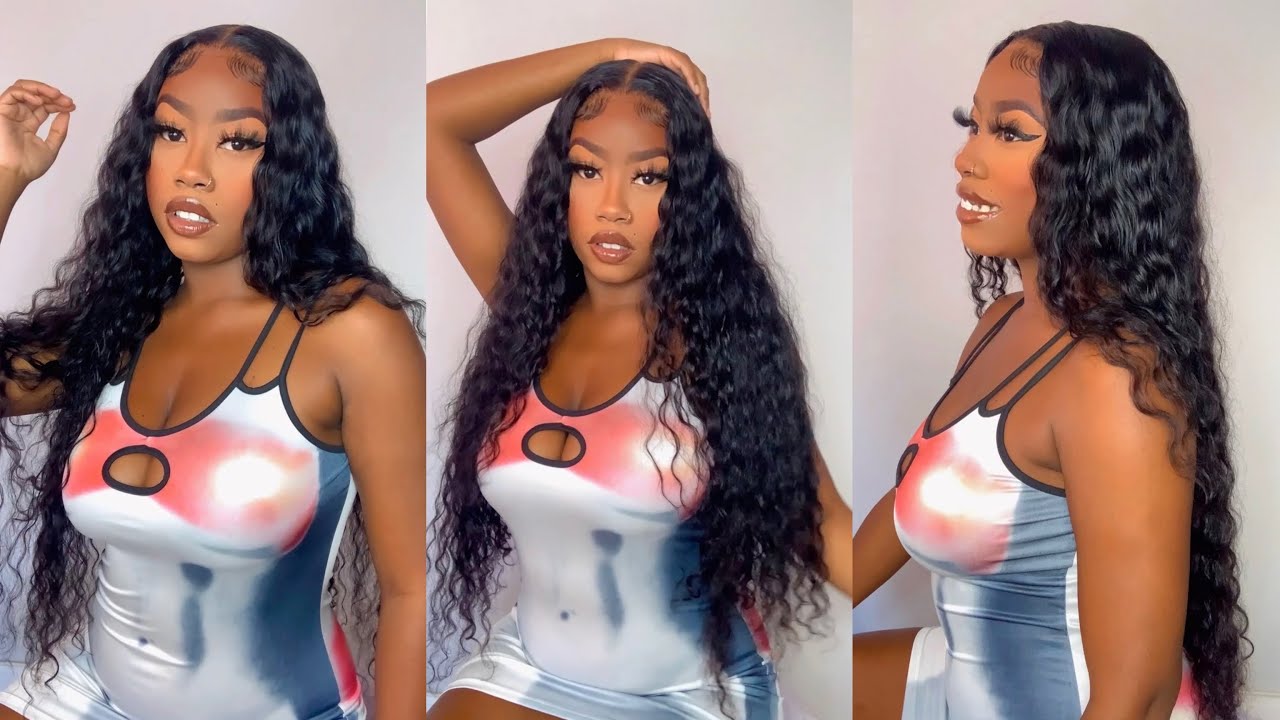
I'M even coming closer, so you guys can see. This is quite frankly, I love it. I'M looking like a black Barbie. This is so different. Okay, let's cut because in my YouTube thumbnail I literally I'm wearing a French wig hi, guys welcome back to my channel thanks for tuning into this video. So, as you can see by the title, I'm gon na talk and walk you through how I achieve these cute bangs in my 555 HD lace unit from exterior hair. Let me know what you think about the style. Quite frankly, I love it. The hair came in this turquoise teal satin bag. They gave me a satin cap for sleeping, very, very handy and it's quite big, so obviously with longer hair. You need a bit more cap space and they accommodated for that. The hair comes with this exterior handbag, but obviously like given the style I've opted for. I don't really need it, but great lashes and obviously um. What else is in here Edge brushes. Unfortunately, I won't be using this diagonal edges and a headband. They give you like. The best sexuals you need to start the wig, I'm so scared, because yesterday I had a bob and I'm coming into the office today with long lost, weave and bangs. It'S quite a plot twist talking about the lip, let me actually show you where the hair reaches and they said it's 22 inches, and I am five foot four. However, this is really lifts in the life out of my backside. Let me know what you think in the comments section. I think it works. This is the perfect, perfect, hair wig for such a style, because it's so light this drops so perfectly now. The quality of this hair is really what makes the style for me. It'S so flowy, it's it moves, it's so natural and the thickness as well. It'S not unnecessarily thick, it's very, very natural. Looking and yeah. It'S not exaggerated. This works and it's really really dark in the winter. Your skin has this certain like glow this brightness about it, and I love the contrast of jet black hair on my skin in the winter. If you're interested in seeing how I achieved this, look, how I've got these choppy bangs, please do continue to watch fake food tuning into this video. Don'T forget to subscribe comment and, like I will see you in the next one bye. Let'S get started, I'm just brushing out the hair if you're a regular on my channel. You know that I always always take the creams out of my wigs just to ensure that this is an extra protective style, I'm getting rid of those curves in the sides and in the back I just put it on the wig we're going to begin by styling. It as though I was going to wear it in the middle part, we want to make sure that everything is super super flat and the wig is in the correct position in preparation for when I do cut the bangs so just breathing over my little pink trolley And working through my hair with my or rest heat, protectant serum, I will list the full names and links to everything below you want to use the sparingly because it is quite thick and you don't want to weigh down the hair. I then follow up by brushing through this, to ensure that it's evenly distributed throughout the hair. Then I proceed to straighten my hair. Realistically, it would have been so much more effective if I had white plate straighten this, but I know my thin ones do the job as well. You want to make sure that you are straightening. You are pressing the life out of or into the hair. You don't want any kinks or any areas that aren't as straight as others, because the whole idea of this style is it being very, very sleek if it wasn't for the little lace tab on the right of my face. You wouldn't know that I haven't cut off the lace. The lace is so thin that it's practically blending into my skin, oh yeah. I love it. I'M looking at this footage now, like yeah, this hair God's gift. Now I'm going over the middle part, this is partially for the foundation of The Fringe. You need the middle part to be centered and sharp so that it helps you when you then decide which parts of hair you're going to set apart for your Fringe, now, there's hot comb that to ensure that everything is flat flat. You can just look at the hair like it is so beautiful, although we're not wearing the hair in the middle part or a side part for that seamless blend it melts with your skin. You still do need to cut the lace in the jagged motion all to The Fringe yourself. I begin by parting out a u-shape using the middle part as like a center point. You then extend the U to end at the arches of your eyebrows. You don't want to get overzealous and just chop the hair, because you might drop it at a length that is way too short and you can't work with it and it ruins the style, and you end up looking like Beyonce in that God, forsaken picture. You all know which one I'm talking about so I begin by chopping the hair about a bit below my chin, and then I go back in again twist the hair until it's taut and chop it about lip length. Here'S where we're gon na start working and molding. This Fringe, I'm splitting The Fringe into three sections: the left, the middle, the right and and point cutting this better, be my right because it looks at my right, I'm quite clearing the right side. Point cutting into the hair gets rid of weight and chopping. It horizontally. Obviously, just gets rid of length, so you can see I've angled it a bit because I want my friend to not just be a straight line across. I want it to be a bit longer on the sides and shorter in the middle. So again, this just takes a lot of going in and out back and forth Point cutting cutting across straightening Point cutting cutting across it's very repetitive, but you could you continuously do that until you get the desired? Look love her class. I do want to always comb your hair off the point, cutting so that you don't mistake, hair that isn't there for hair. That is there. You don't want to keep cutting thinking. Okay, yes still had to cut still had to cut, and then, when you finally decide to comb, you realize that I'm like stock cutting five minutes ago continue to wipe Through The Fringe and when you're on either side angle. The horizontal would cut you due. So it's a bit more diagonal so that the Fringe frames your face your time. So you guys can see the effect that, having those longer bits on the side has it allows The Fringe to blend a bit more seamlessly into the main body of the hair. Given that the hair is so long so again just cutting diagonally and straightening, so I have a better idea of what everything looks like and just playing with it really so that Fringe as perfect as it is, is very, very dense and point cutting is not enough. So I'm going in with my tweezers to get rid of that density, so to get us closer to a wispy Fringe wispy China bangs, I'm going in with my tweezer and just plucking, randomly make sure to not Center on one area. Otherwise, you're plucking yourself a bowl patch, so you can see I'm working on the sides moving a bit more into the middle, going back to the sides going a bit to the lower um areas of The Fringe, just to ensure that it's evenly plucked and the density Is evenly distributed so again, I'm now pulling the hair to the side and just plucking plucking a bit higher plucking a bit lower and just getting rid of the hair. When will you know when to stop talking honestly, it's up to you and the look you're going for I plucked quite a lot of hair out of this Fringe, because the closure is very, very dense and I didn't want it to be so blocky. So it's completely at your discretion and as you would do, when plucking your closure or frontal for a middle part Etc come through the hair. You get rid of that excess hair. So you have a better idea of what's actually happening and going back into the three sections of The Fringe, I'm now working in the middle and point cutting into The Fringe to still get rid of that weight. Foreign, you want to kind of like bump the ends inwards, so you're encouraging the hair to fall in that Fringe shape that we're going for. So at this point, I'm just fiddling with it just separating tasseling it cutting straightening. It'S a lot of chasing we're doing over. Here, but this is what you're gon na have to do until you are happy with the desired look or happy with the outcome. Go slow, take your time and move your hips, and I love how this looks, especially with the rest of the hair type, but actually looks it's giving grown and sexy now that I'm happy with The Fringe, I'm taking out my hairband and just connecting it kind of With the main body of the hair, so you see how I've got the angled bits on the side. It helps with blending time. So I know that I definitely went in and plugged a bit more off camera just to ensure that the density is perfect, because I'm looking at that side that angled bit and it's a bit too thick - it's a bit thick for me and voila the finished look. I'M looking like a black Barbie yeah, I love it. I like I keep looking in my screen because I just love this. This is just kissing. The closure is very, very, very thick, so if you're going to follow me and go for this choppy bang style, let me tell you you're gon na have to pluck you're gon na have to pluck it's a thick, well notice, no yeah! This is literally what I've plucked out of The Purge, I'm sure there's a bit more hair somewhere, but the hair is so thick, so you won't you're, really gon na have to be dedicated to plugging it. So guys. Thank you so much for tuning into this tutorial. I had the time of my life installing this unit and styling it for you. If there's anything you want to know just please check the description bar. I include absolutely everything in there. Thank you for tuning in to this video guys, don't forget to subscribe comment and like, and I will see you in my next one
Comments
Tinashe Hair: Pretty on you Waiting for our videos