How I Install My Synthetic Wig
- Posted on 12 December, 2022
- Lace Frontal
- By Anonymous
Welcome back everyone today I will be showing you guys how I install my synthetic wig enjoy.
Thank you for watching.❤️
#wig #install #synthetic #red #fyp #motivation
Where i order the wig link is here
Lovestory Red Wigs For Women Heat Resistant Synthetic Lace Front Wigs Fashion Long Straight Wig 180 Density 22-24 inch https://a.co/d/eeIBLPl
Make sure you all social medias
Follow me on instagram @its_taquillas_beauty
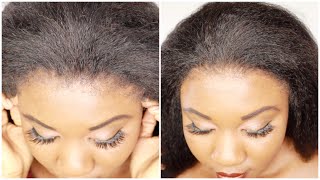
Hello, everyone welcome back to Tequila's Beauty and today I'll be showing you guys how I install this beautiful red synthetic wig. If you're new make sure you like comment, subscribe and hit that notification Bell, so you get notified every time I upload so the hair vendor that I did purchase this wig from is called love store and I did order it on Amazon. So I will put the link down in the description, so you can purchase your own, so this wig did come with this stocking cap. It wasn't my skin tone, but I will be showing you guys how I get it to match it as close as possible, and I will be showing you guys what all it came with and what I received in the package. So here this is how the stocking cap looked and, as you can see like I said it's, not my skin tone. First, I will be starting off cutting the holes on the side of the stocking cap, so I can fit my ears through it and then I will show you the next step foreign spray, and that is to use to mow the cap down, and I will also Be blow drying it, so it can stay in place, I'm not a professional or anything, I'm just showing you guys what I learned so that I can help you guys out too, as well foreign. So here I am cutting off the excess to the wig cap foreign. I am all done with that. I will be using my fit me loose Foundation powder to blend out this Gap part so that it can match to my skin as close as possible. Listen y'all! I know I did not cut that cap as even as possible, but I got it close as I could to make it look already come out all in the end. Right just please trust the process, y'all trust the process, so I will be going over my cap with my got to be glue spray again to make this Gap part a little more darker before I apply my wig. Thank you here. I will be applying my wig and pulling with it to try to get it. How I wanted to sit on my head before I start cutting the lace part off the wig. I know I post to mold the lace part before I cut it, but I did it backwards. Y'All, please forgive me, I'm just showing you guys the way I did it so here, I'm just cutting off the lace before I apply the got to be glue spray to hold the lace wig down here is where I applied the holding spray to mold the front Of the lace wig yeah y'all, it was a struggle, but I got through. I got it through foreign foreign foreign, but that blow dryer was burning. My forehead so excuse them faces. I was making so now I'm using my folded do-rag to mold down my wig. So here I will be cutting off a little bit of hair so that I can make my baby hairs. Yes, honey. You know you need some baby hairs here. I am just using my mousse. It don't have to be a specific type of mousse. It can be any old mousse to lay down the hairs and I'm using my Edge brush to try to train it. How I would like it to go foreign foreign foreign after I applied the move and got my baby hairs to my liking. I did use some more got to be glue spray to go over it so that I can mold the baby ears, and this is the finished result. I hope this video was very helpful to you guys thanks for watching and see you in the next video


Comments
𝗫𝗫𝗫𝟮𝟬.𝗦𝗜𝗧𝗘: - ВЕSТ ADULТ DAТING SIТE f