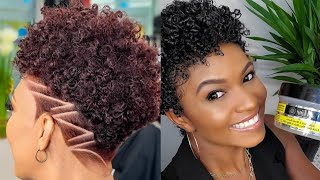
Make A Half Up Half Down Frontal Wig Using $29 Beauty Supply Hair #Boldhold
- Posted on 15 January, 2023
- Lace Frontal
- By Anonymous
Please go watch the wig cap prep video https://youtu.be/59qpVeO-g8g
BOLD HOLD LIQUID GOLD Temporary Daily Hold
Last 2-3 days
To Enter for a chance to win a free wig text me 7865900692 your email, full name, social media handle,
hair from beauty Suppy store Outre Purple pack, 22,20,18 inches with a closure
1. Use on clean skin(use general face wash or makeup wipes) Never use alcohol to clean skin
2. Use Bold Hold Skin Protect if you plan to wear more than 2 days
3. Apply thin layer, partially dry
4. Lay your Lace on top dry with warm dryer, do not press in to prevent white cast, you may lightly wipe with towel after drying.
5. Please see our YouTube for more instructions
❌❌❌❌❌❌❌❌❌
Things to always remember:
Our products do not contain toxins such as ACRYLIC, DMDM(formaldehyde) No Latex or ALCOHOL, Safety is our top concern
Always follow manufacturer instructions on products no matter your expertise.
Using Products that contain Dmdm and other forms of formaldehyde in conjunction with lace glue can cause irritation.
SHOP #boldhold www.thehairdiagram.com & listed DISTRIBUTORS ONLY!
Only purchase AUTHENTIC Bold Hold products from our Distributors linked in highlights & on our website.
If you are international follow and DM to find authentic sellers here⬇️⬇️⬇️
@boldholdlaceamerica
@boldholdlacecanada
@boldholdlaceeurope
@boldholdlaceafrica
To find authentic sellers.
#blondewigs #shorts #wiginstall #boldhold #quickweave
Hey guys welcome back to my channel, and today we gon na get into this nice long, burgundy baby. She was 29 from the local beauty supply store. Yes, she was and guess what this was an actual frontal that I had it was a natural color. All I had to do was actually color match it to match. I did me a little updo, and this right here is one that I made just like it and you get to actually keep it and guess what it's so easy to reapply it and put it back on because guess what the way that I constructed it. You get to keep it in a ponytail and just put it back on it's so easy. Let'S get into it, I'm going to show you how to ball on a budget using some hair from the beauty supply store. This hair was 29 and I'm actually going to be using two packs. I'M going to do a half up half down these are different little tricks that I used to do when I used to do like hair shows hair competitions. I just want to show you like some neat little tricks that you can use. You don't have to use the beauty supply store here, but this is going to blow your mind because it's super easy, let's get into it. You'Re gon na need a mesh cap. Your bonding glue and some hairspray to make it last so on this cap I already Drew everything out. I'M gon na put a ponytail at the top. I put a piece of paper in here some thick like cardboard paper. That way, when you see what I'm about to do, you'll know exactly what you're going to do to make it a half of half down wig and you'll be able to reuse it. If you like I've, already drawing my lines on here so now, all I have to do is just put the tracks on okay, so I took like some braiding hair and I made a thick braid, because this is going to be my base for my half up. Half down, if you've been watching my lies, you know I've been doing wig giveaways. This is for our winner from the last giveaway. I did this wig on my live guys and the wig winner for this wig is all things plush, okay, guys, so I'm gon na take the frontal and I'm actually going to mold it up to a ponytail that way, it'll make it easier for me when I'm Ready to apply it because it will already be shaped in the way that it's gon na go. So I'm gon na put this on a dryer. Let it dry completely as I go ahead and put my unit together foreign. So this hair comes in three lengths of 18 20 22 in this closure. So I took some braiding hair and I did a thick braid. I'M going to use that braid as my base I'll be able to wrap the hair around this. I'M going to secure it with a hot glue gun so that this will be a permanent situation that I can take off and put back on easily make sure that you allow the glue to dry when you put it on the base. I put a piece of cardboard underneath you don't have to do that, but I feel like it gave it a little bit more uh stability. That'S up to you to try it different ways to see what works for you. Okay, so I'm gon na use just some regular bonding glue from the beauty supply store. I'M going to lay all of my tracks on here. Make sure you check out my other previous videos of me doing quick weaves, because I do them all the same, especially when it comes to the markings that way. You know where everything goes now, I'm going to place these tracks on here and we're going to work. My way, all the way up to the ponytail area doing this is very repetitious, you're, just putting those tracks in from left to right. I left the ear out because a lot of times people do have a lot of irritation when you put tracks by the ear, but make sure you check out my other quick weave videos I'll talk about that. A lot on spacing and where to put those tracks. But I'm going to work all the way up, I'm not going to put any tracks on the area where I marked off for the frontal that way, I have room and everything is nice and smooth. So I'm working my way up to the top I'm using that hairspray, which is the actual spray or spray bricks you can use whatever kind you want, I'm using pump it up this way, it's going to allow the glue to dry faster, so I'll spray it on That cap and then I will go ahead and apply the track and dry it with the dryer using warm air. This also makes it last longer and it will keep the tracks from coming out. I'Ve seen people do like the hot glue gun. If I I just feel like, if I do the hot glue gun, I might as well just sew it with my sewing machine, but I didn't want to do that. I would just want to do something really really quick and show you guys something that anybody can do. Anybody can do this. It'S just that when you decide to make like a quick weave off of your head. The best advice is to make sure that you are using your head size, canvas block that way that will ensure that the wig will fit you and it won't be too big or too small. Okay. So now that I'm up at the top I'm going to take that closure and lay it in the back and I'll draw out how much more room I have to add more tracks. Now I'm using this, as you know, it's gon na like if I pull that ponytail up it'll give like scalp in the back. You know, I think, that's pretty cool, just something I thought of real quick. I always try different things and that's how I come up with a lot of my ideas. Sometimes they work and sometimes they don't. I think this one is going to work okay, so here I'm go ahead. Now that that's drawn out, I can go ahead and finish. Putting my tracks in I know exactly how far I have to go, and that's not very far before I get to the area where I'm going to apply the actual frontal, so I'm just putting the tracks in this is very repetitious. Super super easy, like I said anybody can do it. You could double the tracks up if you want to put them closer together, that's going to make the unit actually thicker if you put them further apart, it's gon na make it thinner. Now, I'm adding that frontal piece at the top, like I said, to give it a little scalp action in the back. That'S totally up to you or you could just go ahead and finish putting the tracks in. I just wanted to try something to see. You know if it would work and it did okay. So now I'm going to apply my frontal on I glued it using the just regular bonding glue, I'm putting it on there, and this is just super easy guys, like you, can't mess this up. I'M so sure you guys got to. Let me know in the comments if you try this, it's super easy, I'm going in and I'm cutting out that extra material from the cap. So it lays super flat on my head here and, like I just think anybody can do this. I can't wait for y'all to try this because it's so cool now for me, I always cut my lace off my frontal um you don't have to, but that's just what I like to do. I can see better so it works for me, I'm using my fauxhole lace tint and I'm going to do the application with the bowl whole Liquid Gold, I'm placing it in the middle first guys. This way, it'll be super easy to apply. I'M drying it just a little and then I'll apply the delays. Then you want to lay it right on top of the liquid gold. Okay put it right, there don't take your hands and smash it, because that's how that's what's gon na make it turn white. Now that it's down there, you didn't see me, do anything with a comb. Don'T take a comb and press it in don't do none of that. I just laid it on there now, I'm gon na dry, it all the way. Okay. So when you do these sections, you want to make sure you drive them completely. You can use warm air because this is not glue. Now, I'm doing the sides guys you're going to do it just the way you did the middle. I think it's super easy. If you do them one section at a time this way you can ensure that you have a really good hole and I make sure I dry it all the way before I tie it down guys that way. It'S not sticking. Now I'm using my Glam Tech I'll make sure I add them in the description box. I love using this Spritz on my hair because it's not heavy and it's a workable Spritz like they don't make very many many workable Spritz that don't flake, and that is this. So I'll make sure I add it there now I decided to add a little hair on the side, since that hair is completely humid. I'M going to blend it in using my uh, my waving irons. I just think that'll look super super cute. I did this on another video and I just pulled everything up. It'S totally up to you and what you want to do, or you know just to be creative and how you want to create this. So I'm just leaving some hair out on the sides and I'm gon na do just a little baby here. I don't really wear baby hair a lot, but hey I'm going to do a little bit here because it's giving you know school girl. So I'm like hey. Let me give me some baby here, so I just wanted to do just a little bit. I don't ever make my baby hairs thick. I feel like it looks unnatural on me, so I'm not doing it here, so I'm just gon na make it thin, so it complements. You know my look and my style foreign. Thank you. Hey! It'S 101: hey 101 foreign foreign with my bowl whole lace. Jelly, and this is what I love to use on my hairline. It really sculpts, it super super easy and it's super pliable. So that's what I like to do. I don't generally use mousse, but you can. I just feel like this also like hides the lace and gives it a Extra Melt and baby. It gives it an extra meal. I always dry, like I said before, I tie anything down, so I just feel like that works better. For me, it don't stick to my band, so that's what I like to do. Okay, so now I'm going to take the additional bundles and I'm going to wrap them around the ponytail. Usually I glue this when I do it and I pull it. Super super tight and I glue it, but I'm not going to do that on this, because I actually really need to use this wig for a show. So I just wanted to do a demonstration with you guys, because I thought you know this would be a good idea to give you like some insight on how I do like some creative things that you can reuse. So I'm taking this and I'm pulling it super super tight and, like I said, if you wanted to glue this on, you can and if you haven't seen those videos where people glue the ponytail on, I actually have a ponytail, a frontal ponytail, where we did that And you can go check out that video I'll make sure I attach it, but I'm just wrapping this around, because I just wanted to do a quick little demonstration for you guys to show you this um ponytail, half of half down wig, so hey get into it. It'S pretty cool and I'm gon na do an updo with it after I get this on here, really really tight and I'll, secure it with a actual bobby pin at the end okay. So when I do you pretty much just have to play with it until it falls into place and how you want it to be. On my other ponytail, I just had it like a half of half down and kind of hanging, but this time I say I'm going to do a little updo, I'm just kind of like messing with the hair, make leaving it a little messy and you know, what's Been trending these fish, I call them fish bones, so I'm gon na put one of those like across the front, because I thought that would be cool and on Trend um. So I thought it was cool. I have not done these in years and I generally don't do it on myself not like this, but so I'm just hoping it turned out cute. Let me know if y'all want me to show y'all how to do these, like. I was trying not to make this video too long, because I don't want to bore you, so this was just something I just made up super super quick. We did this on, live if y'all missed it. I kind of wanted to check the footage and see the difference in some of the lives that I've been doing, because I have been just loading my lives guys and not having to do any editing. This is the first video that I've edited in a long time. So so I just wanted to see, if you guys can tell me if you like the lives, that I've been posting or would you rather have like a edited? Video of you know me doing some of the Styles. Let me know in the comments what you guys want to see. I want to make sure that I'm putting out the best thing. That'S going to help you learn how to do. You know some of the techniques that I know so I could pass it on down to you, my nieces and nephews. Thank you, foreign okay. So this is where I took the beach waiver and I decided I wanted to blend the hair from the frontal end with the back of the hair and that's all I did guys. Y'All could do this. Let me know if y'all tried. Thank you guys for watching. I hope you enjoyed make sure you like comment and subscribe below foreign


Comments
A.N.: I just found your channel, and I love how creative you are with these ideas. I like both video formats for different reasons. Personally, the lives allow me to eventually follow along step by step later. It's also quite encouraging in a way because I can physically see that it takes longer to achieve the end result. This edited down version is great when for me when I want to see a snap shot of what you did, but I didn't have the time to watch a full-on live. It allows me to still enjoy your creative process but in a shorter amount of time. I hope this helps. Honestly, even if you decided not to do these edited down versions, I'd just have to find time to rewatch the live (because...timezones)
Tanzy The Glow Up Guru: Now this is affordable looks fantastic. I use to this back in day when I couldn't afford human hair bundles so I used synthetic weave!!! U brought it wayyy back and I love it thank u! I'm going to this !!
The Unique Life Of Nue: I've been watching you for awhile now. And I just love love your videos. You are so beautiful in every wig you make and put on ❤️❤️! I love the bold hold products too. Keep up the great work love ❤️ !
Sunshne41: Beautiful! I’m going to make me a frontal wig!! I actually have a frontal and bundles i was going to use for advertising .. thank you Sis ❤
YuYuWigs: Your skills are amazing….I have alopecia.. so I had to learn how to style wigs so they didn’t look wiggy….I’m gonna try to follow the steps to create that style… thanks a bunch!!
A chosen one: I love your art ,I swear you can slay any slayer when it comes to hair .
Nikki Harrison: I just love watching your videos and your lives! You always dropping the best gems PERIODT❤️ #thiswasbomb
lindyanne3419: I love these type of videos!!!.. I look forward to seeing more
Black Diamonds World: Love it‼️ My favorite color Love the looks! I saw you recently on Tik Tok and enjoyed. Love watching your LIVES & Videos!
ColourBrights: You are too good to us auntie. This style was so cute.
Amour People: I love all of your creative ideas! Could you edit your lives down to the actual process or just time stamp it?
Christina Neptune Artistry: I bought one from my store as well but it's mustard
Ketorrab: Loved this not sure if this was the live video or the edited one but this was perfect I understood every step so I would say keep the videos this way I do have a question though how would we secure the pony tail part more I’m afraid it would fall off or something and now I’m stuck with a patch at the top of the head lol just curious
Tanzy The Glow Up Guru: She said Ball on a budget!!!! Man I love this lady!!!!!
ColourBrights: Hey Auntie. This was so informative! And that hack was brilliant. Quick question, can u add that pencil to ur site?
SerpentineFire11: love it!!!
Monette Amina: Yess i love it
Tasha Kincy: I love the "LIVES" the hair was the bomb...
Thea Woody: Ok it looks cute, it came out nice
Lottiemae: I like both live videos and edited. I like the lives a little more because I get extra knowledge nuggets. And I get to ask questions.
Ty E: Wish she would've showed how she constructed the cap with with the cardboard and all
Chrystopher JaMayne: Yes, post the lives please
I Am Wiggiona: Yesss you’re bomb ❤
Sahai_j: Some ppl just born with a gift .....u the goat in this ish
A chosen one: You are a gangsta when it come to wig making.period
onika campbell: The baddest in the game!!!! ♀️❤#Goat
BLACKSHAMPU: Keep it live
rachel orange: Gdmmmmm in the nyc love love I have to wacth it again .