How To Make A Hair Bow
- Posted on 07 March, 2013
- Hair Accessories
- By Anonymous
*OPEN ME*
How To Make A Hair Bow tutorial. We'll be using a hot glue gun, no sewing required for this cute flat boutique bow. It's super easy and fun to make!! Hope you like! xoxo Christine
For more info or a written list of what you'll need, visit my Hair Bow Blog Post: http://pinksofoxy.blogspot.com/2013/03...
On my nails: Zoya Pasha
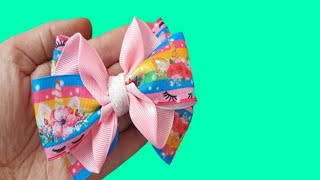
Hey guys today, we are making this hair bow. This is a basic double hair bow, also known as a flat. Boutique bow, first of all, you're going to need two sizes of ribbon. So I have one and a half inch here and I have three-eighths inch here. So I've got another little case here, but I'll tell you about that later. That goes on the clip. So for our one-and-a-half inch I cut two strips, and so these are eight inches long. That'S what we're going to be needing for this particular size and then this little piece here, the three-eighths inch, that is approximately four inches. So the first step is to heat seal your ends. So all we do, because you know the fabric can or the ribbon can kind of start to fray, so we don't want any frame. So all I'm going to do is heat seal. The ends just like this just run it across really quickly. Okay - and you can feel that the ends are completely sealed, I'm just going to go ahead and heat sail all of the ends of all of the pieces of ribbon that I have cut here. So the first step is to grab one of your eight inch pieces of ribbon here and we're just going to fold it in half and we just want to create a little crease in the middle and then once you've got a good little crease pinch there. Just open that up and we're going to go ahead and add two little lines of glue here right next to that little center crease that we made and then just fold over that first side. Now for the other side and then just fold over that side. And we don't want these to overlap. We just want them to be right at the center. We want them to meet right at the center and this is how we're looking so our ends are both meeting at the center and glued down. So let's go ahead and do the same thing to this piece: okay, so we've got our two pieces done and now we're just going to grab one of them here and I'm going to make a crease in the center here. So this is a friend of our bow. That'S the back! So I'm just going to fold this in half this way: okay and just make a little crease right in the back there just kind of hold that crease and take our glue, gun and just add a little dot of glue right in the center just right at The bottom and it doesn't take much and then we're just going to go ahead and close that crease and just hold it there, so the glue can set, and once the glue is set, we're going to take these two ends. I'M going to fold them back on each other, so we're just going to go just like this okay. So that's what our front is going to look like and that's the back. So I'm going to be adding our little dollops of glue right in the back here. So I'm just going to do one at a time, then just press that back on itself and once you feel that start to set, go ahead and do the other side who's going to drop right in the center there and fold it back on itself. So once the glue has set, I'm ready to go ahead and set that one aside and move on to this one we're going to do the same exact thing on this one. Now you should have two pieces that look just like this and we're going to grab our glue gun again and I'm going to just kind of flatten that out of it, I'm going to put a little dollop of glue there and we're going to be gluing. These together, just like that and our hair bow, is finally starting to come together. So I'm just going to set this down and we're going to move on to kind of prepping our clip here. So I'm just using this style clip and you can use any kind of clip you want. It can be an alligator clip. It really doesn't matter whatever you prefer and I cut this piece of ribbon just long enough to fit over my clip and so I'll be gluing the ribbon this little piece of ribbon to the back of my clip here, and I cut it just long enough. So it is a little bit of end over, so I can fold that over I'm going to add a little bit to the ends and fold those down over the ends of the hair clip. Alright, the clip is ready to go so I'm just going to set that down for a moment. I'M going to grab this piece here, this little piece, that's going to be our center part of the bow and I'm gon na go ahead and start to glue that on backwards, so we're just gon na get a little start there. So I'm going to take my glue, gun and just add a little dollop of glue right on the back right and just press that down and now we are ready to glue our clip into place here, I'm going to focus in the middle and just go ahead And add a little bit out to the edges, there I'm going to place that right in the middle and it will just go ahead and press a little bit of the edges of the ribbon on to the glue as well. Okay, just so it grabs on to the sides, so it's not just holding on in the middle now we're going to take our centerpiece and wrap it around and just give it a good tight, wrap there and see this little gap here. That'S right in between the hair clip we're going to actually run this right through there, but first well. Actually, here I'm going to run that through first and on this side, I'm going to put the little dollop of glue - and this is just going to be extra security to make sure our Haribo does not lose its clip just press that down and then I'm going To wrap this around once more okay and we're going to secure it in the back with another little dollop of glue, and just like that, our hair boat is ready to wear just go ahead and flip it over and fluff up the front. Now we are looking good, so I hope you guys enjoyed this tutorial. I really love doing little hair Clips like this, and I have many more tutorials planned for you. So thank you so much for watching and I will talk again soon. Bye
Comments
SandersBraxton: Thanks for this tutorial. My daughter and I had DIY night and we had a great time watching your tutorial and making bows with lots of laughter and fun!
Nita Goosby: I loved this. I was interested in learning how to make hair bows for my niece. this looks pretty simple and you did an excellent job going over the steps.. thanks for sharing
Kathy Wilson: Love your tutorial! Just made some of these to sew onto a tutu and headband for my baby cousin. Turned out perfect!
Jacqueline Hernandez: Perfect tutorial- clear, quick, and easy! Thank you for sharing!!
Austyn Jenkins: Great tutorial! Very easy to follow! Thank you! :)
kymbraaa: After I seen this I made my niece sooooo many bows! Super cute and easy, I love them!!
naima schultheiss: Thank you so much for this video, its so detailed and helpful, appreciate all the effort and time u took to share this with us
Hope Schreiber: for anyone who wants to do this with kids, instead of sealing the ends with fire, you can also use clear nail polish✨
michelleforever21 michelle: Loved this tutorial thanks! So much detailed instructions love these types of tutorials
kt1pl2: I loved this tutorial and I love hairbows! I can't wait to make this one myself!
Peta S: Very helpful tutorial! Been looking forever and how to make my own hair bows and this tutorial seems like the best one. Thanks for the help! :)
Sullivan Gang_gang: I made this all with your instructions! Thank you so much!!!
Irene Martinez: Thank you so much for this video, you explained so well, and did it so neat and now I feel really confident to make my daughter some bows !
Amy Everything: This is absolutely the best and easiest tutorial I've ever seen! Thank you a million times over! You rock!!
A. Elizabeth Hitchcock: Such a simple bow. I sewed one right along with you. Came out super cute. Thank you for sharing!
Kristin H: Thanks for the video. REALLY helpful, super simple, crazy cute. Love it! I followed step by step to make an Ariel hair bow for my upcoming Disneyland trip. Looks great! Thank you so much!
its Simin: I love hair bows. I'm totally trying this out. Thanks for this video. ❤
Scarlett Berry: Thank you so much! This video was such a huge help. I must have watched it 20-30 times in the process of making hello kitty hair bows for my daughter's birthday party.
Hugo Hernandez: Thank you for this awesome tutorial. Me and my daughters had a fun time making bows for them
SnickerDoodleStudios: Great video! I made a pastel bow and I love it so much!! Can't wait to wear it tomorrow!!
Buglet: Amazing! So simple and straight to the point! Keep up the GREAT work.
Rebecca Smith: The is the BEST and easiest tutorial on bow making that I have found for the most consistent, perfect-every-time results.
QuietRiot96: Thank you soooo much for this tutorial!! I just had my first baby in January I've been wanting to the whole bow thing for forever but they're so expensive and not always the kind I want. Can't wait to get started!!♡♡
kristenrl: Absolutely awesome tutorial!! Thanks so much for posting this!
Acts 2.38: Soooo fun!! Thank you so much for sharing!I always come back for this video.Truly the best.
Eden Westergaard: Thank you. To the people saying you can buy them--you can;t always buy the color or color combination that you want.
Its Evanly: I love them, they are so cute. After watching 3 times, I finally got it on my own. Thank you!
Valeria Garcia: Love it! Can’t wait to try this method out tonight. Best tutorial I’ve seen thus far.
Aubrey Miller: This was incredibly helpful! Thank you so much!
Nikola Bailey: Great watch and you made it so simple and a tutorial I found useful. Thank you for sharing your talent x
smartwater S: I am gonna make so many cute bows for my daughter. Thank you for the awesome tutorial!
jonalyn buslon: This is perfect for my fashionista daughter! Thanks christine! xoxo
Beth Keeter: This was a very helpful video, easy to follow. Thank you!
PrettyPinkSprinkles1: Thank you so super much for sharing! Extremely awesome bow! Your explanation was perfect, simple and to the point. Very easy to follow. I really do appreciate the share.
Tony kole: omg, I did this for my demonstrative speech class and I presented it so well thank you for your video
Michelle Peña: Such an amazing tutorial! Thanks! I love it! <3 :)
Ista Matthews: I loved this video! I’ve been making bows but have to say for anyone just starting out, this is the Best! Thank you!
pvzfreddy2021 lor: Love this thank you!!! I have two girls and they love bows...now i can make it for them
Mags Nash: Thank you so much I loved this. I have two little girls who will love ❤️ theses for their hair
RandomCat: Instead of using heat to seal the ends clear nail polish works great too!
michelle o`neill: stunningly made, thank you, just what i needed
CRAFTMANIA: Nice bow! Very gentle and cute! I love this color. Good video! Thank you! ❤
livvytod livvytodd: Thank you for this simple tutorial!
claritabonita1: You are great! I loved the way you explain everything. I've made 3 bows already and they looked very similar to the ones you made
Marycarmen Trugar: I did it!!!! so easy thank you so much for share with us your knowledge!
Pearl Berdass: Thank you Christine. Your are a very good teacher! I was able to follow your tutorial without any problem! I am ready to make bows!
THATGUYOUT: Love it thank you so much I'm excited to make my first bow !!!!!
Jana Elliott: Thank you for your guidance on making a cute double bow. I want to make 4 hair bows for our family wedding shower for my niece and her fiance Jerry tomorrow. One for my niece, the bride to be, one for her sister, one for my sister, her Mum and one for me, her auntie. I really appreciate your easy to understand tutorial. I am more confident in my ability to do this now and I will let you know how it turns out later today. May God bless you and your family and your friends in every area of your precious lives!
Dee Lacy: Great tutorial easy to follow. Thank you.
Erin G: I love it, i just made two for my girls
Elizabeth Puskarits: this is exactly what I needed!!! Thanks for making the video!!!
Lucy Medina-Zamora: Quedó hermoso y es súper fácil de hacer... Gracias por comparir ... Gorgeous and easy!!! Thanks for sharing :D
Needing Less: I absolutely love the way you demonstrate and explain how to do your DIY's!
Debbie Durham: I have always wanted to know how to make these. I am amazed at how easy it is! Your tutorial is wonderful! I never thought about using hot glue. Thank you, thank you, THANK YOU!!!!!
Esellajessica: This is the most clear and easiest sew-free bow tutorial! The result is still perky and very very secure for a bow that won't come apart!. Thanks for making this video! I just made this bow for my luggage tag but added a rhinestone to the center. Doing this for my other two in the set! :)
Jessica Leal: Just made 4 bows using your video! Thanks alot very easy :)
Anupama Kurudi: One of the best bow making videos I've seen...thank u was soo much fun watching and making them!
MooshMash: Wow, so amazing! My mom wanted me to have a hair bow like this, but we couldn't find any. Thanks!
Ilminia Essentials: Cute ! I love your heat gun ! I wonder if I can find that one in Belgium.
Jennifer Ashabranner: made this bow today. first time ever making a bow and my niece loved it. I ended up making her 6.
LoosingOrion: I just made a bow using your tutorial. Thank you!
Lee Xiao Xin: it looks so easy and beautiful!! im gonna do it. looks so nice!! good tutorial.!!
Vareka Gary: Awesome! Now I do not have to buy these I can personalize them for my daughter. Thanks!
Jéssica Coutinho: sou do Brasil... amei esses laços... trabalho com isso... e eles tão me ajudando muito..
nana toure: This was actually really easy for me! love this
Dal Ap: great tutorial, no wasting time, perfect and thanks .. congratulations!
Amber Greer: Great tutorial! I'm definitely going to make some hair bows!!
Charnelene White: I'm so going to the store and doing this sur is good
Nikola Bailey: What a lovely video which explained everything to do in simple and easy steps. Thank you for sharing x
kristina deel: Great tutorial very helpful I'm going to make some and wear them to school! u choose the right things to say to make it easy and simple Ps- I love Ur nails!!!!
Barbara Burton: Beautiful!! Thank you for sharing!
fleming mitchell: thank you so much. your tutorial was perfect and easy to follow. my bows came out perfect!!;)
Margo McFayden: Really enjoyed your tutorial gonna try this with my daughter, do you know where i can get the clip for the bow?
Marilyn Semler: Thank you for a very concise easy to follow video. I feel confident I can do this,hopefully as neatly with the glue gun as you!
Alessandra Lombardini-Parks: Perfect tutorial, thank you! I will try to do the same with velvet since I can never find them in stores, when the bow is big enough the barrette is way to big for my extra thin hair, so I'll have to make it myself.
Tiffany Byrnes: Would love to see more bow tutorials :)
Paige prioleau: I just love the blue-dotted ribbon it's so pretty!
Creative Thinker: Great Vid! OMG Who thumbs down creativity !?!
Nina Tay: Hi Christine! This is, so far, one of the nicest tutorials for bow making that I saw online ^^ Just want to ask what kind of ribbon were you using in this tutorial? Is this the fabric type in texture? Thank you! :D
Kate Franklin: Adorable! I am gonna try this sometime soon!
Ashlie Lily: I tried this bow out, and it was super easy!!!
dgespinoza68: Thanks I really love your bows they turn out so perfect!
Sam Alvarez: Thank you so much!!!!!!! I'm making a business that sells bows and stickers (silly huh) and my grandma will give me some of the "leftover" pieces of cloth from her job, because she works at American Apparel
Elisabeth Fischer: This is so easy and so cute! Please do more videos like them! 1 question where did you get the ribbon from? Thanks for awesome video!
Becky Stewart: Thank you so much for sharing. You are excellent at explaining and so easy to follow. ❤️
Sakura Furukawa: It's sooo cute..Thank you for making this
Jessica Estrada: I love it! It's so cute I am starting to make some and sell them!
Xyna Suckseggs: Omg it is soooo good.thats so cool now I don't need to buy bows Thank you
Swaegi Makoto: This was so helpful, thank you so much!
Jennifer Tull: I can’t wait to try this!!!! BTW, I love your nails!!!
Samantha Rodriguez: Awesome Video!! Now i can make my daughters own bows instead of spending so much buying them :)
mizmelody1970: thanks for the video, my daughter just made three bows using your steps! *Melody*
Kirk Niemeyer: where did you get the ribboin and glue gun
Cheyanne Smith: This looks very easy! I can't wait to make one! Also, I love you nail polish! What color is it?
FlowerCraftAcademy: That's so pretty - thanks so much xx
Dory Dimmonton: Wow! I made nearly 8 bows for Vicky and Jackie and they are so pleased. Thanks!
Morgan Zermeno: This was so helpful! Thank you
Victoria: How long did you cut the two strips of ribbon?
Raquel Torres: Awesome tutorial, thanks!
Dana EODWIFE: Thank you so much for this tutorial!