Diy Hair Accessories Organizer Easy ! Collab With Theplainestjane | Euniycemari
- Posted on 29 August, 2015
- Hair Accessories
- By Anonymous
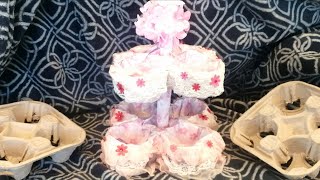
DIY Collaboration with thePLAINESTjane ! For my DIY I did a storage/organizer for my hair accessories! This is simple and I got all the materials to make this from the dollar tree store.
CHECK OUT thePLAINESTjane channel ! https://www.youtube.com/user/thePLAINE...
LIKE, SHARE, COMMENT & SUBSCRIBE !!!!
https://www.youtube.com/channel/UCVn4L...
=====================================================
MATERIALS NEEDED FOR THIS DIY:
Glue Gun
Velcro (optional)
Storage Bins ( as many as you want, any size , any color)
Decorations (flowers, gems, etc)
Small containers ( to organize bobby pins, hair clips etc)
====================================================
DIY Coffee & Oatmeal Body Scrub Collab w/ Chele Von #iamnoirtv https://youtu.be/KItntyCB0iw
AUGUST FAVOURITES | 2015 https://youtu.be/x9ItqN2uPkM
Tips ! Transitioning to Natural / Organic Hair & Skin Care https://youtu.be/uWpt_FtgpUg
++++++++++++++++++++++++++++++++++++++++++++++++++++
FOLLOW ME!
Instagram @EUNIYCEMARI
Twitter @EUNIYCEMARI
Website http://euniycemarii.com/
-~-~~-~~~-~~-~-
Please watch: "Product Review | Essie Gel Contour Polish"
https://www.youtube.com/watch?v=d3kW32...
-~-~~-~~~-~~-~- diy organizer box how to make diy room organization beauty handcraft
Your girl, eunice marie here and today i have a diy collaboration, video with the plain shane and for my collaboration, video. I did a diy hair, storage, hair storage, diy, hair storage. I guess you can just say that it looks like this um very inexpensive. Everything that i got was from the dollar tree store to make this to make this. It was under five, almost under ten dollars. It wasn't no more than ten dollars to make this. Yes and um, it was simple, easy, quick and i think it's cute for you to put on your bathroom counter um in your bedroom on your vanity anywhere. You choose to put it it's cute, it's accessible and yeah. So if you want to see how i did this diy go ahead and keep watching as well as go on over to the planet's jane's channel and check her out and see her diy as well, i will leave her channel link above as well as down below. So yes, let's go ahead and get started all right. So let's get started on what items. First, you will need for this project. Everything is a dollar, so you can find a lot of good stuff in the dollar tree store. So, first i'm going to show you guys these now. These are just three containers. They came in a pack and they were a dollar of course, and these i will use to like um for little sections inside of my little storage organizer. I also got these which they're clear, and there are two of them um and i like clear or like semi-clear like little containers. I don't know, i just think they go really good with the colors that i chose for my actual storage, so got these to store like little items in like bobby pins or ribbons or um, hair ties or clips, and things like sort in here. These three bins. They came in multiple colors, they came in blue, green, red, pink orange and that's it, but i went with orange pink orange. They are pink. Is my favorite color? If you guys could not tell so. I came up with pink orange pink and you can get as many of these. You can actually use like four of these. If you choose, i only decided to get three because um. I don't really have that. Many like that many hair accessories or anything. So it's just three seem like a right amount for what i have to store and the thing about these two is that these little tabs right here they fold inward like this, and then you can take your other bin that has like little like grooves in it. At the bottom - and you can take it and you can hook it into the other one and they stack just like this. I was thinking that i was going to need something to add to adhere um these to each other, because i didn't, i didn't see the grooves until i got home and i was like. Oh that's perfect. I don't really need these, so i decided to instead use these um for my little containers because i don't like when i take um like a container off of my shelf and like all of the drawers or whatever is in it, is sliding around like this. So i got these little adhesive stickies like the little cotton one on one side and the little abrasive one. On the other side. I don't know velcro sorry velcro, so i got the velcro adhesive so that i can stick them at the bottom. As you guys see, i already did it at the bottom of my containers and one at the bottom of the bin, so i can stick it in there and when i pick them up or move them around the whole. My bins aren't moving around inside of the container and then so i was like okay, i want to like jazz it up a little bit. I want to be a little fancy. You know make it a little bit prettier, so i went down the froze while walking down the flower aisle, and i found these flowers. They had so many flowers and there were so many different beautiful ones, but i decided to go with these two. My idea, for this is that i already had taken taken some off of the stem is that i'm just gon na go ahead and like glue them on, because i think they look really cute like stacked with like little flowers. So i'm gon na go ahead and like glue them on in some type of way and then last but not least, a glue gun to glue the items. I mean to glue the flowers to the containers and then last but not least after that you're. Of course, just going to need your hair accessories, combs um bobby pins, rubber bands, hair ties headbands head scarves, all that, just to fill it up. The way that you like it so now that i share with you guys everything that i have and what i got from the dollar tree store in order for me to complete this. Let'S get into me showing you guys how i'm going to make this and how i'm going to fill it with my um hair accessories, okay, so, first to begin, while my glue gun is warming up for me to put my flowers on, i'm going to show you Guys my thought or what i plan to do with my top bin here and the velcro, so the top bin is mainly going to be for my clips and bobby pins. So it will be mostly the most grab for bin out of all about out of the other two bins. So i wanted to keep them from like sliding around, like i stated before, so as you guys can see, i have the velcro in both so that when i take them out, move them around or whatnot or carry it with me wherever i need to go bathroom Bedroom, whatever um, they don't move around. So i already did that for my top drawer here. So i'm going to show you guys how i'm going to do it for the middle drawer that i'm going to use middle drawer, i'm going to put more of my hair accessories. Like my bows, my scarves and maybe like some hair ties, i don't have a lot of hair accessories, so i don't need a lot of like space or anything. So i have a little sticky here and what i do is of course i decide where i want it to go, so i wanted to go off into the corner, so i'm going to take the sticky velcro the one side and i'm going to just go ahead And this there's four points on here and i'm going to use that as a guideline, so i'm going to take it and stick it right onto the four point, one of the points and press down on it. Okay, see i have it there, then i'm going to take the other one, the little soft side of the velcro and i'm going to flip it over to the soft side and i'm going to stick that right on top and press down so that it adheres to The other one and then i'm going to take my container and i'm going to just stick it right on top in the position that i want and i'm going to press down to make sure that it sticks to the container. And then i'm going to pull it off and that will always give me an accurate and accurate um fitting. So i didn't have to go and like look at this and try to measure it up, put it on and try to measure it up with that. It'S already measured out for me, so all i know now is: i just need to line it up line it up in the corner. Stick it on, and i have that going so really really easy. If you don't like your drawers to slide around so so, i'm going to start off with the orange one, i'm going to start off with using the pink flowers and i'm just going to turn this on the side and kind of figure out where i want to Put them, it won't stay, of course, until i put it, but i think that's cute, and i'm only going to do it on one side, because i only plan on showing one side of the bin. So i'm not going to worry about doing it on both sides. Just one okay, so i'm going to go ahead and start to glue them in i like this, i like the way the color the pink looks with the with the orange. So i'm just going to take some glue, put it onto the back of my flower here and i'm gon na. Stick it right into the middle one, and i'm just gon na hold it there for a little bit. Okay! So now i'm just going to go ahead and continue to do the same thing to the rest of the flowers. So then, this is what it looks like with all the flowers on the side. How cute is that? Oh, my goodness, and of course on the inside you're gon na see all the little. You know details of it, but it doesn't bother me so. I'M gon na go ahead now and i'm going to um. Add the details of the white flowers to the pink bin. That is too cute and it's so simple and it's really inexpensive. So now all i'm going to do is i'm just going to fill this um, and this will look perfect, like in your bathroom or on your vanity. So now i'm just going to show you guys how i'm going to fill this. So, let's fill it up here, you can do this. However, you choose, you can add more bins. You can put different things to bin, it's all about personalizing it to what you like. So um, that's the fun thing about this that you can't do whatever you choose or style it. However, you choose to style it. So once again, this is what the final product looks like look at, that it looks kind of empty, though at the bottom, but i don't want to put a flower at the bottom. I think only the bottom just the way that it is, but this is just a cute, quick, easy, simple diy. You can do this for anything. You can do for your nail, polish, which you can do for makeup. You can do it for hair accessories, like i did, you can do it for skin products. You can do it for anything. I think this is also a really good idea for, like little girls room to organize like their little hair accessories, so definitely um. This is really a quick, simple way to store all your hair accessories and it's cute look at the colors and it's just a stack and it's just easy and simple for you to put onto your vanity or your bathroom um counter. So yes, hopefully you guys enjoy thumbs up if you like this diy um, definitely thumbs up, comment down below make sure to subscribe, and thank you, planish, jane, for doing this. Collab with me thumbs up, make sure to rate comment subscribe all that fun stuff. Hopefully you guys enjoyed - and i will see you guys in a little video bye,


Comments
N V: I have to try this for myself great diy
BeautyHack25: Really cute idea!