How To Make Cute Baby Hair Accessories Set Making A Diy Baby Headband With Tulle, Tulle Headband
- Posted on 24 February, 2021
- Hair Accessories
- By Anonymous
How to make a cute baby hair accessories set Making a DIY Baby headband with tulle, Tulle Headband
HOW TO MAKE BABY HEADBAND & HAIR CLIP SETS |Cat's Ribbon Bow Tutorial
#catsribbonbowtutorials
#diytullebabyheadbandset
#howtomajebabyheadandhairclipset
#newbornheadbandtutorial
#babyheadtutorial
#hairassessories
Tulle and tulle pom-pom are from
Heart-felt craft supplies
Padded embellishments from
Little gems ribbon and resins
MEASUREMENTS
40cm of 6cm wide tulle for Ruffle
30cm of 6cm wide tulle for circle
Subscribe for more EASY TO FOLLOW HAIR BOW TUTORIALS https://www.youtube.com/c/CatherinesRi...
Join my Facebook group
https://www.facebook.com/groups/768238...
For all your crafting needs visit my Amazon shop
https://www.amazon.co.uk/shop/catsribb...
DISCLAIMER:
Links included in this description are affiliate links. If you purchase a product or service with the links that I provide I will receive a small commission. There is no additional charge to you! Thank you for supporting Cat's ribbon bow tutorials and follow alongs so I can continue to supply free tutorials each week!
I'm always happy to help if you are struggling with any part of tutorial and need more advice
And I love seeing creations made using my tutorials so do pop across to the Facebook page, I reply to everyone and offer lots of bow making tips, and information every day as well as the tutorials
#Catshairbowtutorials
#catsribbonbowtutorial
#CatGoodband
#ribbonhairbowtutorialbyCatGoodband
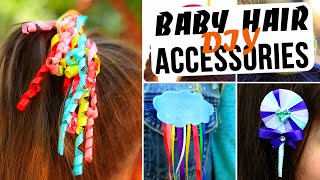
Hi everyone today, i'm going to show you how to make some super cute baby, headbands and clips using the tall, pom-poms and some actual tool also got the circular version. We'Ve also got this ruffled effect behind the the band as well behind the embellishments. So the other thing i'm going to show you is how to stretch your headbands first when you're making, so that when they're on the child's head, there's no gaps so when that's on an actual stand or a child's head, they're still all together and not pulled apart. So you can do this two ways. All you need is like a board or i use my headband stand, but if you don't have one, you can just shoot a board that stretches your headbands that size. Well, i said i'm going to use my stand so there's this one with the tool. This way we've got some super cute little tool: pom pom clips as it's easter, a little cute tall clip there, and then we've got this cute little bunny, just with the two pom-poms and again another cute little bunny with the tool and the circular tool behind. So, like i said, there are little headbands just move this out the way and the first one we're going to do is the super easy little heart, clip and i'll show you how to line a clip as well, so i've just got some nine millimeter ribbon. I want my lighter, always trim down your end, so trim it so straight and always heat seal, always always heat seal touch your glue just on there excuse the color. I have my glue gun on all day. You want to put that on the back of your clip on that bit here, and i also have one of my handy clips for this bit. Just gon na put a touch of glue on either side and take this and use it to get it in the right place and then what i also do is i use that to get it glued the gap and then take my thumb wedge, that in that Gap and then we're going to glue along this side - and i don't do it all the way along across because glue gun dries quickly and you want it to be as flat as possible. So do it in little stages and use the heat of your thumb. To keep it nice and flat, so you don't like have any raised lumps or anything like that, making it look messy, that's a little bit. Okay and then you just want about a centimeter over it's not much at all. Again, heat seal don't want any fraying and then we're just gon na glue this side of the clip flip that over like so there you go nicely lined clip, and then this one, as i said, it's super super simple: we're just going to put a touch of Glue across there just stand a glue gun place that across glue for our first pom-pom. I press it down nice and full and dot of glue for our second pom-pom again give that nice firm press down and there you go. That is your first of our collection of super cute little clips, so the next one we're going to be making is the circle tool to go on one of our headbands or a clip, depending on what you prefer. So i have got 30 centimeters of six centimeter wide tall and i got this from heartfelt craft supplies and this is the one with snowflakes on now. You can use any variation whatsoever that you like, and we just fold this in half, take our needle and thread. You need quite a long length, and all you want to do is start from above fold it in half you just do similar size stitches. All the way across keep fit evenly folded in half all the way along keep your stitches as even as possible. You just keep going until you reach the end of your 30 centimeters. If you wanted a little bit fluffier, you can go between 30 and so to 50 centimeters. The 50 will be much fluffier than 30, but, like i said it's what you personally like, like the look of so like. So if you want the fuller look, like i said, just add a little bit of length, exactly the same method, no changes whatsoever just keep doing your stitches all the way along the edge you get to the end. Okay, pull it through, and what i like to do is line it back up like this, and then i go loop it over and go back through where i did before. If it goes over like that, you can just lift it up like this, and you get in second just finish off. So there's your circle: i'm just going to put a few stitches through the bottom like so and then stitch off, and you can cut that extra off there and there you go nice little fluffy tall circle and you can take these layers and give them a fluff Up just by separating them up like this, there we go so there's our center, and all we want to do is i've got this cute little pink heart and again this is just a padded one. Padded embellishments are one of my favorite kinds after felt is because they stick with hot glue. You don't have to worry about them, coming off anything and they're, quite cost effective as well, so just pop that in the center and as you can see, we've got a nice pink tall circle. I like to trim them a little bit as well. If we've got any sort of bits where your edges weren't quite lined up, but there's one for the reformed one version, this is about 40 centimeters. But again you can do longer. If you want the difference with this, one is instead of folding it half. We just go straight up the center just ring up my thread and, like i said, work out where the center is that from above, and you just do nice even stitches. The wider. You are the fuller it'll. Look, the shortest smaller. These stitches are the more crinkled up. It'Ll look so, like i said again, you can play around and work out what works best for you, but try and make them about the same sizes to get it nice and clean and tidy. Looking and again, you can use any tool. This is my snowflake one. I'Ve got some moon and stars. They look pretty as well. You could use plain colors. The same technique works on all of them. You could even cut it shorter. If you wanted to blow the fluff away there, we go. So that's what it looks like all squished up and what i like to do is i pull it all sort of separate along like this so, like i said, just put it apart to the value that you want it to be fluffed to that's your unlock turn. It a little bit more put it a little bit more open. If you want it a little bit more gathered together, give it a little bit more of a gather and then all you do to finish. It is take your thread on that last end loop. It back and again and stitch it off, because we're going to hide that knot with our embellishment when we put it on the headband and there you go nice little gathered bit of tool to go on one of our headbands and then, as you can see, i've Got my stand and what i do on mine is i pop a little bit of card underneath my headband in a minute, and you can do them this way up all this way up. It'S entirely up to you, i'm going to do it, so it's the inner bit this bits showing this time now. You need to glue it when it's like this because, like i said, if you don't, if you do it flat or somewhere, where the headband's gathered up, when you pull it apart, the pieces will move. You don't want that you want them all to be. In the same place, so that they look all nice and straight so there we go so we've got the pink. We'Ve got the gathered bit we're going to place this on here and it is from the card to there so work out how much glue you need there. You go just some standard hot glue, make sure it's on the center. So, where you've done your thread in and pop that there - and obviously this is the so edge we want to do - is i've got a super cute, pink padded cat and we're going to have that at the top there? So i'm going to put a bit of glue on that center again on that line, where the thread is just above it and about halfway down there. Take the cap place it on there, and the other thing is: is you can twist it that way? It'S entirely up to you, whatever you personally, like the look of is going to work best for you and then all you do. Is you use your tool, pom poms, to fill out the rest of that thread line so touch your glue. There place your pom pom. Make sure your tools gathered the correct sides as well, so just make sure it's there. I think we're just gon na do two more and if you want to, you, can do some longer tool and have it in the center. Like i said with these ones, the fun thing is: is you can literally play around with these techniques and completely make it your own and have some fun? So there you go, there's our cute cat headband and then the other way is like i said, with the circle and again i'll put this bit of card underneath it we're just going to do the pink again with this bit facing upwards, because that's how we're going To glue just put a bit of card underneath just so nothing glues to the stand, and with this one like i said, we're going to do the circle, we're going to put the circle in the middle, and i am actually going to add um a felt circle To the back of this and glue that underneath, because that will give us more security on this bigger piece, so just a felt standard felt circle on the back like this work out, where you want your placement we're gon na do here, because i don't worry about That spot of glue - it's fine, put it that way on this one and then to secure this one in place. What i'm going to do is i'm going to use another felt circle on the back here again. This will be for the comfort of the child as well. So i'm just going to put that spot. There just put your glue around and glue that and i'll just give it a little squish down so that it's secure, and then you can turn that back on on your sand or your board, like i said, i'm just gon na pop my card back underneath it There we go, i'm just going to put some little cute pom-poms inside and i think i'm going to do some pale ones and then some bright ones because, like i said, play around, make it look cute to. However, you like use one pom, pom use 10 pom poms just to play today and last one there. We go fluff up any tool if it gets underneath any other embellishments like that, and there's that one and then the last one i'm going to show you is how to make put these little ears on a pom-pom. Now i use slightly different glue with this. I do use my e6000 and you will need something to hold it in place for 24 hours, because this is amazing glue. But it does take a little bit time to set, but it makes it look cleaner than glue gun, because the glue gun glue will leave like a chunk of noticeable glue gun in there. So you just put that on the edge there and then what i do is wedge it in and hold it for a second and then take one of my clips and i want to push it. So it's like this. That'S what it's going to look like. While it's setting put my glue away now, you can glue your headbands with that as well, but, like i said it does take the 24 hours to set so like i said it takes a little bit of time. I don't always have the patience for that because i'm a pain in the butt. So i'm going to use this one to do my other headband as well, two or more zoom that one a little bit out of the way. So i don't accidentally glue two headbands into one, and then i've got these cute little and if you get on these, if you get these little fluffy bits here, all you have to do is give them a little pull up like that and just snip any extra Excess free and we're going to do our so we want that one like i said you can do the ears up or down so like, so you can do them this way. All this way, i think i'm going to do mine to the side today. So that's that one pop them on and all i'm going to do is i'm going to take my clip underneath headband make sure the ears are wedged where i want them so that it holds in place okay right against his ears, so the ears set and i'll Leave that for 24 hours to set and again i'm just going to add the remaining pom poms on there, nice and close press it down nice and firm and got a little bit of a off. So just cut that off and there's headband number three and then the very last one that we are going to do is i've already lined this clip. So, as you saw with this one, we're just going to put this on here and again, i put a little felt circle on the back of this one for extra security, so a bit of glue there make sure you got it the right way. There we go. I lift this up a little bit for my pom-poms and one and press cut that little extra off okay we've actually got a little bit room for another one on this one. So we'll do one more and there we go two little cute, pom pom rabbit clips and, like i said you can do all sorts of different types. You can do all different variations. You can put as many pom-poms or as little pom-poms as you want or none you could just do the tour with the embellishment but yeah you've got so many options and, like i said you can put your placement of your tall absolutely anywhere and really make lots And lots and lots of cute baby band designs just so they're on there look and, like i said you can make so many different cute baby sets and both the tall pom poms and the tool was both from heartfelt craft supplies. I'Ll put the link in the description below for you, along with the measurements of the tool, because that's really the only sizing that is necessary on these. So there you go so cute, so quick, so many different ways like i said: they're all going to be ready to go shortly and i'll. Just take this one off the headband. The only one i really need to leave on there is the one that's setting the 24-hour set, as you can see, super cute cat headband and again. This is why i add the little bit of card just make sure it doesn't set to my stand. There we go and super cute tall heart headband different ways to do your embellishment, so they sit differently on the child's head. So obviously that one would do this inside that one would be across the center. So, like i said, play around, do whatever embellishments you want and, like i said, have lots and lots and lots of fun. Okay, bye! You
Comments
Ianthe Forbes: Love these, another great tutorial!
Aimee Boyes: Another great video Cat! Very informative! I love all the accessories too the cat one would be super cute at Halloween too in darker colours xxx
Ophelia Kesson: How do you call the thing you put the headband around?
Kylie Henley: where did you get the bunny ears for the pom poms