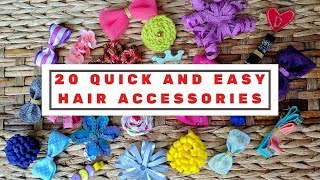
Felt Hair Clips Tutorial
- Posted on 14 April, 2013
- Hair Accessories
- By Anonymous
In this video we will demonstrate how to make some really cute felt hair clips using supplies from Itsy Bitsy. For more photos and details on supplies used, please visit our blog: http://itsybitsyindia.blogspot.com/201...
Hi everyone - this is an era from itsy-bitsy and I'm here to show you how you can make these adorable felt hair clips using some lovely supplies from itsy bitsy. Now, for my first set of hair Clips, I'm going to be making use of this Sizzix flower layers dye, it's a three die set and it comes with three different flower designs and I'm going to be using two of them for my first one, I'm going to Be using this large, almost flat sunflower design and I'm going to combine it with a purple felt sheet, and I'm also adding these itsy-bitsy layers to make it a little thicker than its usual thickness. Now you got to bear in mind. Filled polyester filled is a fabric, so it doesn't really cut very neatly or with the dye. So, by making it a little thicker, it makes it easier to cut it, and you still have to do a bit of touching out by yourself, but at least it gets the job done somewhat now for this particular clip. I need two of these flowers, so I'm just running it through my Big Shot again after that, I'm going to set my Big Shot aside and using a little scissors. I'M just gon na cut it wherever it's not quite cut by the die. Once again, remember fell. Doesn'T cut that well with dyes even the best dies, but it cuts pretty much the design so trimming it out of the sheet is not a problem. Hmm, once that's done, I'm going to take one layer and glue it over the other layer, and I've got these really pretty flower from itsy bitsy, which I'm just going to glue on the top, and I'm going to take my hair clip now and glue it at The edge of the hair clip I'm using regular black hair clips, but itsy bitsy has some lovely alligator clips, which are much better for this purpose. For my next clip, I'm going to use a hot pink sheet with another die from the same pack from the same Sizzix flower layers die again, like I said, you're going to need your scissors to just ease out of the felt, because the dye doesn't cut it As well as it would cut paper or cardstock and then using another flower from the same petite daisies back, I'm just gon na glue it in the center once once again using the hair clips, I'm going to glue it to the top and I've already done. The pair, so I've got a pair of really sweet hot pink clips. Now, for my next art clip, I'm going to use the itsy-bitsy butterfly die with some blue felt. This is really cool, because the dye has some embossing features in it and that embosses the felt really well, but once again, because of the nature of the felt and the fibers associated with it, it is, it will not give you a clean cut at the first Row but it's it cuts it to a large degree, so you can just use your scissors to etch it out. Um, here's a look at the embossing. Isn'T it pretty I'll? Show you a better picture later now. I'Ve got these really cute buttons from itsy bitsy, which I'm going to use to make the body of the butterfly and that's pretty much it. My clip is done. I need to just do it on the back of a hair clip and once again, I'm going to put a little piece of felt at the back to keep it in place, and here I go my two butterfly clips: isn't it fine and sweet? My daughter has just the perfect dress felt now for my next project: I'm going to be using the emerald green felt sheet with the itsy-bitsy leaf dye. This is another really versatile dye, because it helps you produce three different types of needs which are great for these kind of projects and the bail sheet I'm using again needs a little bit of easing out, but once that's done, I'm going to take a pack of Itsy-Bitsy fabric flowers and just glue it to the edge the itsy-bitsy fabric. Flowers are just great for this purpose and again I've already done the pair now for my next clip, I'm going to be showing you how to do a fabric. Rosette I've taken a strip of felt which has cut one inch wide by 9 inches long, and a good rule of thumb is to remember that, whatever the width of your strip, it needs to be 9 times that length. Then I'm just going to use my needle and thread to create an in and out stitch fairly evenly on this trip, just in and out and in and out really straightforward stuff, and this you can do not just with felt but also with ribbons. We can make some really pretty ribbons ribbon rosettes using the same technique, but I thought I would try it out with a piece of felt, because you know this this particular. It feels really good when you hold it and when you see it it gives a nice rich texture which looks really pretty when you actually use it. Now, I'm just about nearing the end of my in and out stitch and then I'm going to pull the thread. So that it all bunches up in a circle and when it's fully bunched I'm going to knot it up at this end to keep it bunched like that again and once I'm done with that, I'm going to join the two ends as neatly as I can, and Then stitch those together so that the rosette is joined in a nice neat circle. Isn'T that fun I'm using our back stitch to keep it joined because I don't want it to gather again and so back. Stitch is a really good securing type of stitch for this kind of a project right now, I'm going to just knot it up all done and I'm ready to start putting my two set together, I'm going to take another piece of felt a small little square. The same shade and add an ID generous helping of glue from my glue gun on that I'm going to glue it down and again I've got this really cute button from the fashion buttons and I'm just going to secure that in place with the glue. So now my ribbon rose now my felt rows that button is clip is done, I'm going to glue it on to the back of her hair, clip once again, itty bitty as much where I had Clips there, these alligator ones. This is actually quite flimsy and I've already done another one which again I'm going to glue on the back of my hair clip and that's pretty much it isn't it cute and fun. So here's the whole set of hair clips, the nice butterfly embossed ones, the felt with the fabric, flowers. There I felt rosettes in the purple and the pink he has a close-up of each a particular clip. Isn'T the rosette adorable here's the deep purple with the petite daisies nice and rich here's, the hot pink with his smaller petite daisies? I love this one. He has that emerald green leaf felt with nice, frilly fabric, flowers and here's the butterflies. Don'T you love that embossing? Isn'T it pretty gorgeous and here's how it looks when modeled by my daughter he has a nice green rosette, here's the adorable hot pink. Doesn'T she look at alling? Here'S the spheres are all thoughtful in her butterfly clips and here's my mischief-maker with her cute little purple clips. Well that wraps up this tutorial. I hope you found it useful and stay tuned to many more tutorials from all of us here at itsy bitsy by
Comments
Irene McIntyre: Thank you for sharing your projects, they are really great. Your daughters are so beautiful.
digupstuff: GORGEOUS WORK! OMG! You're daughter is so ADORABLE!!! ♥
Lemon ta: I love your videos, could you please tell me where can I get the cutting machine ??
My Random Days: Is there a certain hot glue I need to use ?
Veda Anurag: She is so adorable
Fazal Farid Vora: can you show more
arty crafty: Where do u have stores