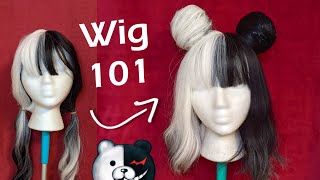
Yoko Wig & Hair Acc
- Posted on 01 March, 2017
- Hair Accessories
- By Anonymous
Diy Yoko Littner wig & hair accessories. This is a tutorial on how I made Yoko's Hair acc. & how I styled her wig. I hope this video is helpful to anyone wanting to cosplay Yoko from Gurren Lagann.
~More detail way on how I Styled the bangs, Please check out my Jinx wig styling video
-High Ponytail Tutorial
My social media
https://www.facebook.com/AlexejaSimone...
-Storenvy
http://alexejasimonecosplay.storenvy.c...
https://www.instagram.com/alexeja_simo...
Music
-Domastic - Weird Dream [NCS Release]
[Domastic]
• https://www.facebook.com/djdomastic
• https://www.instagram.com/djdomastic
Glude - Breathe [NCS Release]
Glude
• https://soundcloud.com/the-glude
• https://www.facebook.com/officialglude...
Rob Gasser - Supersonic [NCS Release]
Rob Gasser
• https://www.facebook.com/robgassermusi...
• https://twitter.com/robgassermusic
• https://www.youtube.com/user/robgasse...
Y&V - Falling Up [NCS Release]
Y&V
• https://soundcloud.com/itsyandv
• https://www.facebook.com/itsyandv
• https://twitter.com/itsyandv
• https://www.instagram.com/itsyandv/
Blazars - Northern Lights [NCS Release]
[Blazars]
• https://www.facebook.com/blazarsmusic/...
• https://soundcloud.com/blazarsmusic
NoCopyrightSounds
https://www.youtube.com/channel/UC_aEa...
Electro-Light
• https://soundcloud.com/maskedacoustic
• https://www.youtube.com/user/ElectroL...
• https://twitter.com/ElectroLightEDM
• https://www.facebook.com/ElectroLight...
Channel Art
https://www.facebook.com/ultimatexbui...
https://www.instagram.com/ultimate_x_...
Edited with Filmora
(づ。◕‿‿◕。)づDon't Forget To Please Subscribe (づ。◕‿‿◕。)づ
Hey guys Lexi here and today, we're gon na be doing Yoko's, wig and her hair accessories. So first we're gon na be making the hair accessories and then we're gon na work on the wig and I'll. Explain how I got it into a ponytail. I had to do it twice because the first time I messed up, they just got all tangled in with some giant rat's nest night to fix it so explain how I got it in a ponytail later right now, hair accessories. So I have some wooden chopsticks and we are going to paint them and make them the right color. So we can put them in Yoko's hair. So some wooden chopsticks is what you'll need all right. A little piece of extra evie, a foam and i just stabbed two holes in it. So whenever i'm painting them and just kind of stick them in there just so they can stand there. So I can paint either. Here I drew a pattern or a hair clip. I might just make it just slightly bigger and I cut it on the craft foam, but I drew a pattern: we're gon na put it on the craft foam we're gon na cut little pieces out of the craft, foam and kind of snap them. So we can get the eyes and the head I'll show you. I don't really know, explain but hair accessories use, craft foam and we're gon na cover it with some more block that way it's a little bit more stiff and it stays in the hair a little bit better. So wooden chopsticks pattern, craft foam, worbla and paint. I have a paint plate put my paint on. I have real, yellow and bright yellow. I don't know exactly which one we'll use so she's got those two and I got an old makeup brush, so it will just be really easy to go across the wood. So, let's get into the hair accessories. I guess we're gon na work on the chopsticks first, because it's gon na take a little bit longer and put a couple coats on to wood, so we're gon na get three points. Our EBA foam stick the chopsticks in there. It works and take these up a little bit put a little dab of this. I think we might use the real, yellow, Ernie's real, get some paint and get your makeup brush and then you're, just gon na dab your makeup brush and just kind of go across them until they're covered the way you want them to and just do thin layers. Let it dry and then do another layer. You don't want to do thick layers. Isn'T it we'll just it'll have all those running paint things it look like wet paint. I don't know: hey, I'm sorry, it'll, look like wet paint, so just do thin layers and let that dry and then put on your next layer, so it dries completely together. I forgot to get to tell you to get a little cup of water or your brush. So it can clean it off because you don't want all that paint to dry in between this drawing, because I don't know how long each layer is gon na take to dry. So I'm gon na let this dry completely and then I'm gon na put the next layer, but you wan na make sure your brush doesn't get all dry and the crusty paint on it. Isn'T it's gon na not go on smoothly and it's just not gon na? Be nice just make sure your brush is nice and clean, let this dry and then we'll come back to the next layer. It took six layers, I believe, six layers of paint and remember we did thin layers, so it was six thin layers. Let the thin layer dry and we went onto our next layer, so six layers and then after this finishes, drawing I'm gon na, pull it out and paint the tips which will take probably six layers like the rest of it did so I'll, come back whenever this Is completely painted and then I can put our clear coat on it, so, okay, so the chopsticks are covered in all the paint. I did six layers on the whole thing and all the word is covered so now we're going to put a clear coat on it. We are going to use modge podge because it's just a lot easier, probably do two thin layers of my brush. It'S stuck two thin layers of mush mush and then let it dry and then chopsticks are complete and then we will work on the little headpiece. Hey guys, sorry, it's a new day got too late. The other day when I was meeting chopsticks, but here is the completed chopsticks. They look so nice they're, not brown, wood anymore, they're yellow, so we put them in the wig whenever we get the rest of the wig done so mix we're gon na make the hair clip. So we have our pattern. I'M gon na cut it out a little bit closer to this and then we're going to trace it on a piece of craft foam and cut it out of the craft. So now that you have the two pieces cut out: yeah the one with the eyes cut out and you just normal one you're going to put your hot glue on the back.this and then glue it on to the second piece so that the two pieces become one Piece not this whole shoot, but we're gon na take a little bit of worbla and then heat it and cover this so that it will look covered and it looked more like a plastic hair clip or whatever her hair clip. I know okay, so everything is together. So now we have our wash pot paint plate and the makeup brush. We used for the chopsticks theme, so I put our hair clip on our paint place, get just a little bit of montage to thin layer on the front. Let it dry just and lay our back foot dry and just try do two thin layers and see how this okay. So now that everything is primed, I did three layers of modge podge, make it nice and smooth. So now that we have all the montages. Everything is dry, we got white paint and some black paint and we are going to cover everything in white paint first, so just make sure that everything is kind of primed with white and then cover the outside piece of the skull with white. Until we are happy with how it looks and then the inside the eye black from the little scar, okay, okay, all the white is painted, it looks so pretty and white excuse me. So I got a smaller detail. Brush we're just gon na hit a little bit of black and just carefully paint his eyes in a scar on the forehead, okay, okay guys. So all the black is nice and dry. So, just to give it a little bit more detail, I'm going to make some of the black and the white to make the kind of gray color and just kind of you know, give the edges a little bit more of highlights and lowlights. So it looks a little bit more 3-dimensional and plus 2d. I wanted to look a bit more 3d, so we're gon na add some weathering and some highlights and stuff and see how it looks after that and then we're gon na attach the clip onto the back. After I get the rest of the paint done well, we're gon na get the rest paint done, and then we have to put a clear coat over it of wash clothes which are just gon na. Do one thin clear coat and then we'll put the clip on the back okay, so I think that's all I'm gon na do to it. I just put some gray and kind of blended to the end around the edges and around the cracks and stuff. I believe. That'S all I really want to do to it. I don't want to do too much so now that we have everything painted. We are going to take our large makeup, brush put it in some mouths, polish and just put a thin layer over the top and let it dry so thin layer over the back and let it dry in a needle attached, our hair, okay guys. So next I started on the wig. I separated the bangs into three sections, the middle section I teased and used hairspray and heat and the top and bottom section I used as the flattening. You want to know a more detailed way on how I did the bangs, but please check out my chinks hair, styling video, and I explained how I do things in that video. I essentially did the yoga veins the same way that so watch that video started to become shape. I made sure everything was nice and hairspray down with some hairspray and heat, and then I used my Garnier mess maker and made some fringed ends and styled it. So it looked more anime style, look more like anime here you know with all the little fringes on it and all the little hair standing up. You got to do all that and on the bangs and then on the side of the hair, and I did one little tiny piece that stands up on the top of the head. I just ended up putting the little furnished in sand all of the things, and I put it in the long pieces that hang in the front of the hair, just to give the hair a little bit more shape and a little bit more of an anime style And then I took some bangs or some of the hair for the front of the piece, and I put them around the face so a forever after I styled the wig. It is now time to find the as a hair accessories. So I put the hair clip in to add the hair clip. I had to put it in the wig cap and kind of just thread it through the lace pieces in the top the cap. Then I put the chopsticks in the back of the head and try not to put the chopsticks through the wig so that way it's to interfere whenever you put on your way, okay, guys so something I forgot to talk about whenever I was styling it those way, But how I got it into a point, I will be putting a link in the description of a video that I use to help me put it into a ponytail, but I just want to talk about a little bit in this video to help anyone so we're Gon na do is you're gon na take sewing pins, put one in the middle of the head and line the front of the the wig above the ears and behind the neck to make sure it's secure against the styrofoam head and then you're gon na turn. The wig upside down and gather all the hair with your fingers don't use a hairbrush because it'll get taken so gather all the hair with your fingers and like the ponytail in it, and carefully pull it through the ponytail. You may need help. I had to use my sister tummy she held the head. Why does the hand it's easier with two kids, if there's a little harder than one person who's gathered here and carefully put it into a ponytail, be very careful because it will get tangled? That'S all I messed up the very first time I try it. I just turned to this plate giant rats nests and I'm not over exaggerating, I mean giant rats nest. It was really hard to get untangled, but, as you see, I was able to save it. Thank goodness, but be very careful with long legs they get tangled so easily, but that's pretty much it. But don't forget the videos that I use to help me will be in the videos in the description below so check that out and give them a like. And so I hope you guys enjoyed how I made the hair accessories and how I styled Yoko squid. If you did, please give this video a thumbs up, don't for any more possibly related content. Please subscribe to my channel didn't give this video a like, and I will see you guys in the next video


Comments
Victoria Shoup: The wig styling is so helpful! Thankyou for the tutorial!