Stunning Diy Hair Bows, Wreath Bows And More
- Posted on 01 March, 2020
- 6D Hair Extensions
- By Anonymous
Why stick to simple hair bows when you can make them unique and stunning in minutes at home? Learn to make some exciting hair bows with Sandy Sandler, the creator of Bowdabra bow maker. Join her Facebook Live to watch her demonstrate how to make these bows in easy steps. She’ll also make some really beautiful wreath bows. Stunning DIY Hair Bows, Wreath Bows and More
Crinkle Hair Bow (Starts at 00:05)
Material Required
* Large Bowdabra (https://bit.ly/399E9OS)
* Gold Bow Wire (https://bit.ly/2TmJsnz)
* Bowdabra Gold Scrunchy Ribbon (https://bit.ly/2w8yiLf)
* Bowdabra Silver Scrunchy Ribbon (https://bit.ly/2Tj9dFk)
1. Sandy makes this adorable hair bow using Large Bowdabra.
2. She places two Bowdabra Gold Scrunchy Ribbons between the pillars.
3. Now she scrunches the same ribbon while making 2 to 3 loops on either side.
4. Sandy puts Silver Scrunchy Ribbon in between.
5. Next, she ties the bow with bow wire and separates the loops for a beautiful finish. Your crinkle bow is ready to use.
Little Hair Bow (Starts at 4:55)
Material Required
* Mini Bowdabra (https://bit.ly/2TkCVd2)
* 3” Purple Glitter Ribbon
* 1.5” Sheer Blue Ribbon
* Korker Ribbon (https://amzn.to/2SxWM8n)
1. She uses the Mini Bowdabra for this project.
2. Sandy takes the 11” long purple ribbon and scrunches it to make a loop on each side.
3. She repeats the same process with a sheer blue ribbon.
4. Sandy tops it up with pink Korker ribbons.
5. Now she ties the bow with bow wire and attaches it to the ponytail holder. Voila! The easy to make hair bow is ready.
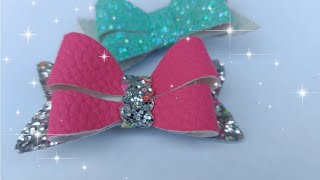
Pink-Purple Hair Bow (Starts at 8:20)
Material Required:
* Bowdabra Gold Bowwire (https://bit.ly/2TmJsnz)
* Mini Bowdabra (https://bit.ly/2TkCVd2)
* Light Pink Sheer Ribbon
* 1.5” Sheer swirled Purple Ribbon
1. Sandy sticks to the Mini Bowdabra to make this bow.
2. She scrunches the pink ribbon in crisscross directions.
3. Now she scrunches the purple and makes a single loop on each side.
4. She repeats the process with the pink ribbon.
5. Sandy decorates it with flower picks and ties it with the headband. This beautiful headbow is perfect for little baby girls.
Spring Wreath Bow (Starts at 13:13)
Material Required
* Large Bowdabra (https://bit.ly/399E9OS)
* 2.5” Yellow Gingham Ribbon
* 2.5” Yellow Ribbon
* 2.5” Purple Ribbon
1. Sandy places already dovetailed ribbons in Large Bowdabra.
2. She scrunches a sheer dark green ribbon while making a single loop on both sides.
3. Next, she repeats the process with a gingham ribbon.
4. She makes a tail using sheer dark green ribbon.
5. Now, she makes another tail with an 8” long purple ribbon.
6. Sandy uses decorative flowers stems and puts 8” long yellow ribbon and sheer green ribbon.
7. Next, she tops it all with burlap rose with a small ribbon scrunched between.
8. She ties it using bow wire and fluffs it for the final finish. This bow can be used as a wreath bow or centerpiece.
Electric Wreath Bow (Starts at 17:48)
Material Required:
* Large Bowdabra (https://bit.ly/399E9OS)
* Silver Bowdabra Bowwire (https://bit.ly/2TmJsnz)
* 4” Glitter Mesh Metallic Ribbon (Ice Blue)
* 1.5” Ice Blue Ribbon
* 2” Sheer Blue Ribbon
1. Sandy uses Large Bowdabra for this project.
2. She places the silver bow wire between the pillars.
3. Sandy scrunches the mesh ribbon into the Bowdabra. She puts 4” Glitter Mesh Metallic Ribbon on the top of it.
4. Next, she puts a sheer blue ribbon between the pillars followed by 1.5” Ice Blue Ribbon.
5. She repeats the process with all the ribbons used before.
6. She scrunches 4” Glitter Mesh Metallic Ribbon while making single loops on each side.
7. Sandy uses a beautiful pick and ties it with the wire. Your beautiful bow is ready.
Flower Bow (Starts at 22:19)
Material Required
* Mini Bowdabra
* Beige Ribbon
* Glittery green ribbon
1. Sandy makes this pretty flower using Mini Bowdabra.
2. She places 3 pieces of beige wired ribbon into the Bowdabra.
3. Sandy scrunches the small piece of curved green and white ribbon between pillars.
4. Next, she ties it with the bow wire and places a small flower using a zot.
5. Now Sandy takes an alligator clip and ties the beautiful flower using wire.
Super Easy Wreath Bow (Starts at 27:10)
Material Required
* Large Bowdabra (https://bit.ly/399E9OS)
* 3” White and Gold Ribbon
1. Sandy puts a gold bow wire between the Large Bowdabra.
2. She places a 33” long ribbon into the Bowdabra.
3. Now she scrunches the same ribbon while making 6 to 7 loops using twist and turn method.
4. Sandy ties the bow with wire and fluffs it to give a beautiful finish.
And I'm Sandi Sandler the creator of the bowdabra bow maker, and this Monday nights are when we do our half hour. Facebook live show, so I'm extremely excited now that I am here with everybody and we're gon na have some fun, so we're gon na make some hair bows wreath: bows: gift drop bows, and most of you who are my regulars will know that I give away a Roll of our bowdabra scrunchie ribbon so tonight I'm gon na make a bow using the scrunchie ribbon. I love this ribbon. It'S just it's like crinkly and the crinkle kind of gives it sort of a diamonds cool look. So what I'm gon na do is get started and you have to be on the live watching on bowdabra in order to win but you'll win a free roll of our bowdabra scrunchie ribbon and it'll be picked near the end of the show. So I'm gon na get started with our loud scrunchie ribbon. I'M gon na grab some bowdabra bow wire and we do have it in gold, silver and red so I'll. Take the bowdabra bow wire and use the gold and cut it here and let's just get okay. There we go and I'll fold my bowdabra bow wire in half and just hide hi Edna and hi Marie from Louisiana thanks. You guys so much for popping right on with me. So I have these pieces that are 24 inches, long and I'll just fold them in half and just kind of lay them down into my bowdabra and take my other one, though I've already dubbed till the ends and we'll go over dovetailing if you're unfamiliar with it. At these, during during the lie which we have a bunch of bows we're gon na make, we have some hair bows. Last week I asked and everybody said they wanted to see, hair bows and hair bows and wreath bows, so I decided to redo those and then this one could work as a really cool gift wrap. Oh so now I'm gon na just listen and fold it over and because this is a really thin ribbon, you can just fold it back and forth. You don't even need to twist so hold this and fold it back and again and fold it over and fold. It back and I have I'm using about two and a half yards of the scrunchie ribbet and let's trace that back and fold it over and one more time go back over here then I mean I take some of my silver scrunchie and how much do they Put here, I've got about 26 inches and just gon na scrunch that right into the center - and I'm sure that's so loud here and so also can you guys please share and let people know that we're live right now and I am looking for my bowdabra wand And it seems to disappeared on me Remy's pointing to it is this: okay. Is it on the table room? No, that's the mini bowdabra yeah, so we'll find it it will show up. I guess I better keep that one here. So now I'm going to take my wire just pull it through the Slipknot, pull it tight. Well, it's still in the bowdabra and I'm gon na separate the ends, bring it around to the back tie a knot tie another knot, and now I'm just gon na shape. This out bring my tails down and just separate all of my loops, and I just love how this ribbon just sparkles. That'S probably Mike the one of the funnest thing, and I I love how it can get crinkly, but it still looks really cool kind of gets. A diamond texture with the crinkles, so let me know what you think and if you guys haven't already, I know a lot of you have, but if you haven't already, can you click follow so you'll get notified when we do new Facebook lives so just follow our Bowdabra page, so now I'm going to take this really pretty. I love this bow and I'm gon na put this aside and we are going to make a little hair bow. So I'm going to exchange voda brazeau, I'm going to take the mini, and what I'm going to do. I have this ribbon here and Terry might be able to put up a link. I have eleven and a half inches and this is a three inch wide bow and I'm pretty sure that we have a link for this, so I'm just gon na take the top and oh, I need to put my bowdabra bow wire in and let's see here, Something'S going funny bear with me for one sec, guys: okay, because I'm not seeing the comments. Now I see them okay, so I'm gon na fold, my wire in half and just tuck it underneath and we're gon na make a cute little ponytail holder. So I take the right side of this ribbon and I'm just gon na scrunch this down and then I'm going to take this side and put the right side of the ribbon down again and then now, with my hair bow tool, I can measure exactly so. I'Ve got two inches on each side and I'm just going to scrunch that down into the center and then I have this ribbon and let's see I've got it's about a 1 and a half inches and I have 9 inches of it. So I'm just gon na take the right side and put that down in here, bring it back around, take the right side and scrunch that down and then just go to the center and make sure my rip. My loops are even and scrunch it down and then take my pink corker ribbon and, as you guys will watch regularly. No, I do not spend time making the Corker ribbon that I buy already made so scrunch this down and, if you're interested in knowing where we get it, just go ahead and put it in the comment section. Pull that really tight. While it's still in the bowdabra pull it out separate the ends and bring it around to the back, I think and I'll tie it off and tie a knot and then I'm just gon na tie this right on to my ponytail holder. So it's super cute and if you have a puppy, you could easily make one for your puppy's collar and then you'll have matching puppy puppy owner bows Gloria. Thank you so much, I'm glad you thought that was really pretty so now. I'M just going to take this shape it a little bit and you have this super simple to make ponytail holder or you could use a scrunchie on it as well. So now I'm gon na set what wrong oh um teri. Do you have a link for that? That you can put up, I think we do. Oh, she did put a link up - okay, perfect! So now I'm going to put this aside and then we'll also put a link to where we buy this really pretty puppy ribbon too, because I think this is so cute. So now put this one aside and what am I making? Oh, we have another hair about perfect, so hold that there and now so, let's see Jill you won before yeah. I know you it's I mean it is so cool to win a free roll of scrunchie ribbon. I think I love this Grunch cheer it up. So I'm gon na take some of my bowdabra bow wire and clip it, and also you know something I haven't done in a while. I want to thank everyone who purchases ribbon and stuff from our our bowdabra store. It really helps out in paying for the lives that we do and all the videos that we put out - I don't know also I don't know if you guys are familiar. We actually have a bowdabra app, so you can download it for free from iOS from iTunes or from Android, and it gives you all kinds of projects. It'S all the projects that go on our blog. Oh, let me tell you what I'm doing as I'm chatting so I've got 28 inches of ribbon and I'm going to fold my ribbon in half and I'm gon na take the right side of my ribbon and scrunch it down into my bowdabra. Now, what I'm gon na do is loop, this side over take the right southern my ribbon, and you know what okay best. Ladies and gentlemen, I am actually gon na make this in the mini bowdabra, and the reason that I switched to the mini bowdabra is because to make I've got smaller loops here, so to make the smaller loops it's sometimes easier in mini, so I'm going to now. Just fold this over take the right side and scrunch that down and fold this over, take the right side of the ribbon. Put that down and now I'll I'm gon na made I've made an X. So now I'm gon na take the lower loop and just scrunch that in and then take my top loop and scrunch that in and then I think I should have. I do. I have this ribbon here, which is I'm going to actually do this one first. So the purple ribbon is one and a half inches by 12 inches and I'll. Let me know, do is take the right side of my ribbon and scrunch that in fold it back over take the right side of the ribbon scrunch it down and now scrunch this. In here and okay, we are going to be making wreath bows soon, so please stay tuned. If you want to see how we make the wreath bows so now we'll take the right side of the ribbon. Oh and good news next week. Nick is going to be doing some, I believe Saint Patrick's Day, and he is a totally different style than I do and he'll be making some wreath bows as well. Take the right side here bring this one in here now just scrunch this down, and then I have these really cute little flowers, and I think we have these roses. They come in a package of I think 72, individual and bunches of 12 and they're on sale. I believe in our bowdabra store, so I'm just gon na pull this through here, pull it tight, while it's still in my mini bowdabra separate the ends, bring it around to the back, tie it off, and I am not seeing the comments anymore, so something's going wonky With my feed so now in order to tie this on to this cute little headband, I'm going to just feed it through on one side of the seam and then open this side up and feed it through on the other side of the seam, I think there We go, and then I'm just gon na tie this on here and just tie a knot, clip the ends and come back and just shape out my bow and bring my roses around here, shape that there and bring this loop and then I'm going to actually fold This over here, so it's pretty, really simple, simple to make, and you know - and they want to thank everybody who watches on YouTube and comments. It'S like so cool when you guys watch the replays to have this really cute little hair, bow or headband super simple. So now we're gon na get on and we're gon na make Arif bow. I'M gon na put this aside for me. Are you seeing the comments? Okay, I'm not sure why I'm not getting them! Okay! Here we go so now. I'Ve got this wreath bow here or the ribbon cut for the wreath boat and we're gon na get started. So I'm going to - and I see, Gail it didn't use. Richardson is watching and she's in our bowdabra fan gallery and oh my gosh some of the stuff. She makes is so incredible, so I'm gon na fold this in half lay it down tuck the ends underneath then this is part of our actually some of the ribbon. We sell in our store sort of our spring ribbon count which I really love, because it's so bright and perky and I have 20 inches of the three different ribbons and I have already dovetailed the ends. But just in case you're, new I'll fold. It in half - and I'm just gon na cut right here at an angle and that's how you get your dovetail. So now I'm going to just fold this in half and scrunch this down into my bowdabra, I'm going to take the purple and scrunch that down and then take this yellow and then I have. We have all these pieces so like wonderfully cut here, I have 25 inches of a two and a half inch ribbon. I'M going to take the right side and scrunch that in bring it back around and take the right side of the ribbon and just scrunch this in and then just front that in on top what I love about this bow. Is it's a great bow, so I have another 21 inches here right side, but you can use scraps of ribbon. So if you have the extra scraps, no one is ever going to know that you used your extra pieces of ribbon in this bow. So now I have, this piece is two and a half inches by 13 inches long, just gon na make another tail. So it's really super simple to do, and then this piece is eight inches by two and a half inches and just make another tail there. I have this really pretty floral pick that I'm just going to lay in here just lay that right down into the bowdabra, and then this piece is 8 inches and they've already dug tailed it. I'M just gon na lay that in there - and I can do a little scrunch in the middle, but I'm not sure if you're even gon na see it, because I have this gorgeous little yellow. It'S a yellow, burlap hope. You know what I have one more piece to put in here that I forgot lay that in there - and I'm not gon na put that in and put this in here and then you know what I'll just scrunch this in at the end. And then I will take my wand and give everything a good push, and oh thanks, you guys so much everybody who's share died. I really appreciate it. Pull it tight while it's still in the bowdabra, I'm gon na pull it out, and this bow would look really pretty on a wreath or it could be beautiful on a package. You could even put it as a centerpiece and that's what I love about. These bows is, they have so many different uses, so I'm just gon na bring this and bring that up there kind of scrunch that and bring my tails around this tail there and now just bring these tails down and bring this up and bring these around, and So is there anybody? That'S watching, that's new! Oh thank you for sharing Gloria. I really appreciate everybody who watches and shares, and there you see you have this really like it's so pretty and it could be a beautiful centerpiece or a great wreath bow. So I hope you guys liked it. I love the love that I'm getting so now. I'M gon na put this aside, and now we have another wreath bow. So we've got these all clipped together to make it a little bit easier for me when I'm making at so I'm gon na take my regular bowdabra and I think I'm gon na use the silver bowdabra bow wire on this, because we have silver in the bow And I'll clip a piece and don't forget everybody say I want to win so you are eligible to win a role of the bowdabra scrunchie ribbon and now I'm going to lay this here. I'M gon na poke this around and they have a piece. It'S a 21 inch wide piece of mesh and I've only got about 15 inches, and then this is a great and I'm just going to scrunch this in it's a great way to use your excess mesh, and then I have this piece here. Actually, this is one of our bowdabra ribbons and it's really glittery and I just love it. It'S four inches wide, I believe, and it's 24 inches long and we've dovetailed the ends. I'M just gon na scrunch this in here and then I have a beautiful piece of blue ribbon that is 23 and a half inches by two and a half, and I'm gon na just lay this down in there and then one and a half inch by 24 Inches and we're just gon na lay this in here, and I think this could be a really pretty centerpiece. So me, just that's gon na come after so now I have this piece here that is 25 inches, and it's just a tail. I'M gon na lay that in there - and we have another tail that I believe is the same length, that's 23 inches and it's a one and a half inch wide ribbon, and now I have another one, so we're just putting a whole bunch of tails in here. I'M actually going to grab this piece here that is 18 inches and just kind of lay that in so we're just sort of mixing and matching all of our different tails. And I just think this makes a gorgeous. Centerpiece Wow lay that down in there and I have another tale that is 23 inches, so they're all pretty much. You know the same length and this one is the same length here and now I have another piece of our mesh and this is, I think we call it a glitter mesh, but I'm not 100 % sure so take the right side and scrunch this down. Hi Kay and hi Annette and again take the right side put that down this way, go to the center and scrunch everything down, and I have another one that is 16 inches. I'M just gon na take the right side of it. Lay that down fold it over lay that in there and then you have this little MN. I have this really pretty illness works for Mardi Gras, with the little feather put that down in the center and I'll take my wand and just give everything a little bit of a push, and one of the things you'll notice is when the bowdabra starts getting really Full the towers will come together, so you just have to kind of push them apart a little bit then now I will take my bowdabra bow wire and pull it through the Slipknot pull it tight, while it's still in my mode Abra - and I take it out Separate the ends, so I mean how super simple was that and I'm going to tie a knot, tie another knot and I'm gon na clip my ends and just shape this out, and you have this like? Is that knot like so super simple and what you could do is lay it flat, and if I, if I lay it flat on the table, I can put like a candle here in the candle here and we make a really beautiful centerpiece. So I hope you guys like this and also I'd. I see it just popped on the screen to join our bowdabra fan gallery definitely join our bowdabra fan gallery. It is so much fun and we have such amazing creative people, and now I'm going to take my glitter grabber here, because I've got glitter all over everything and this just works like magic to pick up their glitter. I don't know if you guys are seeing how amazing this is for picking up glitter. It'S like the best thing I've ever found, so I'm gon na put that aside and I'm gon na make a little ribbon flower in the mini bowdabra, and this is really fun, and this could be really pretty. You could just make it bigger and put it as a wreath bow. So I'm just gon na grab some of the dabber bow wire and I'm gon na fold it in half and I think, like we'll, make some more ribbon flowers starting in March, because I'm so excited. I can't believe I mean, I know a lot of you live in colder climates than where we are, but we actually have our cherry blossoms starting to bloom. It'S just kind of cool, so these pieces are 7 inches and I've just cut the points on them because they're gon na be like my leaves of my flower. So I'm just gon na lay these in I've got three pieces and, as you can see, I'm just sort of shaping them as I go, and these are wired ribbon, which, when you see when we do the flower, it kind of makes it a little bit easier To shape and we will be making flowers during our lives in March, as well as a wreath bows and doing some wedding stuff as well, and so now I have these and we've just curved we've just sort of kind of curved on the end, we'll just lay These down in here you don't even tell you how long they were there five inches before we cut the curves, so we'll just lay these in and so how many of you have made flowers with the bowdabra before, let me know, and if you have made the Flowers, please post pictures in our bowdabra fan gallery. Oh and the other thing which I almost forgot to talk about, is lay that in there and then I'm gon na just take my ends, bring them up, pull it through my Slipknot and as soon as I'm done with this fun, I mean to make one more. Like a real, simple wreath or a wreath bow, so I'm gon na separate the ends, bring it around to the back. I'M gon na tie a knot and double knot. It and I can just tie this um, let's shape this first, and so. The reason that I that I, like the wired ribbon is because it's really easy to shape my flowers, and this could be even really pretty for a hair bow for like a wedding and I'm going to grab. I thought I put them on the table. Maybe I didn't um whoops. I guess I didn't excuse me for that and I'm going to grab one of my sauce and I'm just gon na put this on the back of this little flower and put that right in the middle. Just to add a little decor to it and I'm going to grab a hair, alligator clip and I'll show you how we tie this onto the alligator clip. So I want the top of the clip to be against my bow and I'm just going to wrap this around here and probably wrap it like twice around that way and then take this one and wrap it twice around the opposite way and then just bring them Down here and I'm just going to tie a knot there and we should be having the winner coming up really soon. Oh and I almost forgot, if you didn't see, last week's we are doing a carbo contest, so you have to be a member which is free to join. It'S not a big deal of our bowdabra fan gallery. So isn't that adorable and just so super simple and there's just a cute little hair clip so I'll put that aside and as promised, I'm just gon na make a really quick and simple wreath, bow Remy's trying to get my attention we do sell on Amazon in Canada, so right now we don't ship to Canada, but amazon.com has our product has the bowdabra x' and you can buy from there or you can also buy from Michael's encounter that so now, I'm just going to take some bowdabra bow wire and now, let's see whoops Sorry guys, I'm just trying to look at so, but we have had winners from Canada. So we should. We will ship to our winners up there, but but as far as shipping or a product not yet and hi, Francis okay, so we've got 33 inches and I've already dubbed held the ends I'll just fold that in half and lay this. So this is just a super super simple wreath bow, so I'm just gon na start, okay, you're trying to tell me something: oh, the winner, where's the winner. I don't see the winner, Oh Regina, awesome, so Regina Hoffman is our winner and Remi will post that up. There so I'm gon na take, I think, I'm gon na take it's about probably three yards to three, my unofficial measuring and just clip this and I'll show you really quickly how to make a super simple wreath bow. So now I'm just gon na twist this I'm having sorry you guys, I'm having trouble getting all the comments for some reason. It'S I don't know what it is, but at least Remy's there to tell me - and I can see them when they're posted up so we're gon na twist it and I'm just gon na fold it back and the really cool thing with the bowdabra is so we'll Fold that there and I am using a wired ribbon, you don't have to use wired ribbon, but I prefer it because it's so much easier to shape. But I have had requests from people who want me to make bows without wired ribbon, and I definitely will be doing that in some of our videos and just as a reminder, I'm twisting everything up here. I think that's why why Nick always turns the bowdabra when he makes the bows, but it's funny, because some people have to turn it to make them and me I can't do it if I have to turn it, so I actually want a bigger bow than this. So I'm just gon na stop there and I'm gon na take a little bit more of my ribbon and and oh my gosh everybody thank you so so much for sharing and all I'm gon na do is just keep going. So this is: what's cool is if you get to the end of the roll or you run out of your ribbon, you don't have to stop making your bow. You can just continue, and this will be a really pretty like winter wreath bow so we'll just fold. This back or even wedding pew bow. This would be pretty twists and I'm just gon na fold it back here and take this and do this here and then I am going to take my wand and just sort of scrunch everything down into my bowdabra and pull this up, pull it through. My Slipknot tight, while it's still in the bowdabra and you know the cool thing about these bows - is they work for Riis? They work for chair, bows or pew bows, or a gift wrap, bow and I'll. Just not that and then now we have to shape it. So I'll shape it by bringing my loops in here, bringing my loops in opposite directions and taking these and just I just bring all my loops in opposite directions here and just pull my tails down to the front. And you have a super easy. But beautiful wreath bow, so I hope that you have enjoyed our show. Nick will be here on Monday. Next Monday and he'll be doing the live and he's amazing. So I know you guys will love his his bows that he'll make, and I want to thank everybody for tuning in thank all of you for sharing and please don't forget, to follow. Bowdabra on Facebook, see you soon bye,
Comments
Liz Toone's Crafts and Tips: Co grata, Regina!
Liz Toone's Crafts and Tips: I want to win!
Carolyn Young: Congratulations on your win
Carolyn Young: I would like to win
Carolyn Young: I have both bowdabra
Liz Toone's Crafts and Tips: I mean Congrats!
Carolyn Young: Hello sweetie from South Carolina