Diy: Hair Bows With Custom Fabric
- Posted on 26 October, 2020
- 6D Hair Extensions
- By Anonymous
Hey guys in today's video I show you how I make my DIY hair bows with my custom fabric I made as well!
Custom Hair Bow Fabric Video: https://youtu.be/VTYaRvi2w8o
_________________________________________
♡ SHOP WITH ME ♡
_________________________________________
♡ CREATIVE FABRICA ♡
https://www.creativefabrica.com/ref/23...
_________________________________________
♡ GET A GLOWFORGE ♡
GET UP TO $500 OFF A GLOWFORGE!
https://glowforge.us/r/YVTJSLLE
_________________________________________
♡ PRODUCTS USED ♡
- Faux Leather Kit: https://amzn.to/3l2cANv
- Black Glitter Faux Leather: https://amzn.to/3p0SiXh
- Hair Clips: https://amzn.to/3oY0HL0
- Hot Glue Gun: https://amzn.to/34ZNHwm
- Hot Glue: https://amzn.to/3p6wXvF
- Hair Bow Template: https://etsy.me/3jumJ3V
_________________________________________
♡ SOCIAL MEDIA ♡
Instagram: ElleRaiDesigns
Facebook: https://bit.ly/2NjxUma
Business Inquiries: [email protected]
_________________________________________
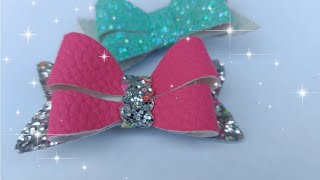
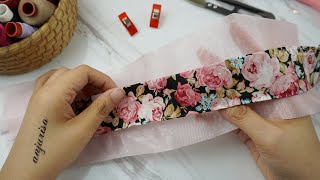
Hey guys, it's shirelle from sunny ray and creations, and today we are going to be making custom hair bows and with this tutorial i'm going to be using um some custom canvas fabric that i made myself the designs that i printed myself and then i have these Faux leather fabrics here that i purchased right off of amazon um. You can also purchase like printed fabrics, also amazon, i believe, but you get a lot of like custom ones off of etsy, but i printed my own. Yes, you want more details on how i do my custom fabrics. These are some of the ones i have here that i have printed out already um. I do have a video of that as well. How i do that and everything i use, so i will leave that comment down. I will leave that video down below and also up above in the icards. If you guys want to see um so yeah, you need all your fabric. You'Re gon na need your stencil. This is the stencil i use. I could see if i could find it and link it down below, for you guys. You'Re gon na need some scissors or you could also cut it with like a cutting machine. I have a cricut maker. I have two silhouette cameo machines, but i feel, like i get the most out of my materials when i hand cut it, so i don't mind hand cutting it, i'm also only making them for my daughter currently. So it doesn't bother my hand that much because i'm not making that many bowls in a day, um and then you're gon na need a pen. This came with my kit off of amazon. These are washable pens. They have different color inks, so i just have one of these and then i have a high temp heat gun. It is very important that you get a high temp heat gun because it does get hotter than your standard heat gun and it's just going to ensure everything stays together and doesn't fall apart, but yeah okay. This is basically let me now, i'm going to show you guys what i'm making today i'm making these right here. These are just a standard size. Three inch, hair bows. This is one i made for my daughter already using the fabric that i printed right here. It just has rainbows and her name. I do have a video on this. I will show that to you. This is what it looks like and then this is the back, and then this is another one i made with just a little flamingos super cute, so we're going to be making this style today with everything. So first thing you're going to want to do is you're going to pick what you want to use already, i'm using, and so i'm going to be using the cheetah leopard print today and i'm going to be pairing it with this color and i'm going to be Pairing it also with my black faux glitter letter leather fabric, so this is basically how i appear my colors. I just pick a print out and then i just put it on top of other colors to get what i like. So this is what i picked out. This is what we're doing today, okay, so now i'm going to show you guys which template goes on, which color of your fabric for making this one, so your printed fabric is going to be this one right here. So this is the custom one here. This goes with here and then this bigger part here it's going to be this color. So it's going to be this one and then my back piece, which is just a little bow ends. The flaps is going to be black and then i'm making two of each. So i just need to come here and i need to trace two of each of each color now, when i do her name, if you're doing, if i'm doing a seamless pattern, i trace it on the back. But if i'm doing a pattern, where i want to make sure i get certain things to show like what her name, i would trace it on the front, because i would line this up to make sure i get her name where i want, because this is going To get folder over so most of your design is going to be right here on the first half, so i try to make sure i get like a name or their names like right here, so the client or you could actually see it. So that's just a little tip. I have for you guys, but yeah now we're going to go we're going to trace two of each and then we'll be back to cut it out. Okay, so now we have all our designs traced out and now we're just going and cutting. I don't have any fancy scissors, i'm just using the ones that came with my actual faux leather kit like off of amazon um. But if you have fabric figures, i would honestly recommend that i do need to purchase them and also my black one probably can't tell, but you can still see the design the trace out on the black but yeah i'm going bracelet we're just going to cut these Out, okay, so i have mine cut out already one more piece. I forgot you're going to need that. I don't have a template for because i just cut it myself, you're going to need the strips to go around the middle here. Um so i'll usually come here and look for pieces of scraps and just kind of cut that off. So i'm going to use this middle color. So i'm going to use this piece in this piece and we're going to make our middle strap just cut that off. Moisture because you're only going to be seeing like this little piece in the middle, so it doesn't have to be perfect there. We go that's my middle piece, okay, so i also forgot to mention that you're going to need some type of clips to go on the back of your um bows, i'm just using these. These are double bronze clips. I bought this off of amazon for a couple. So bucks have this link down below and yeah. This is just a glass cutting board. I like it because for my heat gun it does drip a little bit and then the strings that come off. It does just make everything an easier cleaning process. Okay, so now we have all the pieces for one bow and what we're gon na do don't forget our prongs. This is everything you need here: you're going to take the circle piece and you're going to turn it around, and we are basically going to just fold that in like so i like to do it first, just to see okay, so i hold this and i'm gon Na put a little bit of glue, you don't need a lot literally a drop like so push that down and then we'll hit the other side, you're, basically bringing this little knob here and lining it in the center. Like so now for the circle, one, i do overlap them just a little bit in the back like so, and then we're gon na flip that over so there's our middle piece, then you're gon na take your front piece a little oval and we're going to place This right, on top, i like to glue this right in the middle for extra, make sure it's extra secure and it doesn't move on me. I put a little dab of glue and i just line this center piece with this one boom. So now that's not going to go anywhere like so, and then we're gon na flip it over and we're gon na bring these. In now this one, your two tabs are not gon na overlap, they're, basically just going to touch, because if you overlap them you're going to make your bow too tight and it's not going to be able to open up, and we want it to open up. So we're just fold it here put a little bit of glue and hold now we're gon na put a little bit more glue here and, as you can see, we're gon na just put them touching and not overlapping, and then i go in and i make sure I remove the glue as i go, excess glue. You don't want too much excess glue. Okay, you want it to look nice and neat. So now your bow should look something like this and then what we need to do. We need to take this piece and we're going to just glue that right down in the back as well and make sure it's going to be upside down like so, and then i fold it over to get it make sure it looks even on both sides and Then i like to hold it so it doesn't move. I lift it up and i put glue right there in the middle and push it down and be careful because this glue is hotter than regular hot glue. But you also get more working time and it adheres better okay. So now we need to take our clip. We need to put our clip on the back of here, so just a little bit of glue and then just glue it down. Stick it press it. I press it for a probably four or five seconds and then i put my finger underneath here and i push and i open it because you don't want it to be glued shut and then i remove the excess glue. And then i just go in and i'll hold it and i'll push it to ensure it's all the way down in the hair. You don't really want to push on these two flat tabs, because you will start to flatten the bow out and you don't want to so you always want to stick your finger in between the back piece right here to push down. Okay and now i'm gon na use my clip and i'm gon na, stick this in here like this and i'm gon na pull it like so just to see how it looks like that and then we're gon na do your clip should be holding this you're gon Na put glue a little bit glue here here and here and then you're gon na pull it really tight and hold in place and i'm just going in and peeling off the glue while it's still a little warm and then i come here. I open my clip. Remember pinch: it here open your clip a little bit of glue underneath this, this tab to push it down and then add a little bit more glue right there and i'm going to take this. Put it under and pull like so make sure your clip is open because you don't want it to glue, shut and just pull off the excess glue. As you go. So it looks nice and clean and neat. Then, once that's done, you're going to get your scissors and you're going to cut off this little excess tab here and there you go, you have your bow done and now i'm going to make my other one. You think i'm crazy, but i know i am losing your patience. I already have don't try to change me, i'm just the way. I am you know better better. I'M sleeping this is okay, you guys, so our bows are complete. This is what they look like. As you can see, they came out super adorable super cute. They were super quick and easy to make. Once you get to know what, once you know, what you're doing you can make each bow under five minutes easily the most time consuming thing is cutting them out. Like i said, if you have a cutting machine use that it will save you so much time - and this is what they look like, this is the side of you super adorable, and if you want, if you're making them for people make sure you let them know When they open it, don't pinch it like this to open the clip. Stick their finger in between this part here and push the clip like that. So you don't flatten this part and mess it up but yeah. I hope you guys liked this video. If you did, please give me a thumbs up if you want more videos like this or where i find all my prints and stuff like that, let me know i will link a video for you guys. You want me to show you guys how i make different types of custom fabrics. I will make more videos for you guys, like i said i already have one uploaded when i upload this, so i will leave it linked down below, so you guys can watch it again. Thank you so much guys for watching and stay tuned for my next video bye now bye,

Comments
Claire Davies: Thank you for showing how to make the bow clips there beautiful. I've never made them before & will try making them myself & follow the steps that you've shown. Thank you for posting x
Anna Walton: Thanks for sharing this video I just started making bows and I found this video very helpful. Beautiful bows by the way
Lynn St. Laurent: Love, love, love! Just what I've been looking to make!
Paula Gross: Great step by step instructions! Thanks!
Whitney Owen: Beautiful bows. Thanks for sharing!
Maria Alvarez: Beautiful job!!
Roxana Kamila Almanzar: Awesome video. You just saved me a lot of money haha I'll tried it myself. Thank you.
Linda Starzenski: Cute, thank you for sharing.
Tamikka09: Love the tutorial tfs❤
Emily Mine Designs: I love hearing your baby in the back! Hard working mama!
Dominique: These are so adorable!
NancyNailz: Thank you! Your adorable!
Naturally_Nookie: Where do you print the templates from?
iris garcia: The end part of my bows always feel really floppy how can I prevent it?
buffy lee: Greetings, where can I get the template for the different layers?
Catherine Mendez: My metal clips come off even with hot glue any tips?
Chanta Guerrero: What program do you use to print your fabric
Guia: How do you make it stiff?
Robyn Fetsch: I cannot find the template you used - can you share the link or pattern?
Mariela Hurtado: Love the video. Unable to see custom printed canvas video.
Lines M Perez: I can’t see the video of how to customize the fabric it’s private
Lines M Perez: I can’t see the customize fabric video . It’s private video