How To Make A Twisted Boutique Hair Bow - Theribbonretreat.Com
- Posted on 25 September, 2014
- 6D Hair Extensions
- By Anonymous
Learn how to make the popular Twisted Boutique hair bow. Don't forget to check out our SPECIALS: http://www.theribbonretreat.com/custom...
Link to our BLOG with written instructions: http://www.theribbonretreat.com/blog/h...
Links to supplies used in this video:
RIBBON: http://www.theribbonretreat.com/Catalo...
Needle, Thread, Glue Gun, Scissors: http://www.theribbonretreat.com/Catalo...
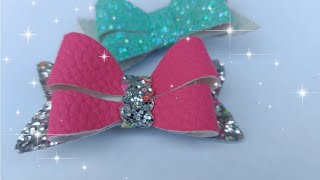
The twisted Bowtique bow is a very popular bow and there's lots of different techniques for it. This is a great way to do this technique. It'S a little bit different and it just helps you create the perfect bow every time so you're going to want to cut your ribbon and we have a formula right here on the screen and you can see how how much ribbon to cut for what size of Bowl you want and once you cut it, go ahead and seal your ends and then now take your ribbon fold it in half and then you can take a pen and mark your crease. So we know that's your Center and now take one end of the ribbon and we're going to bring it. So it's right side facing down on wrong side, bring it over the top of that dot and then we're going to take the top we're going to bring that one down the other way and the right side on top. And then it's going to create a figure. Eight, you can also use a adhesive or even glue to make sure all the pieces are together. So now we're going to take the top the middle of the top loop down to that to that part and just make sure that it's even and then take the bottom one and bring it up and then just make sure the same thing that it's even and Then you're going to flip it around there you've got perfect Bowtique, Oh twisted boutique bow, and at this point, if you've been gluing it you can be done or you can bring your needle through the back and then, if it doesn't look absolutely perfect, you can move The the loops around a little bit, but it should be really close and then just go ahead and crease the bow. This part definitely takes practice. So don't feel that if you don't get it right away, just keep practicing when you're done just take a stitch couple. Stitches in the back - and that gives you your bow teeth, though so so easy and so cute, I'm just going to show you how to stack this bow, there's lots of different ways that you can do this, and if you look through our video tutorials you'll be Able to see lots of fun stuff and so using our twisted boutique bow and a spiked bow. I'M going to show you how we're going to put that together so you're going to take your spike bow! That'S going to be the bottom bow! So take your needle and thread pulling it through and then take your twisted. Boutique bow! Stick your needle through and then we're going to tie this together, just pulling the thread around and make sure that it's on and centered and then just tighten as you go around until there's no more give. This will just keep the both really secure and then, when you're done, you just tie off or take a couple stitches, and then we have the basic part of the bow and I've got my line, clip right here and so you're trying your bow over and take Your line clip and then add glue and take your clip and glue it onto the back of the bow and then to make it extra secure, we're going to wrap ribbon around so open up the clip place. The end of the ribbon on make sure that the end is sealed, wrap it around, and then I have a balloon there, while keeping the spring open and glue that down and then cut off the excess ribbon and then take your lighter and seal that end right. So now we can be done, you've got the center and the bow. That'S super cute, but I made this. I love this. This is just a knot and to just make a simple knot: pull it through and we have. We do have a tutorial for this on our YouTube page and then just cut right cuts into the ends, and then I'm going to place that and have that be my Center. So I'm just going to take some hot glue. That'S all right! There we go that finishes are stacked bow with our twisted boutique, bow that we just made. Thank you so much for watching our video on how to make a twisted boutique bow. You sure to check out our YouTube channel for lots, more tips and techniques and tutorials on how to make both and then also check out the remote recom for all of your supply needs. Thank you. You


Comments
DLC-R: OMG I've seen SO many tutorials on boutique bows and this is BY FAR my favorite!! Its very clear and detailed. And I love the different style on the spikes TOO!
lsutigers4life2010: I love this bow thank you so much for teaching us how to make another wonderful bow
Treksy: I've recently discovered The Ribbon Retreat! I was having the hardest time finding 2.25 or larger anywhere in anything but basic colors... I am so happy with the selection!!
spgurl47: This is the easiest way I've seen how to do this type of bow!! Thanks for showing!
Toni Daniellee: So cute & very helpful thanks
Tammy McFee: I have been struggling for so long to do it the other way...this is MUCH easier!
Maricela alfamomdesigns: Thank you for this tutorial. I have lots of trouble trying to make this kind of bows but I will try this method to see if I can finally make a boutique bow.
Ruth Hamilton: Thank you for showing such a simple way, its much faster too!
Valentina Simmons: Thanks for this tutorial! This is the easiest way that I've seen.
Sandy Martinez Mtz: You explain so clear. thank you.
Dayane Barbosa: Muito Lindo
ms Estrada: Wow you make it seem so easy ❤❤❤❤❤
Lesa: Thank you!!! Have watched several tutorials & viola! You & I both win!!!
LifeStyles of Staciek76: You showed us such an easy way to do it. Thanks!
cirlene K.R.L.: parabéns lindos de mais
Ivona: Ohhh thats a really really really beautiful bow.
Hairoein Addict: How do you line the clip ? Your bows are beautiful btw , I can't wait to get started on mine
Evelyn J. Amponsah: Great instructions, not wordy. not too long. Thanks for sharing.
Ivette Polanco: Love your easy steps and calm voice. It makes it easier to learn. Thanks
Shelley S: Can you please tell me where I might be able to find the same ribbon as what you are demonstrating with, it is so cute, thanks and I love your video, very helpful.
Yvonne Lopez: so cute!! do you have a tutorial on how to do the spikes like this?!!!
jcmoney squad: Love it
Julia: Hi I know this might be a silly question but how do you seal the ends?
sara: Thanks so much all the other videos I watched weir so complicated unlike that one so thanks so much ✨
Ana Carolina Dourado: adorei .lindos e práticos
Elizabeth Vallely: Very pretty enjoy your video, thanks for sharing!!! Liz...
Veronica Dasilva: So cute
Tamika Carter: The best tutorial so far
celeste pereyra: I love it ☺
Kristany Wells: this is the best tutorial I've watched so far...Ahh thank goodness lol
Tonisha Williams: This is the easiest bow I've found
Crafty Momma: for this Bow what size ribbon should I use 7/8, 1" or 1 1/2" ?
MD Sazzad Hossain: So Sweey.I Love It
Alejandra Ferreyra: thank you
Lucy Wilkinson: Loved it but hated that knot piece you added last, think a gem or something would av been nicer but love your tutorials xx
Jackie Copenhaver: I'm a little unsure how to "creace" the bow after you make the loops.
Emily DeRaimo: What size clip do you use for this one?
Rick Falcon: wow so nice...
Sonja Coleman: thanks will make a couple soon some Easter
Unholy_DK: Sweet!
ms Estrada: God bless you ❤
Peggy Pekrouhie Iskenderian: Do you sell these
Delete: Nice
Whitney Cake fam: That's way better then buying and raising money I made 600
cool teddy: Super
Charles SImpson: That is 7/8 in can that be done with 1 1/2 in.?
Jasmine Gordon: How much do younthink one hair bow would cost if someone were selling them individually
Iliana Perez: Hermosos
Charles SImpson: You didn't tell how much ribbon to use
Chelsea Rae: Thanks
Роман Н.: Cool
Cencen Cencen: thanks
Lisa Ziegler: How do I make the back part of the bow with all the spikes
Chelsea Rae: What's the length I dident really get the formula
Nurmi mimih: I am very interesting