How To Make A Stacked Korker Hair Bow - Theribbonretreat.Com
- Posted on 13 March, 2014
- 6D Hair Extensions
- By Anonymous
Learn how to make this cute STACKED KORKER BOW! This bow uses two different techniques, the Flower Loop Bow and the Korker Bow. Don't forget to check out our *DAILY DEALS*! http://www.theribbonretreat.com/custom...
Pre-Made Korker Ribbon - http://www.theribbonretreat.com/Catalo...
How to Make a Flower Loop Hair Bow: http://www.youtube.com/watch?v=kS_QQuq...
How to Make Korker Ribbon & Bows (.pdf file) - http://www.theribbonretreat.com/Catalo...
How to Make Korker Ribbon (video tutorial) - http://www.youtube.com/watch?v=Mgvbxfv...
Links to the Supplies used in this video:
7/8" Ribbon - http://www.theribbonretreat.com/Ribbon...
5/8" Ribbon - http://www.theribbonretreat.com/Ribbon...
3/8" Ribbon or Korker Ribbon - http://www.theribbonretreat.com/Ribbon..., http://www.theribbonretreat.com/Ribbon...
Clips - http://www.theribbonretreat.com/Catalo...
Hi-Temp Glue Gun - http://www.theribbonretreat.com/Catalo...
Stiffen Stuff - http://www.theribbonretreat.com/Produc...
Needle/Thread & Scissors - http://www.theribbonretreat.com/Fabric...
Heat Sealing Tool - http://www.theribbonretreat.com/Catalo...
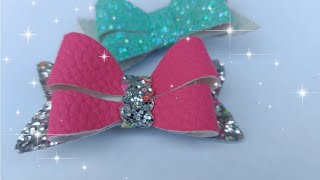
Hi, I'm Renee with the ribbon retreat. One of the great things about making hair bows is that you get to be creative. Once you've learned a few techniques, you can create your own styles and the possibilities are endless. Today'S show is going to show you how to take two techniques and turn them into one adorable, stacked, Crooker, hair bow so enjoyed. Today'S video and I'll see you next week. The stack Corker bow consists of three layers. The first two layers are made using the flower loop, bow technique and the top layer is a Corker bow. You can find links for our youtube tutorials for these techniques. In the video description for the first layer or the bottom layer, we are making a flower loop, bow using 7/8 inch ribbon and the straight down fold, so cut 3 pieces of your ribbon to 8 inches for a three and a half inch bow and remember to Steel, your ends also have your needle and thread ready with a knot in the end, so we're going to take our ribbon, we're gon na stack it and then we're going to fold it in half and if you're using a printed ribbon, make sure to fold it With the print on the inside, then we're going to find the center and then take your needle and stick it through the center, but don't push it all the way through just hold it right there and then now bring the ends of the ribbon onto the needle. Okay and then just shape it, how you would like you can see the flower forming and then, when you've got got it the way you want pull the needle through. I just usually take a couple: stitches, okay and the bottom layer is done. Our next layer is using the same technique, but with five eighths inch ribbon and for this next layer we are going to cut the pieces, a half an inch shorter than our bottom layer, so cut three pieces of ribbon to seven and a half inches and then Now form this layer using the same flower loop, bow technique here is the finished second layer, and I'm just going to put that aside and now we're going to do the corker bow that goes on top, and you can check our video description for the link on How to make corker ribbon or you can purchase pre-made corker ribbon right here at the rumor tree and the pre-made ribbon is a great time-saver. I'M using through different colors of three-eighths inch ribbon. You want eight to nine pieces of quarter ribbon, so I cut three pieces in each color and I cut them in five loops long or about two and a half inches. So take your needle and your thread and we're going to place it just in the middle of the corker and just slide it on and then just alternate your colors as you go. Okay and then take a look at it and see if you like it and how it looks the way the workers are facing and then now just grab them together and then we're going to stitch them together. Okay and there's your finished corker bow. Now, let's put the bow together, you can stitch this bow together with your needle and thread or hot glue. The layers together, I'm going to show you quickly how to hot glue them together. So this is our bottom layer with the 7/8 inch ribbon and I'm just going to put some glue in the center. Now take our second layer, the 5/8 inch ribbon and we're gon na place it on and I made sure to place it. So you can see the 7/8 4 inch ribbon, okay and then next, we'll put it on our corker bill, okay and then now all that's left is gluing on your line. Clip come on over okay and then one more step that you can take is to spray. Your bow with stiffened stuff, so it will hold its shape longer and you can check the video description for a link to that product. And here is your finished, bow, be sure to subscribe to our YouTube channel for a new video tutorial each week and check out our other fun tutorials. You can get all your supplies right here at the retreat com, where we have a huge selection and great prices and awesome service. Thank you so much for watching you

Comments
Jan Aistrop: Can't wait to make them for my great granddaughters, they will love them! So will my granddaughters! Thank you, for such an easy way to make them. God bless!
Butterflylove78: I love your company! You guys have THE BEST customer service ever! So glad I came across this channel. Thank you, thank you, thank you!
Evelyn J. Amponsah: Very clear and precise instructions. Not to long. Thanks for sharing.
Zoila Mendoza: hermoso gracias por enseñar tu talento
Mr. Whipple: Helpful video! Going Monday to buy ribbon to start making them :D
Elizabeth Davis: great tutorial!
nadia Majed: your work very perfect and nice ,and I learn somemany adies.so I need new one for my littel girl ,thanks