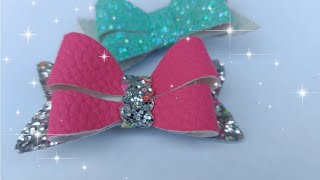
How To Make A Spike Puff Hair Bow - Theribbonretreat.Com
- Posted on 01 January, 2015
- 6D Hair Extensions
- By Anonymous
Learn how to make this cute Spike Puff Hair Bow. Very easy and fun to do. Don't forget to check out our SPECIALS: http://www.theribbonretreat.com/custom...
Supplies used in this video:
Ribbon: http://www.theribbonretreat.com/Catalo...
Needle/Thread: http://www.theribbonretreat.com/Catalo...
Clips:http://www.theribbonretreat.com/Catalo...
Cut out 24 inch pieces of ribbon, you can do them all the same color you can do 10 and 10. Here I have three different ribbons, so I'm going to do ten of the printed ribbon, five of the other two ribbons, so I've already cut mine out to four inches and now we're going to make the Z cut, and this gives it the spike of the bow. So take your ribbon fold it in half like so and then take your scissors and just cut at an angle like that, and that makes your be cut and then make sure to seal your ends as well. So take your lighter and do that and then go ahead and do this to all of your ribbons on both sides. Take your needle and thread double your thread and have a knot in the end, and since we have three different colors we're going to start with the one that we have most of and that's as printed ribbon. If you have two or one of the same ribbons, then it doesn't matter which one you start with, so we're going to take this printed ribbon, take our needle and just go through the center and we're not going to pull it all the way through one get As many as we can onto this needle and then just take another color and put it on, move it over a little bit and then we're going to do another of the printed one and then the other color. And that's the pattern we're going to do we're going to do one printed and then one of another color and then one of the printed and then one of the other color and right now, they're, all all the folds are facing this way, but we're going to Switch that up so it will look different throughout. So we're going to do another printed, open half of the sweat time we're going to do it, the opposite direction and just make sure that the ribbons are all going in different different directions and just keep going until we get towards the end. Okay, now the us ones on you're just going to squeeze them all together and pull your needle through we're going to stick it through. You can use your table to push the needle through, and I also like to use a thimble to save my thumbs and my fingers. You can use your your table we're just going to go through a few times. I guess I should say quite a few times because we just want it to be super super secure right and then we're just going to take a couple stitches then just fluff it out, and that finishes the bail part. And now I'm going to do is just add our clip so take your line clip this is just a partially line clip and then put your hot glue and take back of your bow and just place it on, and that finishes a super cute bow

Comments
excelbaby69: So cute and simple. Thank you for sharing!
Joy Mahan: Love this idea. I’m thinking of using it on a wreath. Thanks.
Anny katiucia: Lindo parabéns
Crafty MJ: Wow so easy! & beautiful =)
Lau Madrigal: me fascino gracias por compartir tu talento. i love it thank you for sharing
Hannah Blankenship: can i use 5/8" ribbon?
Martin Ehigiator: Cute