How To Make A Large Loopy Bowdabra Hair Bow
- Posted on 26 November, 2013
- 6D Hair Extensions
- By Anonymous
Learn how to make a large loopy Bowdabra hair bow. We invite you to watch our tutorial to make a 5" wide 8 loop bow. Visit http://bowdabra.com to learn more about Bowdabra's Bow Making Products.
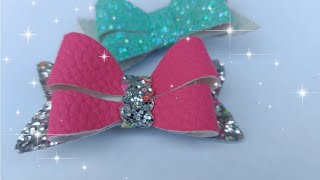
To begin with, I'm going to place my hair bow tool and ruler right on the mini bowdabra, and I'm going to take my bowdabra bow wire fold it in half and place into the mini bowdabra, and then I'm going to chuck it underneath to keep it out Of the way, next, because I'm making such a large boat, I'm going to need quite a bit of ribbon to make a 5 inch bow with 8 loops. I'M going to need 54 inches of ribbon, I'm going to seal the ends running it along a lighter just to seal it and keep it from fraying. I can also use clear nail polish I'll do the same thing. Then I'm going to take my ribbon fold it in half. This is my center point and I'm going to form the crease I'm going to start with a mountain down crease. I actually get that by making a mountain up, pinching it together and flipping it over. It'S just the most natural way for me to make it and it gives you nice creases both front and back of your bow when you say mountain up, it's just because it looks like there's a little mountain envision because I was very creative naming it. But yes, it looks like a mountain up and - and it helps remind me every time to make the creases and it just really makes the bow to have the creases, and it is important, it's very important. It adds you know that extra style to your bow and give them a nice boutique, look well looks like it's all off absolutely absolutely and we're using satin ribbon, which can kind of move around a little bit. So we really want to utilize the towers and pushed it down into the mini bowdabra, and if it starts to slip up, you can even use your wand to push it down, and I probably will have to do that throughout the bow. Just because we're making such a large bow to get a 5 inch wide bow, I need to make two and a half inch loops on either side and I'm making eight loops. So this is a pretty big bow, it'd be perfect for prom or even cheerleading, because it's the satin. It really has such a nice texture and looks great hair going along making my two-and-a-half-inch loops kind of adjusting along the way, I'm going to scrunch down again just to keep that satin ribbon down inside yeah. The center is so slippery. It is exactly exactly so now for the final one kind of probably going to have to hold it a little bit just to get those final tails in there and my trusty wand will keep it all in place. For me, give me those final creases that I need there you go and then I'm going to take my bowdabra bow wire underneath slip it through here and press down, and then you want to pull tightly. This really will keep all the satin ribbon together and keep it from moving around satin can be hard to work with, but really them the mini. Bowdabra just makes it so easy, it's one of the harder bows to make, but, as you can see, between the mini bowdabra, the ruler and the buddha bar wire, it's all held together nicely and has those beautiful creases. So I'm going to bring it around the back and tie it off. This is my final knot just to pull it all together, pull it tightly and then I'm going to add. The hardware which I have an alligator clip lined with ribbon chose a white satin ribbon because I just thought it would make the fuchsia pop attached here and then do a couple more just to keep it all in place. And we do show you how to line the hardware on the other videos. Yes, it's on the other videos and also on the interactive CD, and I trim away the extra wire okay and I have a matching bow and then should hide the wire which you can do. If you want or you can leave the wire, it is pretty. It'S definitely a personal choice, whether you want to hide it or not. I use glue dots because they stick really well actually to the wire, and so I just kind of run it along the wire and then I have a piece of ribbon that I knot it in the center I'm going to attach it here, bring it around the Back and then just kind of trim it up a little bit and I'll use some final glue, dots to hold it in place and just cover up the wire and give you a nice finished. Look on the back one more glue, dot hold the other side in place, trim away, no burning yourself exactly and now we have matching bows that can be used together or as bestfriend bows or gifts. Thank you.


Comments
Pokè girl: This is an amazing bow! I will try to make it at home! :3
Janie Warre: Love it
Tyneisha: How long should the wire be ?
Letty Martinez: Can you give me more info on those glue dots
proud aunt: or you could use rinestone over up there wire..
Toboggans for your noggins and a bit more: can you make a 6in bow on the mini bowdabra I just got mine last night
mamaosayi: Beautiful bow but are you aware of you wrote SATAN ribbon and NOT SATIN ribbon?